Kiosk mode for iOS

e.g. for self-check-in stations

Here you can find out how to use the guestoo check-in app in kiosk mode and which settings we recommend.

Using the kiosk mode, you can, for example, implement self-check-in stations where your guests can check in to the event independently using the devices provided on site.

Important: The kiosk mode is currently only available under iOS, when using Apple devices!

Du kannst für das guestoo Back-End zwischen zwei Darstellungsoptionen wählen. Die Screenshots in der Doku basieren auf dem "Klassischen Design".
Hier siehst Du die Unterschiede, damit Du dich auch im "Modernen Design" zurecht findest: » guestoo Back-End-Design

Device settings


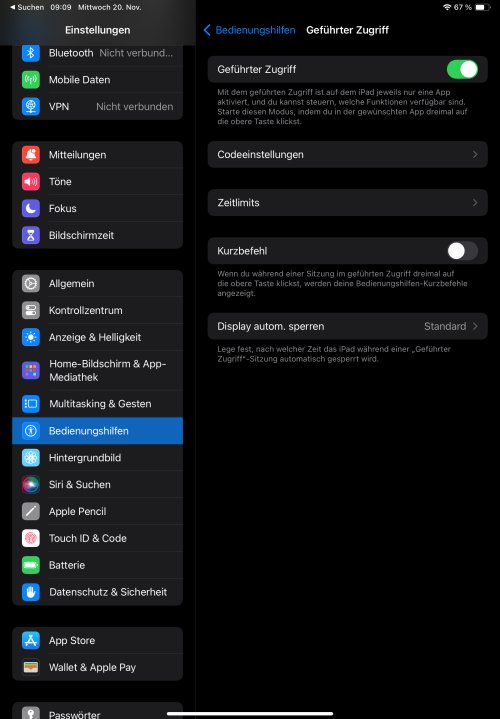
In order to be able to use the guestoo check-in app in kiosk mode, you must first activate guided access on your Apple device (e.g. iPhone, iPod touch or iPad).


This is how

  • Go to the Settings of the device
  • Select the “Accessibility” menu item
  • Activate the “Guided access” option
  • Then tap on the “Passcode settings” menu item and set a passcode there or activate Face ID

    Important: You should memorize the code specified here or write it down if necessary, since you will need it to exit the app's kiosk mode again


Once you have made this setting, you can activate the kiosk mode in the check-in app at any time:

  • Open the guestoo Check-in app
  • Click the top button on the device that you also use to switch on the device three times in quick succession
  • The app is now in kiosk mode and displays a very minimalistic check-in view, which ensures that guests cannot accidentally leave the check-in view and that they do not have access to the app's settings
  • To exit kiosk mode, click the top button on the device three times in quick succession again
  • If you have set a passcode, you must now enter it (or, if active, use Face ID) to return to the normal view of the app

Recommended app settings


If you would like to use the kiosk mode of the check-in app, we recommend that you first make the following settings in the app under “Check-in settings” (see documentation) to make self-check-in as easy as possible for your guests:

  • Which action should be carried out?
    Here you can decide which option makes the most sense for your event. There is no option that is better or worse suited, it depends on the individual use case.
  • Who should this action be carried out for?
    Here, too, you can decide which option makes the most sense for your event. There is no option that is better or worse suited, it depends on the individual use case.
  • How should the name badges be printed at check-in?
    If name badges are to be printed, we recommend the option “Automatically” so that no further confirmation steps are necessary for the guest.
  • Print mode
    Depending on the printer used, we recommend the “Brother printer” option (only if a Brother brand device is used!) or the “Print without dialog” option (if a printer of a different brand is used). With both options, there are no additional confirmation steps, so that the name badge - in combination with the setting made above - is printed automatically without any further clicks or confirmation steps.
  • Customer cards
    Optional. If you expect guests to show up with a customer card, you should select the desired event here that they should be checked into when scanning their QR code.