

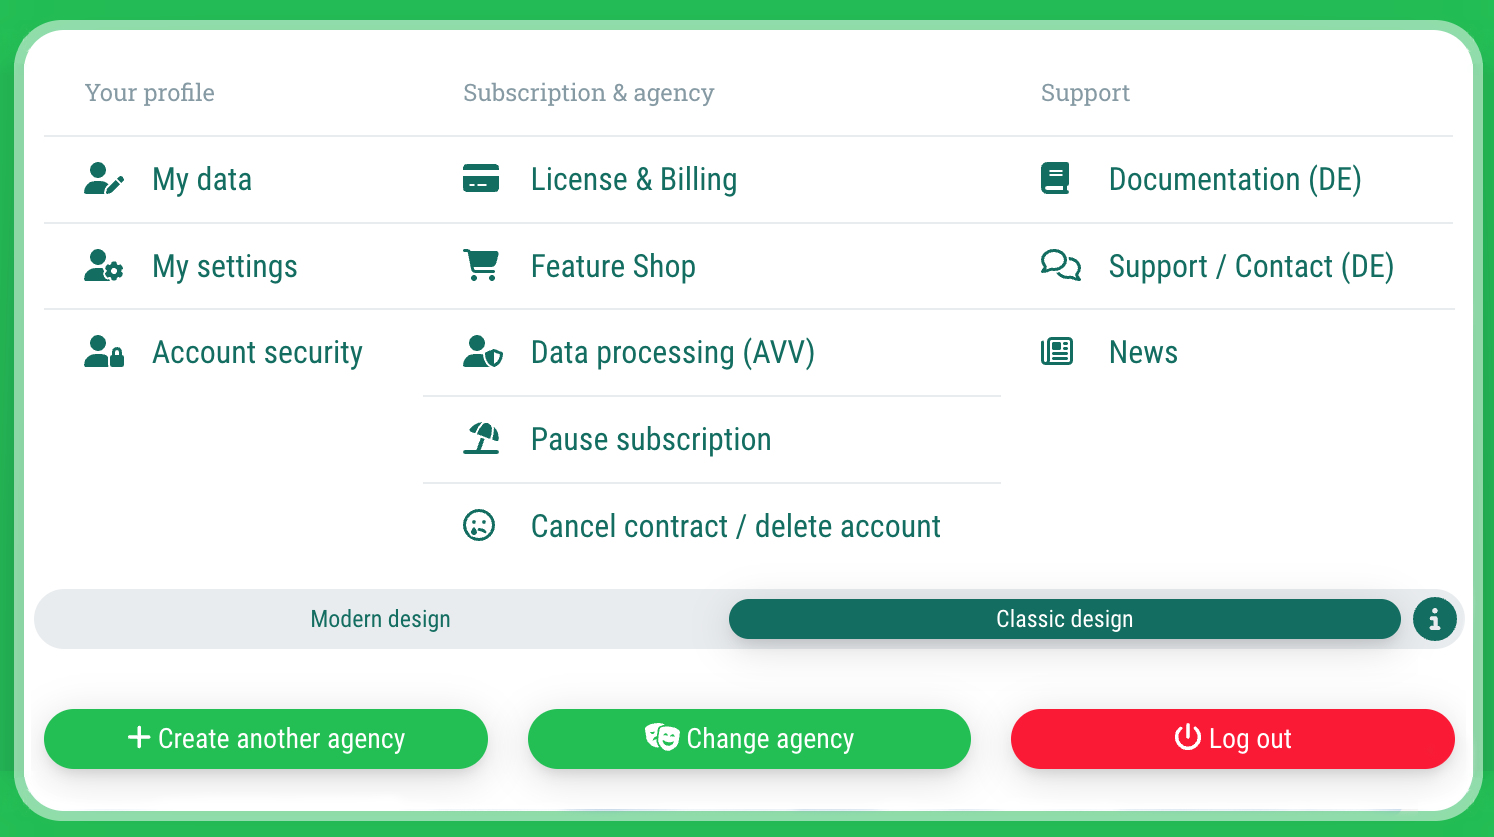
You can find the user menu by clicking on your name / the name of your agency in the top right corner.
User menu
By clicking on your name at the top right corner, you'll be redirected to the user menu. On this page, we'll explain to you which options you have there.
 Du kannst für das guestoo Back-End zwischen zwei Darstellungsoptionen wählen. Die Screenshots in der Doku basieren auf dem "Klassischen Design".
Hier siehst Du die Unterschiede, damit Du dich auch im "Modernen Design" zurecht findest: » guestoo Back-End-Design
Inhalte dieser Seite:
The user menu
This is how you can find the user menu
My data
User menu > My data
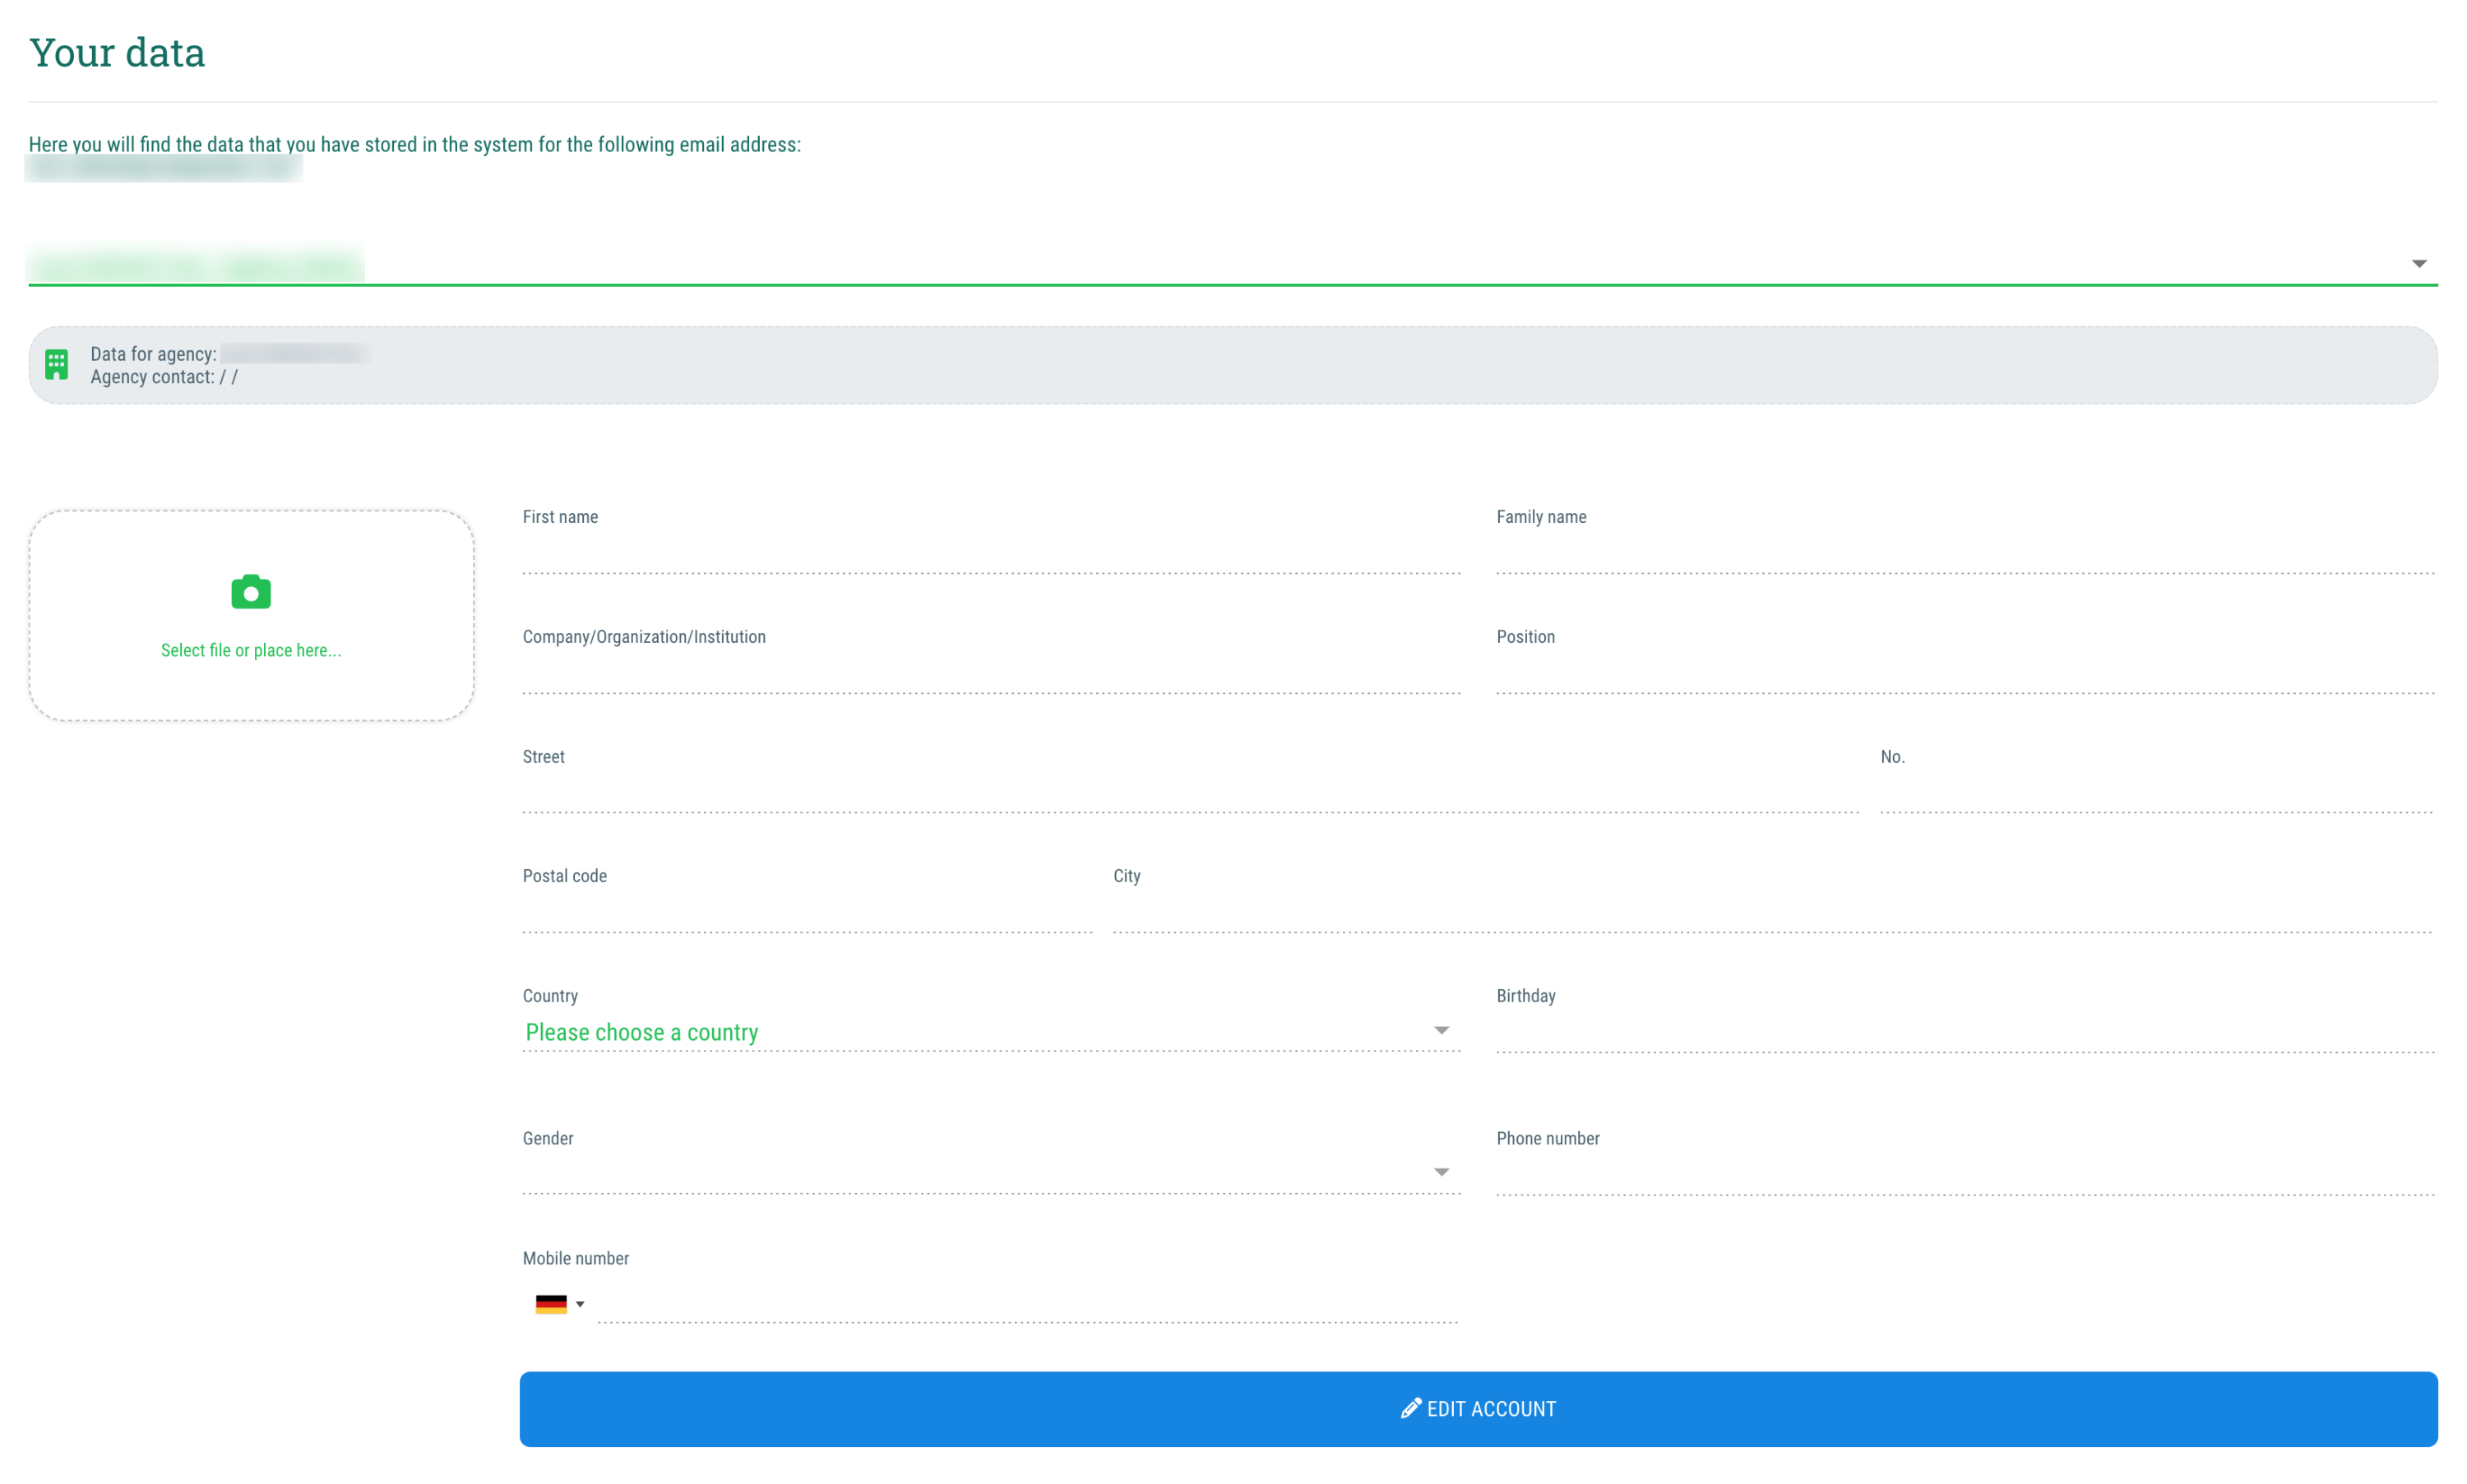
If you click on the menu item "My data" you can view and edit the data that has been saved for your e-mail address.
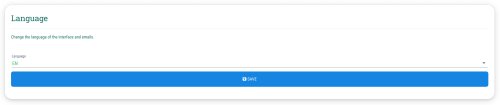
My settings
User menu > My settings
If you click on the menu item "My settings" you can change the following settings:
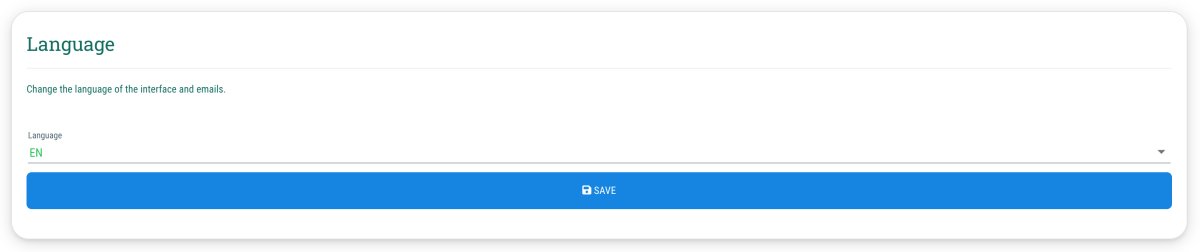
Language
Select the language in which you want the guestoo contents to be displayed.
Design
Here you can choose the design in which you want guestoo to be displayed in.
Please note that all designs marked with (laboratory) are still in the testing phase and are therefore not yet fully developed.
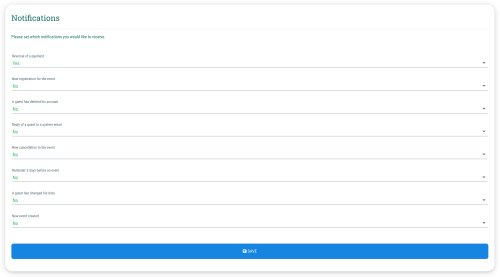
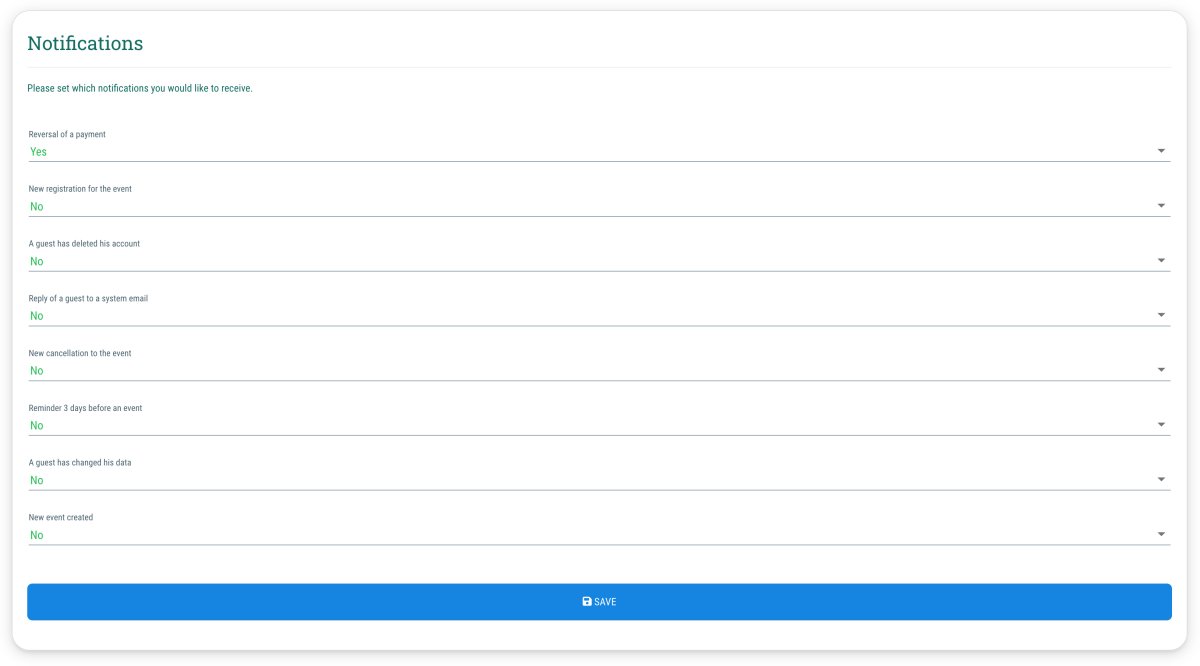
Notifications
Here you can specify which notifications you would like to receive from guestoo.
These settings apply across all agencies. This means that if you activate the notifications for new event registrations, you will receive these notifications for all events from all agencies which you have access to with your account (= your e-mail address).
You can (de-)activate the following notifications for your account:
- Reversal of a payment
- New cancellation to the event
- Reminder 3 days before an event
- New event created
- A guest has changed their data
- A guest has deleted their account
- New registration for the event
- Reply of a guest to a system email
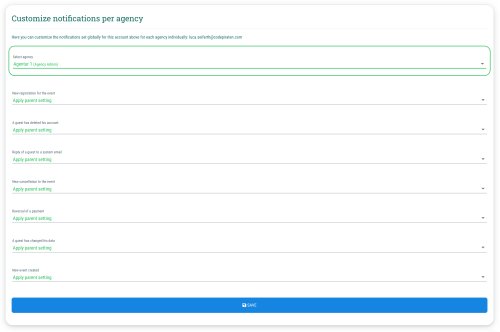
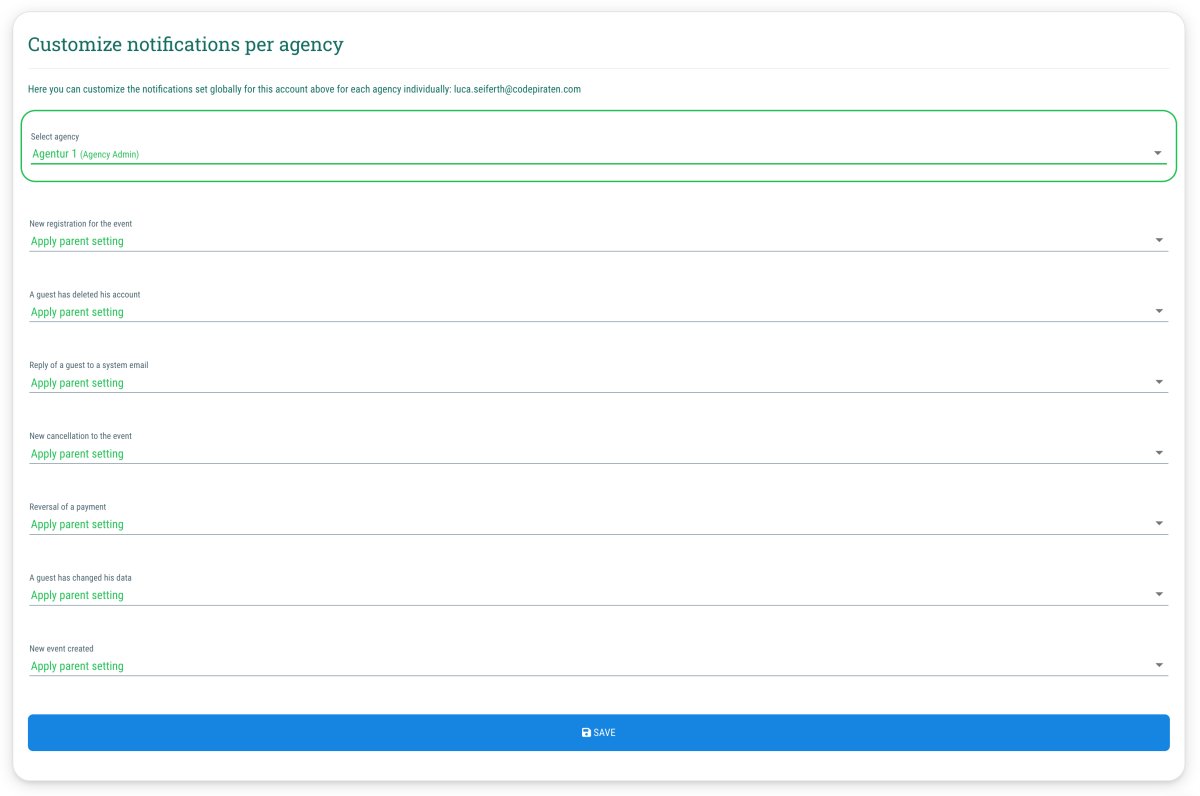
Adjust notifications per agency
Here you can adjust the notifications per agency.
If you do not make a selection here, the settings you made above under Notifications will apply to your entire account.
To define individual notification settings for each agency, first select the desired agency and then edit the notification settings.
You can (de-)activate the following notifications per agency:
- Reversal of a payment
- New cancellation to the event
- New event created
- A guest has changed their data
- A guest has deleted their account
- New registration for the event
- Reply of a guest to a system email
For every notification you can choose one of the following options:
- Yes
You'll receive notifications of this kind for all events of this agency that you have access to, regardless of the setting that was chosen under "Notifications". - No
You will not receive notifications of this kind for any of the events of this agency, regardless of the setting that was chosen under "Notifications". - Apply parent setting (Default setting)
Whether or not you'll receive notifications of this kind for all events of the agency, depends on the setting that was chosen under "Notifications". - Example: If you have chosen not to receive notifications for new registrations, but choose the "Yes" option in the agency settings, then you'll receive notifications of this kind for this agency, but not for all the other agencies that you have access to.
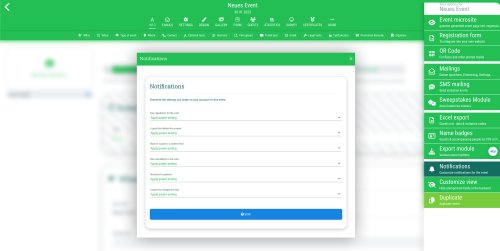
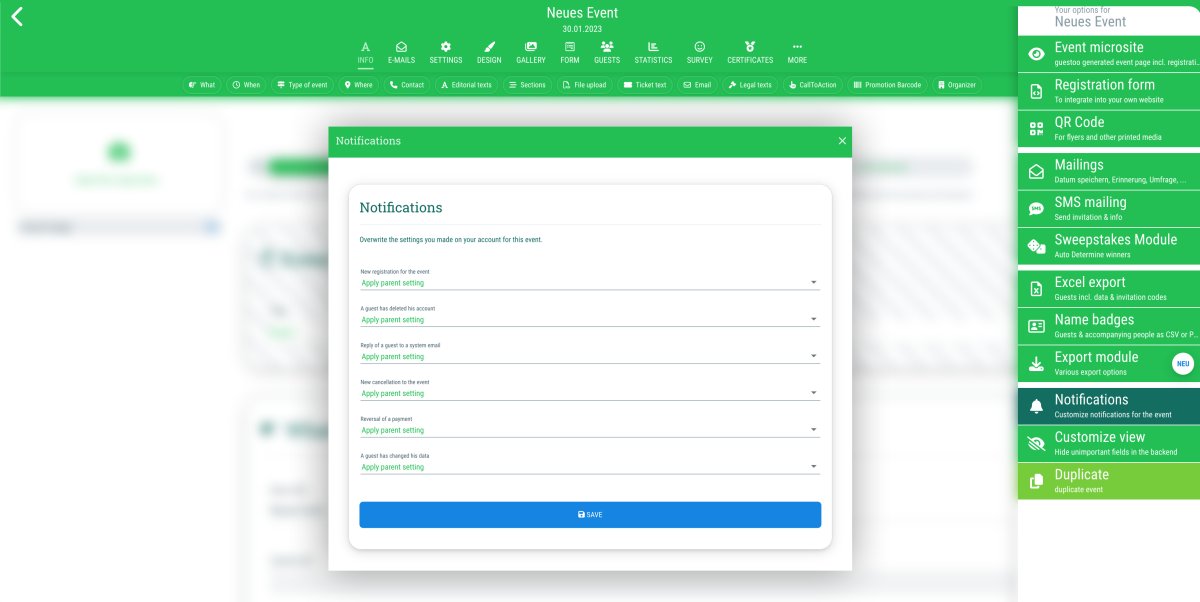
Adjust notifications per event
In addition to the settings mentioned above, you also have the option of customizing the notification settings for each event.
You can find out how to do this on this page.
If you want to have the notifications sent to different or an additional email address as well, check out our FAQ regarding this topic.
-
 Language
-
 Set notifications for the entire account
-
 Set notifications per agency
-
 Set notifications per event
Account safety
User menu > Account safety
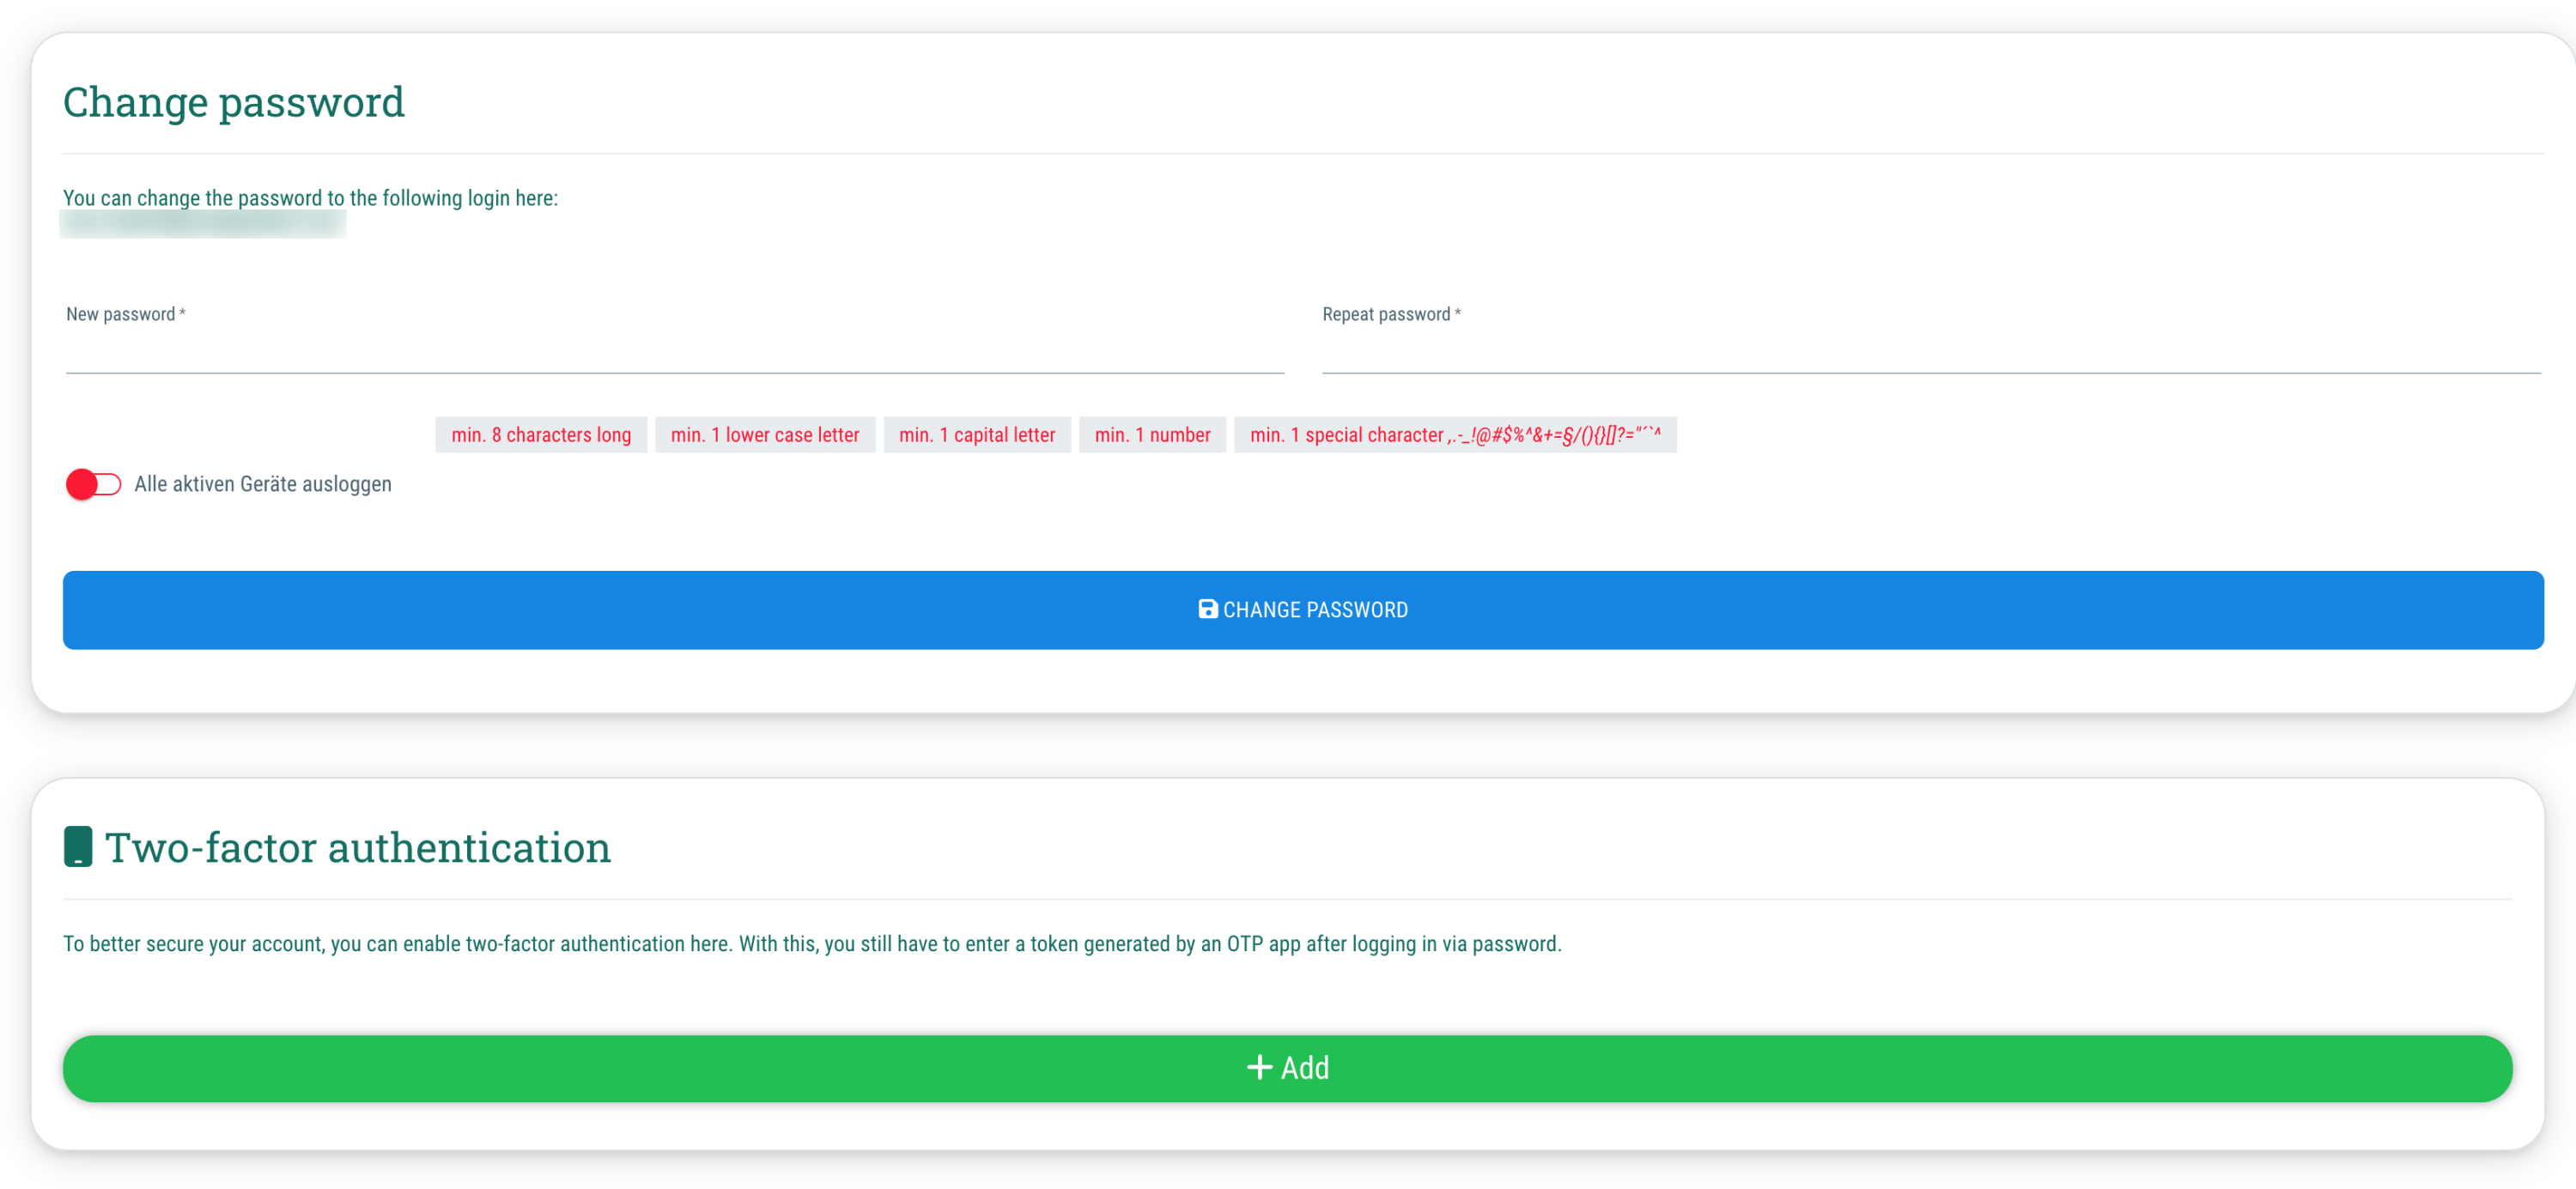
You can adjust the following settings in the menu item “Account security”:
Change password
In order to change the password for your guestoo account, enter the new password twice and confirm the change by clicking on the “Change password” button.
Two-factor authentication
In order to add a two-factor authentication to your account, proceed as described below:
- Click on the button "+Add"
- Enter the Device name and the password that you use to log in to guestoo
- Open the autentication app that you use on your smartphone or tablet and scan the QR code shown on the display
- If scanning the QR code doesn't work, you can also manually enter the character string displayed below into your app
- Next, enter the code that is shown to you in the OTP app under "Newly generated OTP"
- Click on "Finish"
If you want to edit or delete an already existing two-factor authentication, you can do this by clicking on the pencil icon (Edit) or the trash symbol (Delete).
Subscription & Billing
User menu > Subscription & Billing
Important note: This menu item is only visible to agency admins!
By clicking on the menu item "Subscription & Billing" you'll be forwarded to the agency settings, where you make changes to your guestoo subscription and your billing details.
On this page you'll find an explanation how this works and which data you should provide.
Feature Shop
User menu > Feature Shop
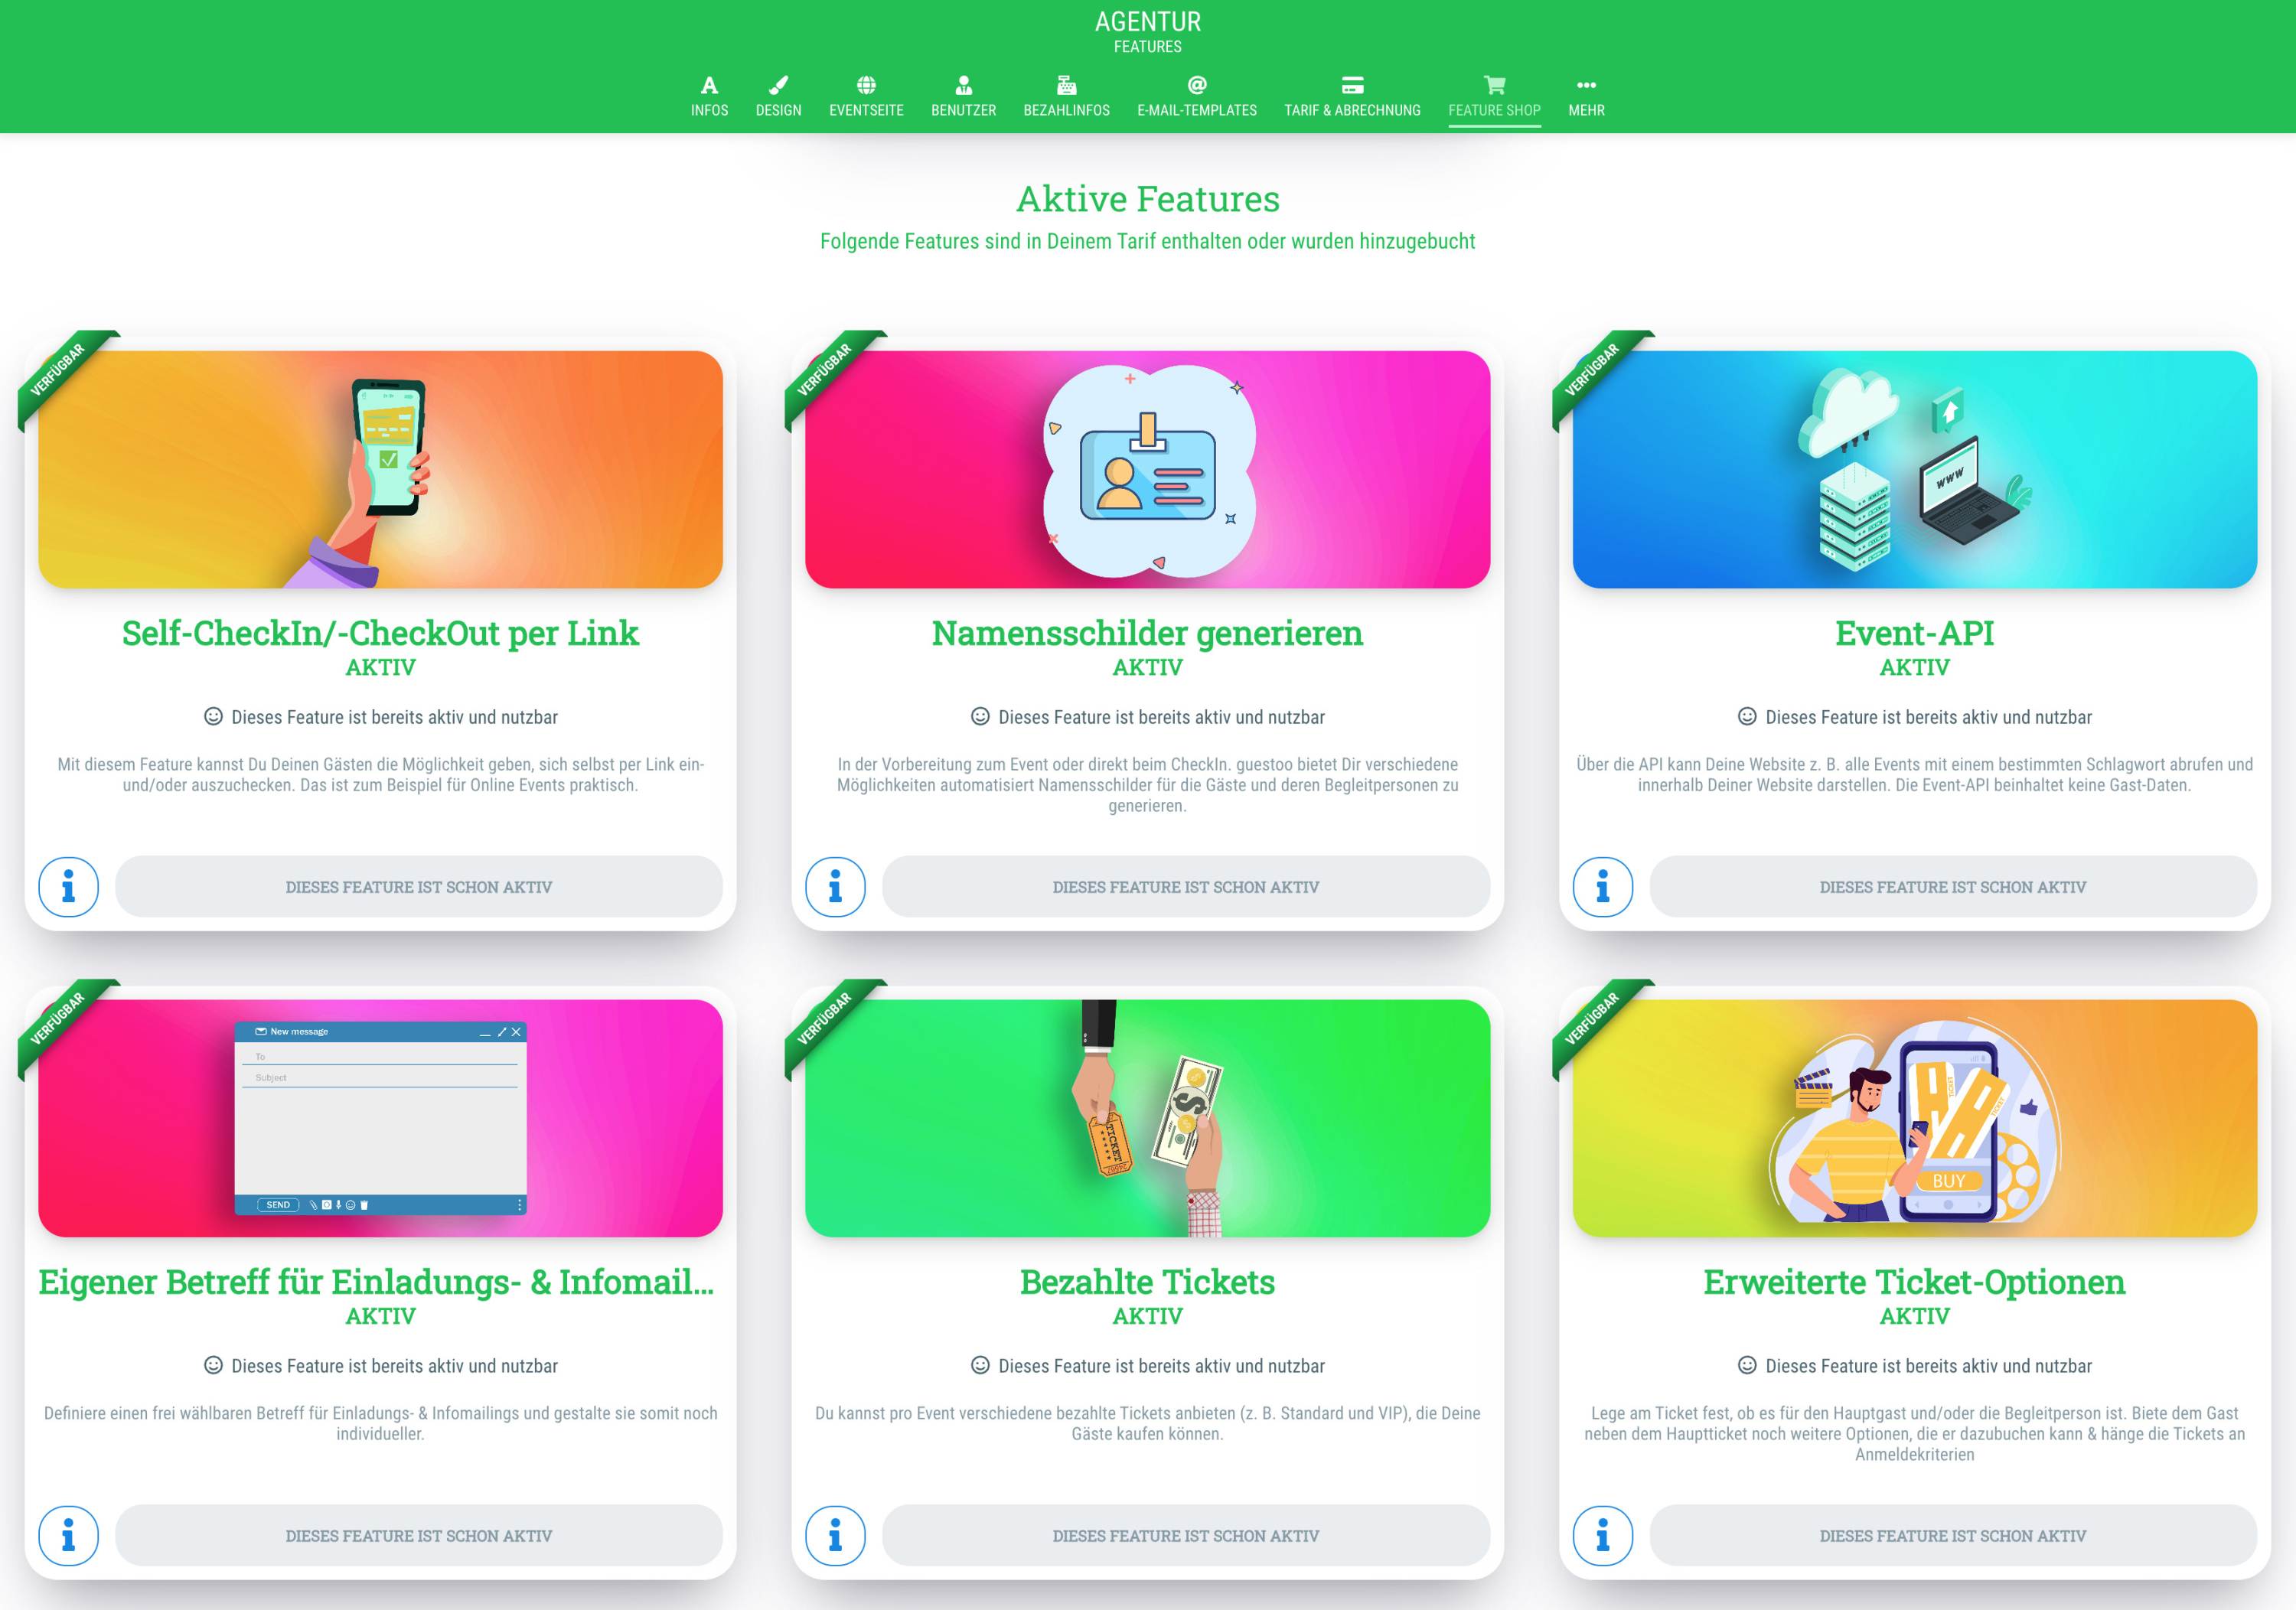
Important note: This menu item is only visible to agency admins!
In the feature shop you'll find an overview of all available features and limits and can add them with just a few clicks. The feature shop also shows you which features you have already booked and which features are included in your subscription.
More information about the feature shop can be found on this page.
Data processing (AVV)
User menu > Data processing (AVV)
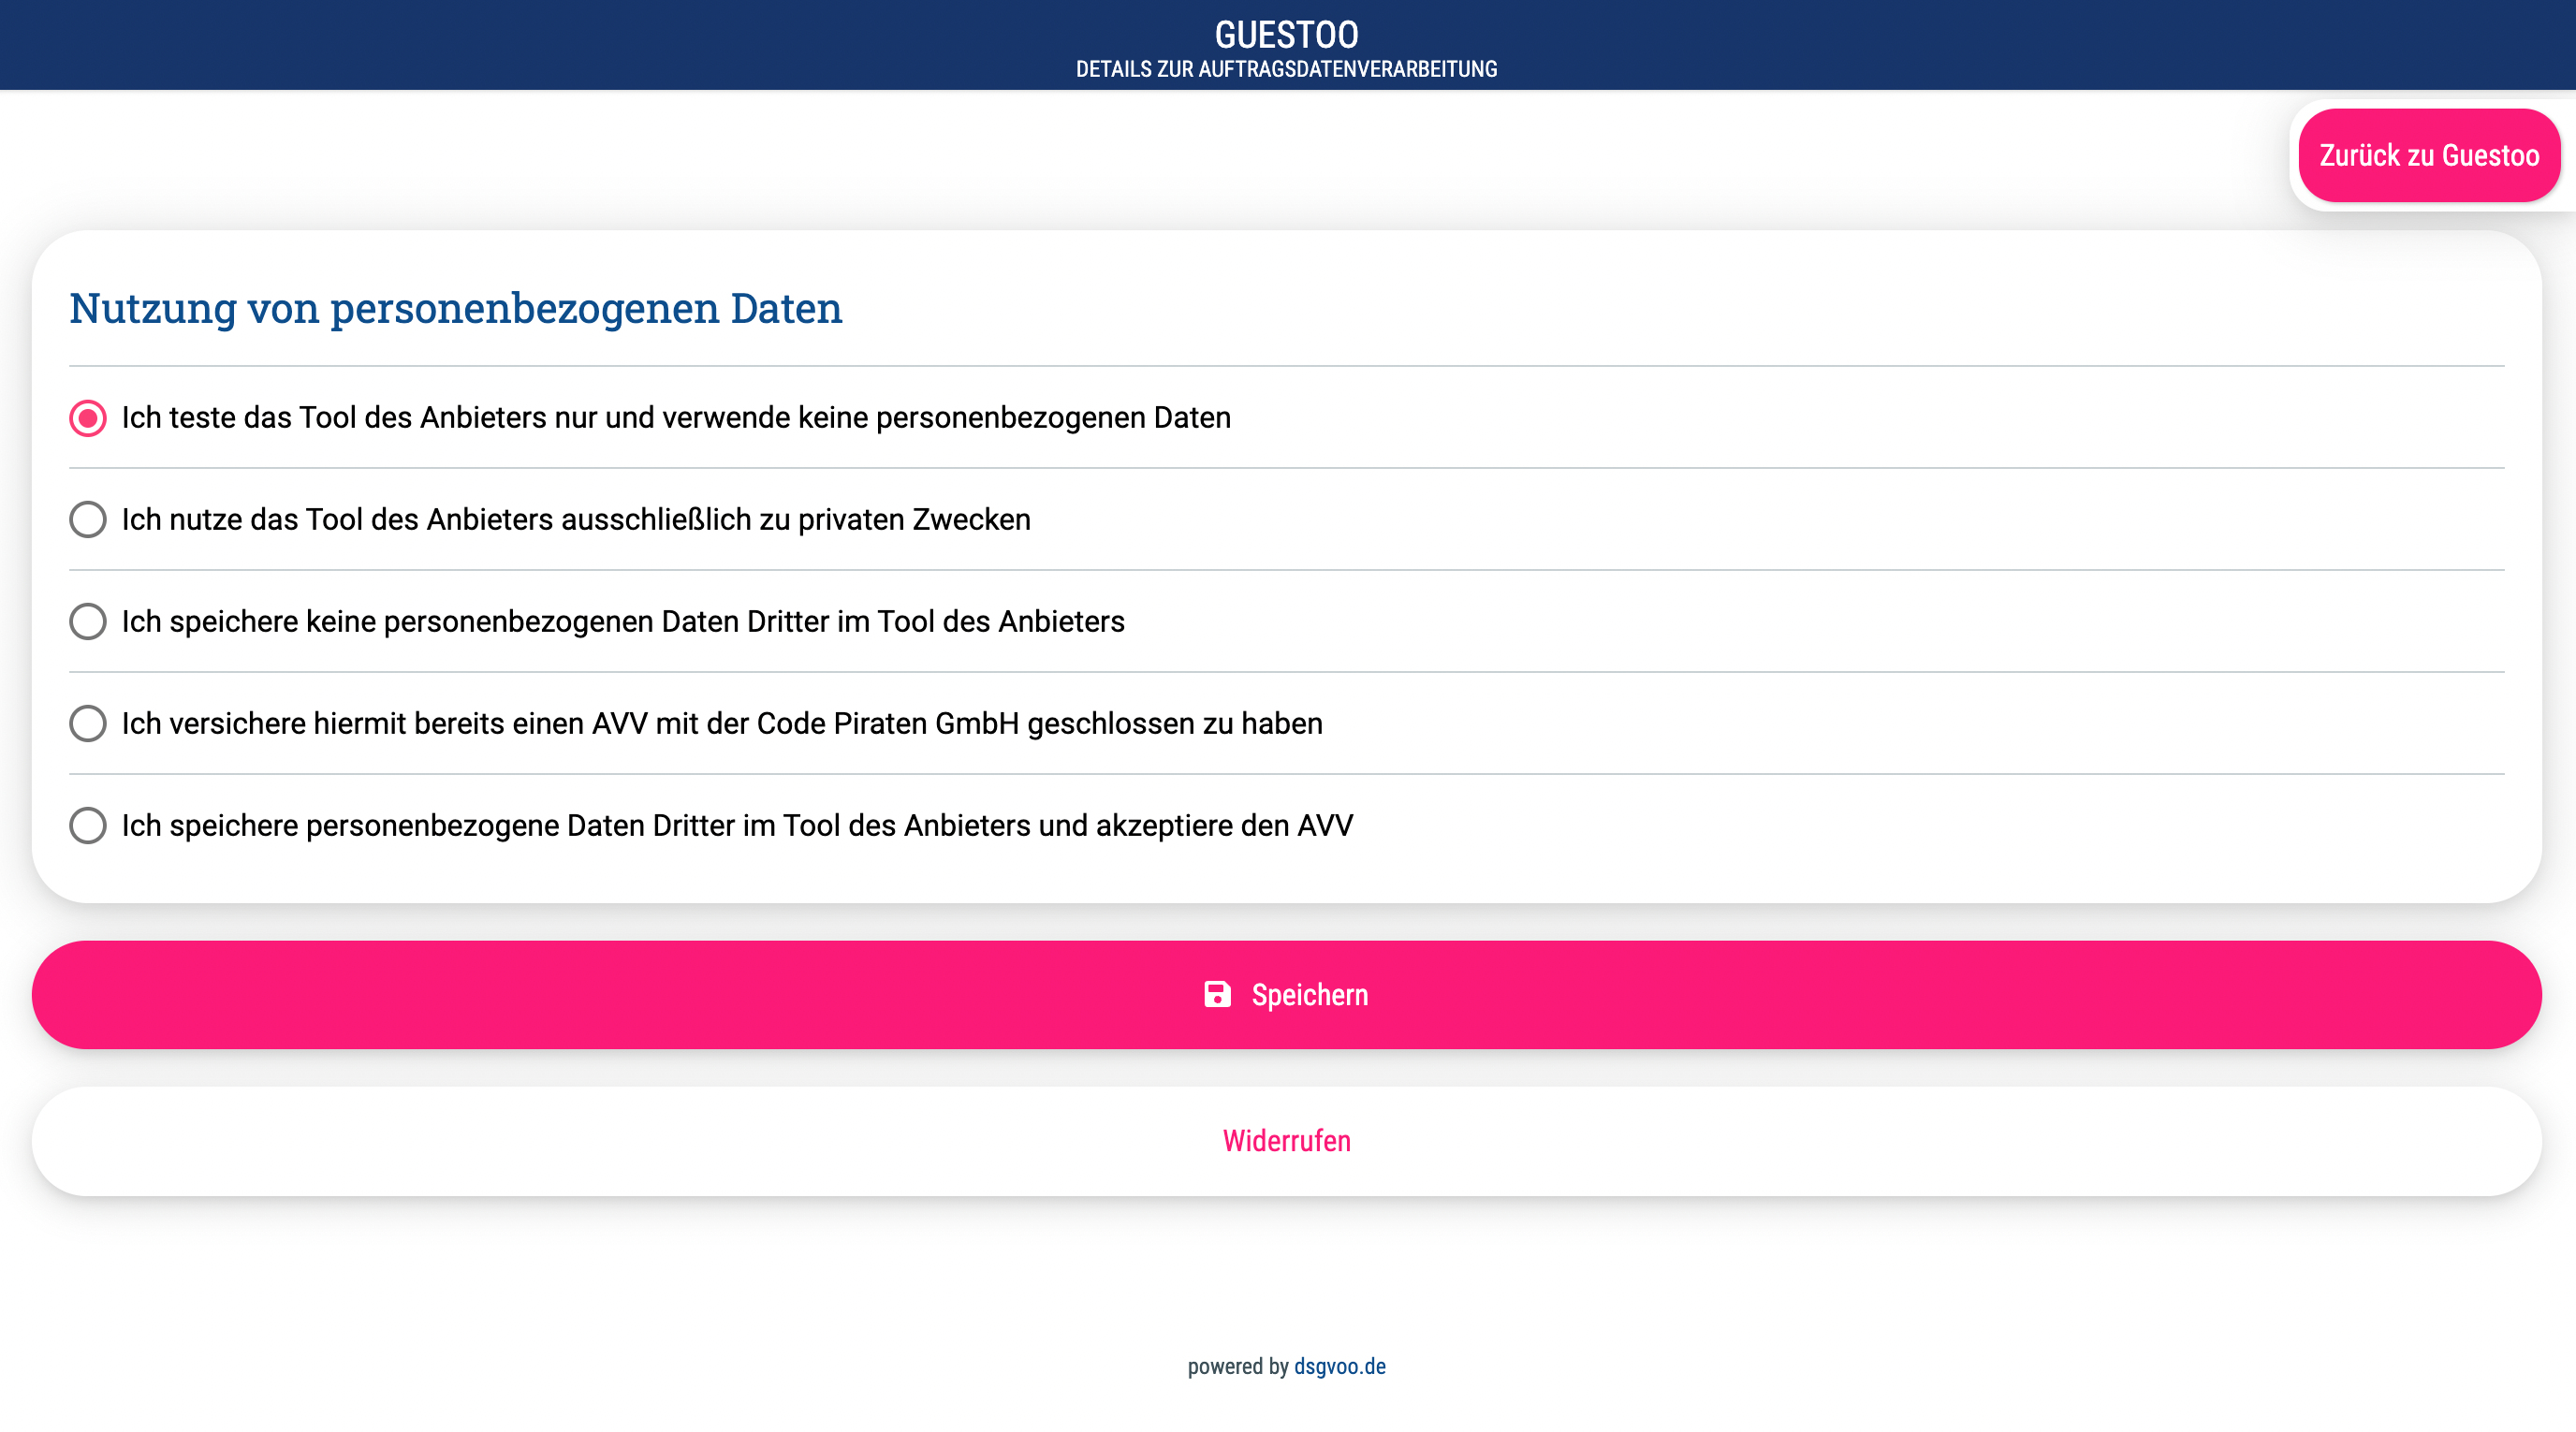
By clicking on the menu item "Data processing (AVV)" you'll be forwarded to a site where you can complete a contract for commissioned data processing with us.
Important: Please take note that, for legal reasons, the so called "AVV" is currently only available in the German language.
There are certain cases in which you are not legally obliged to complete such a contract with us. Those include:
- You're only testing guestoo and aren't using any real personal data
- You exclusively use guestoo for private purposes
- You don't save and process any third party data in guestoo
- You have previously signed an "AV" contract with us
If you use guestoo to store and process personal data of third parties, you are legally obliged to sign a contract for commissioned data processing with us.
Here's how:
- Open the User menu (Click on your name in the top right corner)
- Choose the Menu item "Data processing (AVV)"
- Choose how you use guestoo
- If you have selected one of the types of use listed above, you do not need an AV contract with us and no further steps are necessary. In this case, simply click on the “Save” button
- If you use personal third party data in guestoo, this is how to proceed:
- Auftraggeber-Daten Please enter the necessary information of yourself or the person responsible within your company
- Erhobene Daten Enter the type of guest data you store and process with guestoo
- Click on "AVV abschließen" to save the changes
- By clicking on "AVV herunterladen" you can download the contract that you have just digitally signed
- Done :)
If you want to revoke this contract at any point in time, you can do this by clicking the button "Widerrufen" below this form.
Further information regarding the AVV and why you have to sign it with us can be found on this site.
Pause subscription
User menu > Pause subscription
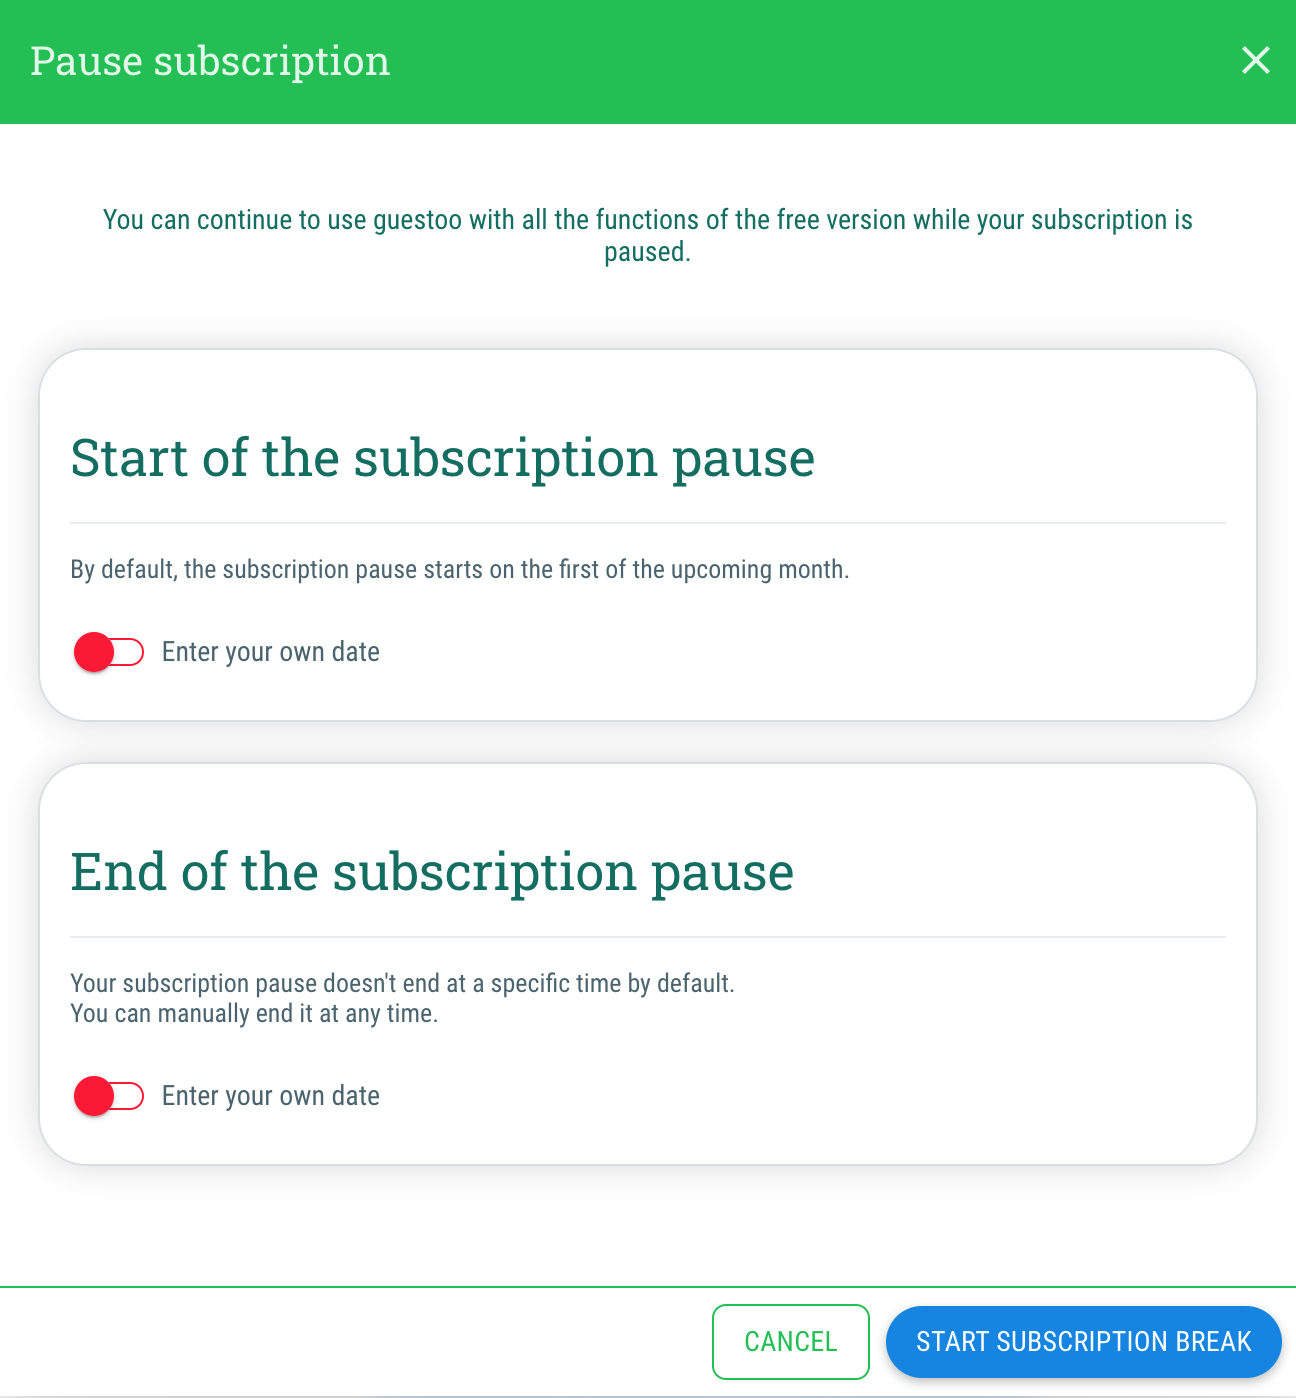
If you don't need your guestoo account for a certain amount of time, you can pause your subscription at any time. During the subscription pause, you won't receive any invoices from us and there'll be no warnings regarding exceeded event or contact limits and can still use all the features of the free subscription.
This is how you can pause your guestoo subscription
- Open the User menu (Click on your name in the top right corner)
- Click on the menu item "Pause subscription"
- Start of the subscription pause
By default, the subscription pause starts on the first of the upcoming month.
You can activate the toggle "Enter your own date" in order to freely choose when you want the subscription pause to start. - End of the subscription pause
Your subscription pause doesn't end at a specific time by default - you have to manually end it at any time by booking a subscription of your choice.
You can activate the "toggle "Enter your own date" in order to freely choose when you want the subscription pause to end. Once the subscription pause is over, the subscription you had before the pause will automatically be renewed. - Click on the button "Start subscription pause"
Note: If you do not want to receive any further invoices from the 1st of the following month, set the start of the subscription break to the 30th/31st of the current month. If you set the 1st of the month as the start of the subscription break, you will receive an invoice for the month, as the invoices are always generated and sent automatically on the night of the 1st of the month.
Cancel contract / delete account
User menu > Cancel contract / delete account
If you click on the menu item "Cancel contract / delete account" you'll be able to delete your guestoo account/agency.
This is how it works:
- Open the User menu (Click on your name in the top right corner)
- Click on the menu item "Cancel contract / delete account"
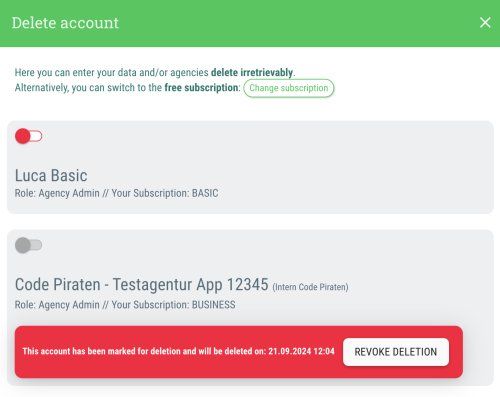
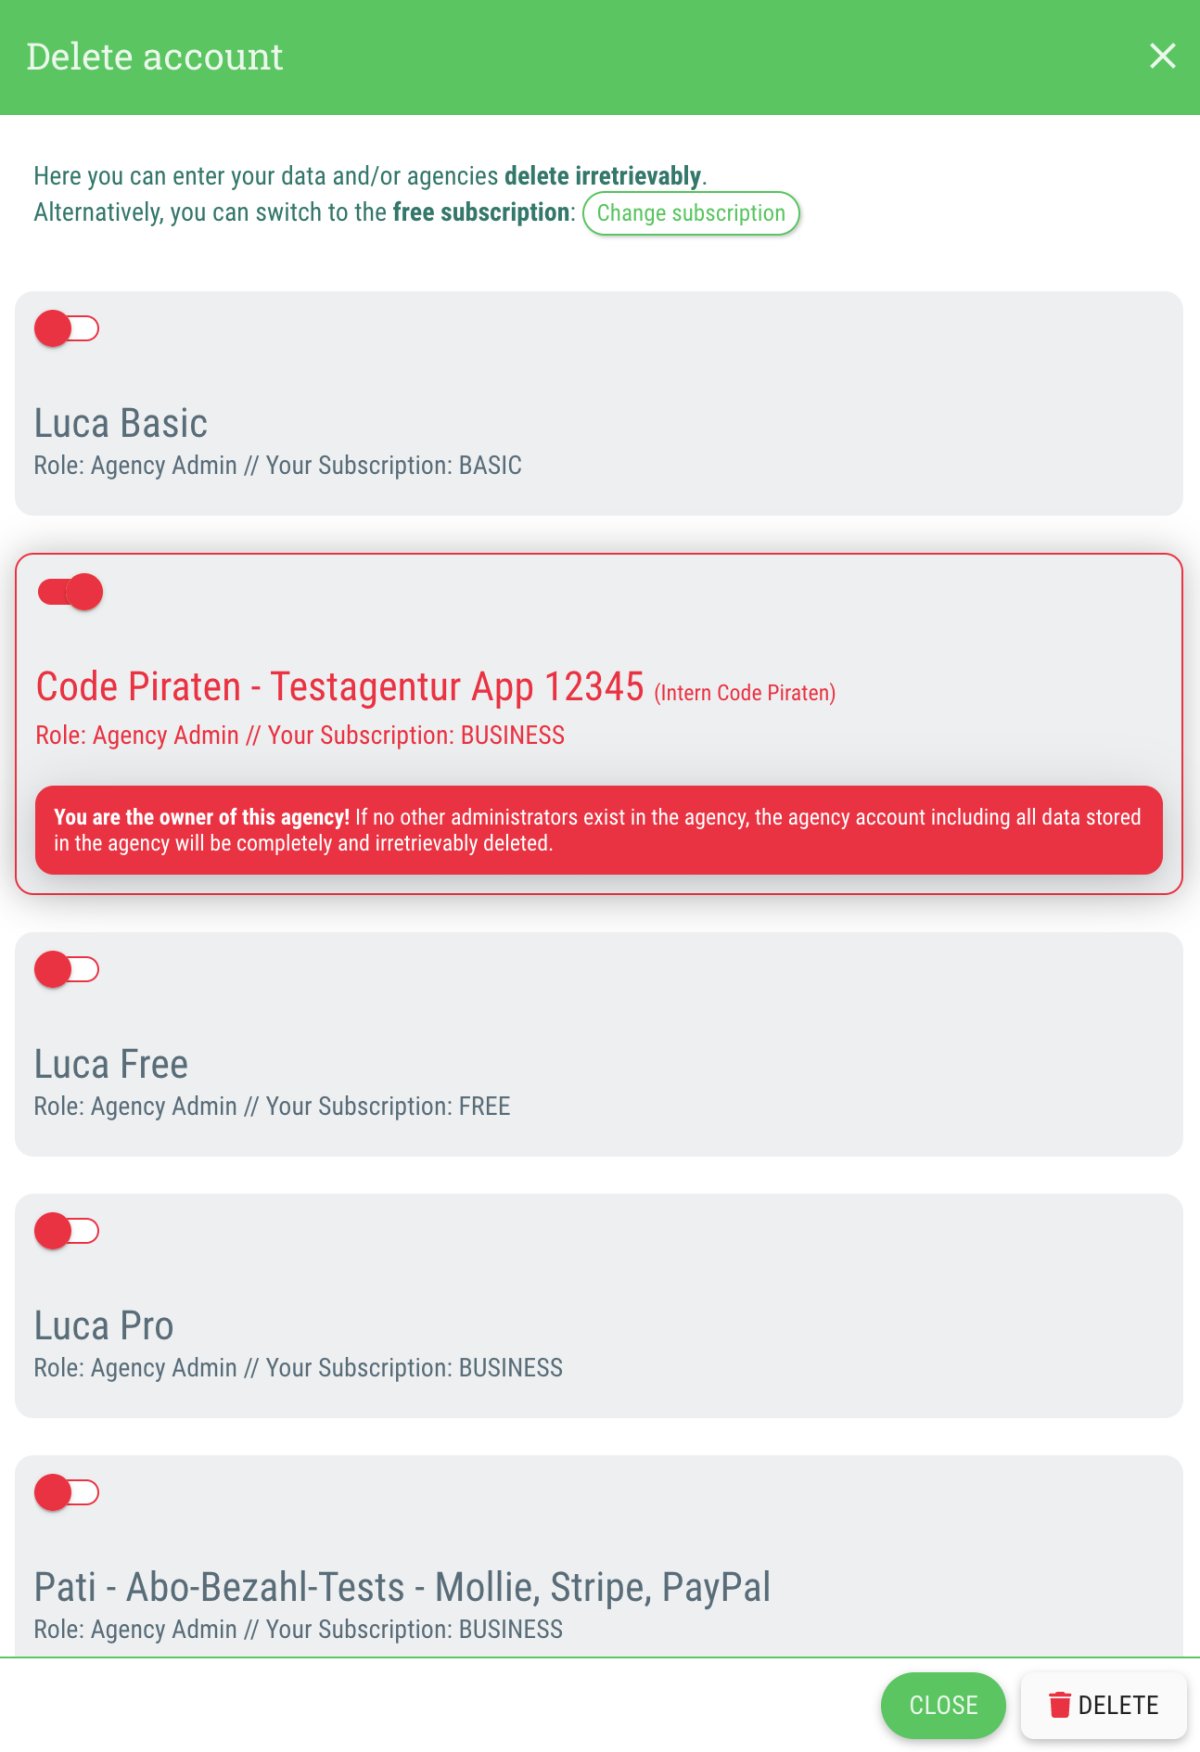
- Select the agency account(s) that you want to delete by enabling the toggle next to them
- Double check whether you've chosen the correct account(s)!
- Click on the "Delete" button
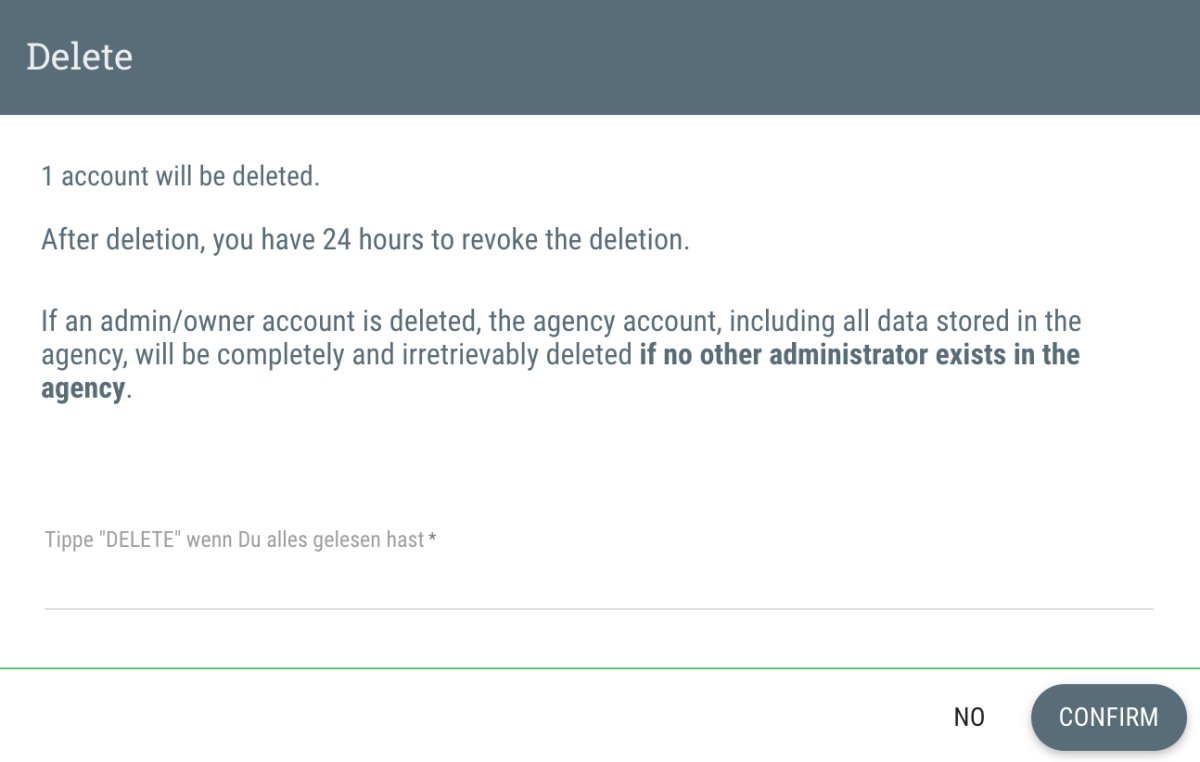
- Make sure to read the text in the pop-up window carefully and then confirm the deletion by entering “DELETE” in the text field.
- Click on the "Confirm" button
- The deletion of your account will now be noted for the time being.
- Note: You have 24 hours to revoke the deletion by clicking on “Revoke deletion”! After that, the accounts will be deleted.
Important notes on deleting your account
- If you are the owner of the agency and no other admin exists within the agency, the agency account including all data stored in the agency will be completely and irretrievably deleted.
- Please make sure that you have selected the correct account before confirming the deletion!
-
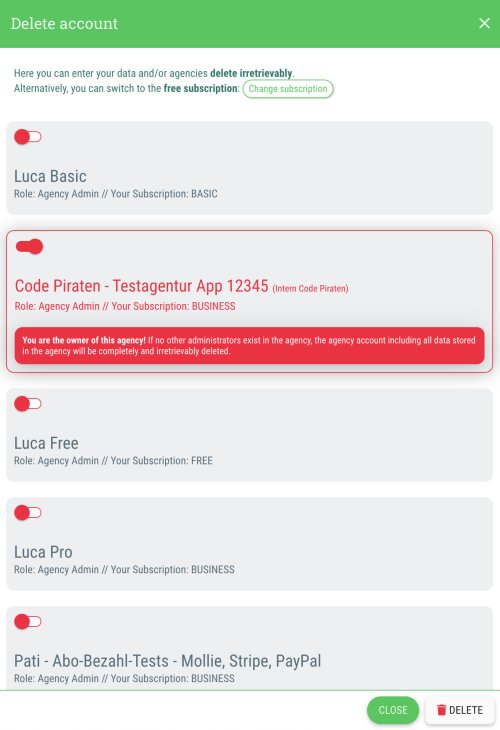 Choose the agency you want to delete
-
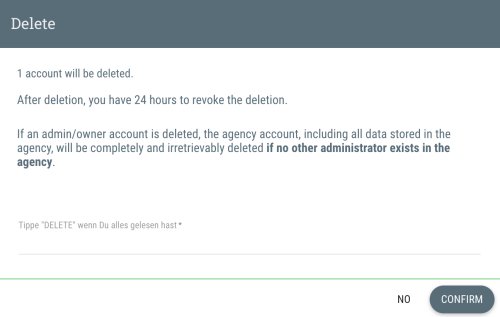 Information window before deleting the account
-
 Button to revoke the deletion of the guestoo account

Create another agency
User menu > Create another agency
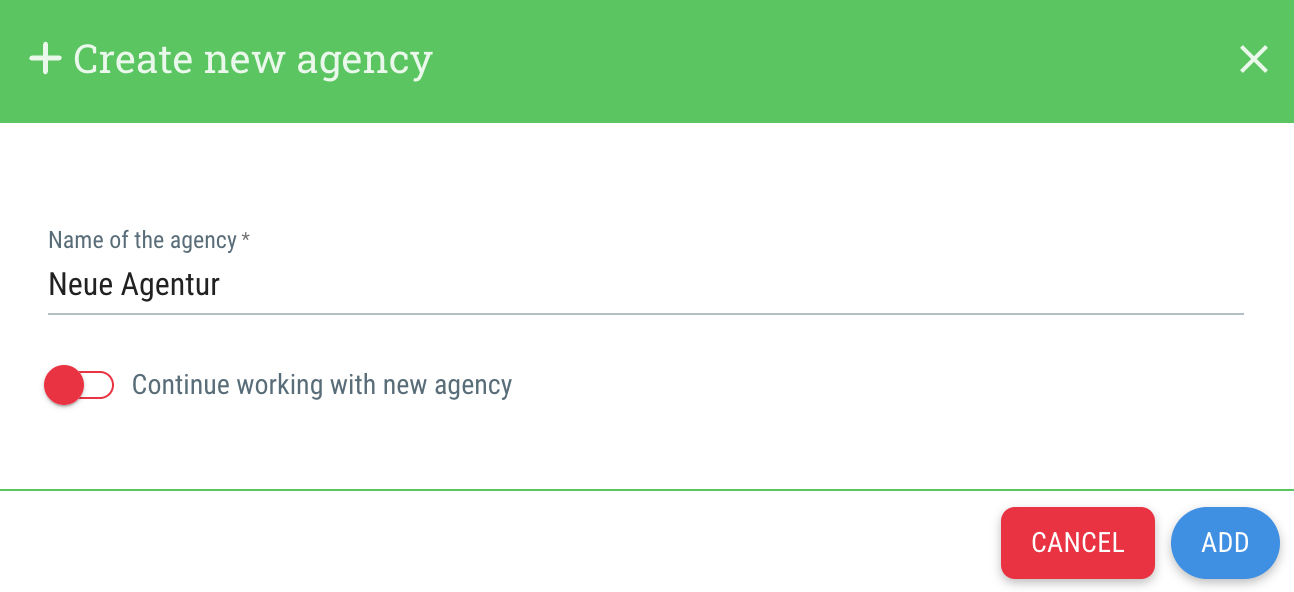
By clicking on the menu item "Create another agency" you can add a new agency to your account.
If you create a new agency using this menu item, it will be created using the same e-mail address and password with which you are currently logged in to guestoo.
This is how it works:
- Open the User menu (Click on your name in the top right corner)
- Click on the menu item "Create another agency"
- Name of the agency
Choose a name for the new agency that you want to create - Continue working with new agency
If you activate this option (= toggle on green) then you'll be immediately redirected to your new agency after clicking "Add" to continue working there. - Transfer data from this agency
If you activate this option, some data from this agency will be transferred. However, the payment details for the subscription and the payment methods for ticket sales must then be linked. No event or guest data will be copied. - Click on the "Add" button
Note: You can switch back and forth between your agencies at any time by selecting the Change agency menu item in the user menu.
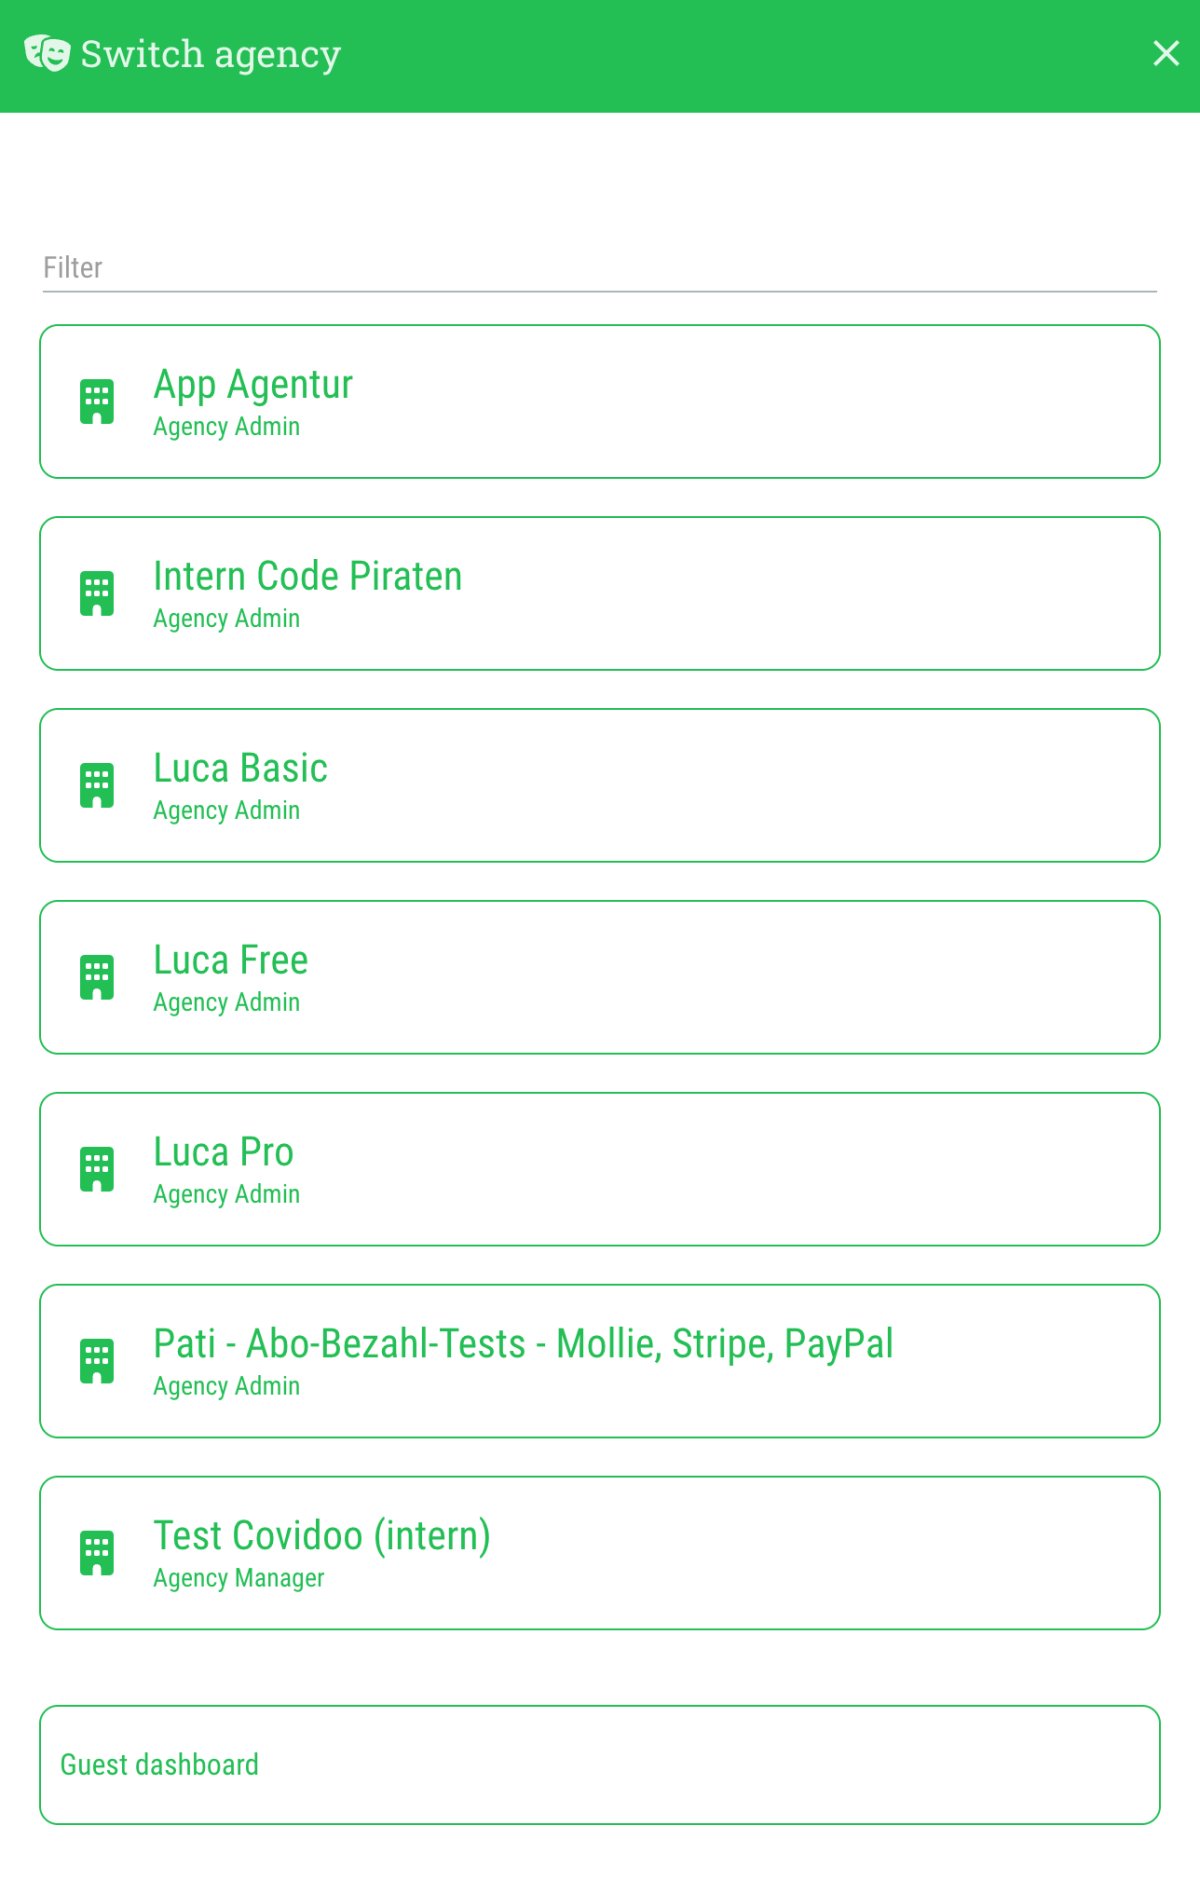
Switch agency
User menu > Switch agency
If you have several agencies in guestoo or are also active as a manager user at other agencies with the same e-mail address, you can switch between the agencies by clicking on the “Switch agency” menu item.
This is how it works:
- Open the User menu (Click on your name in the top right corner)
- Click on the menu item "Switch agency"
- Click on the name of the agency that you want to switch to
- Done - you'll be redirected to the chosen agency
-
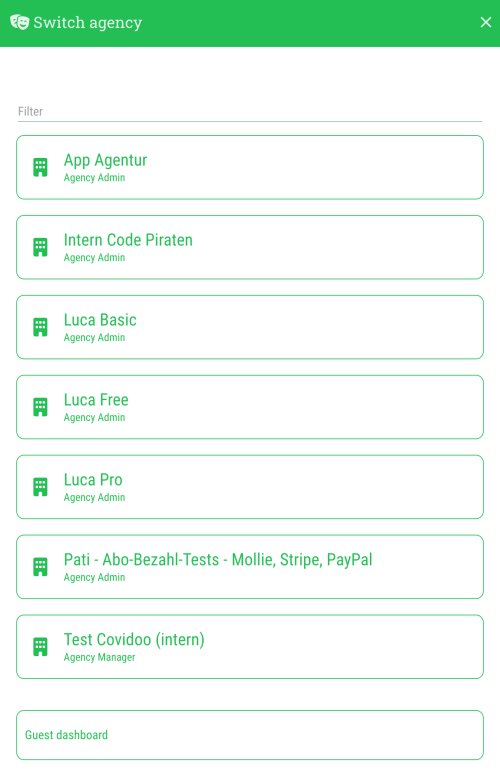 Select the agency you want to switch to
Log out
You can log out of your guestoo account by clicking on the “Log out” button.