Design

Here you can find out how to customize the design for your event.
You can find all the settings explained here in the “Design” tab of your event or event template.

Du kannst für das guestoo Back-End zwischen zwei Darstellungsoptionen wählen. Die Screenshots in der Doku basieren auf dem "Klassischen Design".
Hier siehst Du die Unterschiede, damit Du dich auch im "Modernen Design" zurecht findest: » guestoo Back-End-Design

Note: If you cannot see some of the sections explained on this page, there may be two reasons for this:


1) You do not have the required subscription to use the corresponding function.


2) The sections are hidden. To show them, scroll to the bottom of the “Design” tab and click on “Show more options”.
There you can set which sections should be displayed and which should be hidden so that you have a better overview. :)

Background image + Colors

Event > Design > Colors

Background image + Colors - Event > Design > Colors
Background image

Here you can upload a background image.


The background image is displayed in the following places:

  • Event microsite
  • Payment site
  • Survey site

To ensure that the background image is displayed optimally, it should meet the following requirements:

  • File format: JPG
  • Size: Longest side at least 2000px
  • Aspect ratio: ideally 15:10 (but will be adjusted automatically)
  • DPI: 72
  • Colors: RGB
Colors

Here you can set the colors that are used for your event page, your registration form, your tickets and your emails.


You can pick the following colors here:

  • Primary color
  • Accent color
  • Text color
  • Text color lighter
  • Separator color: Used for lines and other separating elements
  • Background color

Event page template

Event > Design > Event page template

Event page template - Event > Design > Event page template

Here you can specify which template should be used for your event page.


You currently have the choice between these different templates:

  • Tile - DEMO
  • Tile + Navigation - DEMO1DEMO2
  • Tile Rounded + Logo + Navigation - DEMO
  • Classic + Logo - DEMO
  • Classic + Logo + Navigation - DEMO1DEMO2
  • Modern 1 #hell - DEMO
  • Modern 2 #dunkel - DEMO
  • Classic - DEMO
  • MiniMiniMinimal (beta) - DEMO

If you change the template, no data will be lost! So you can always try out the view of the different templates by setting them and then going to your event page to see the changes.


Tip: You can access your event page by clicking on the eye symbol in the top right-hand corner.

Show/hide elements and buttons

Event > Design > Show/hide elements and buttons

Show/hide elements and buttons - Event > Design > Show/hide elements and buttons

Here you have the possibility to further influence the appearance of the event microsite and the registration form.


You have the following options here:

Labeling of the button

Here you can select the label for the button that leads to the registration form.

The following options are available:

  • Register / Buy Now (depending on whether it is a free event or an event with paid tickets)
  • Register now
  • Participate now
  • Join in now
  • Vote now
  • Send inquiry
  • Prebook now
  • Request document
Further options

You also have the option of showing or hiding the following buttons and elements:

  • Hide invitation code & login items in form
    If this option is activated (= Toggle on green), the options for entering an invitation code and for logging in are not displayed to guests.
  • Show share buttons on microsite
    If this option is activated (= Toggle on green), various social media buttons for sharing the event are displayed on the event microsite. This is practical if you want your guests to recommend the event to others and thus make other interested parties aware of it.
  • Show free spots on the microsite (Available: 6)
    If this option is activated (= Toggle on green), the event microsite will show how many places are currently still available for the event.
  • Show number of available tickets in the registration form
    If you activate this option (= Toggle on green), the number of tickets of this type still available will be displayed under each ticket in the registration form.
    Requirements: Several tickets must be created and the availability of the tickets must not be set to “-1” (= unlimited).
  • Show number of available timeslots in the registration form
    If you activate this option (= Toggle on green, the registration form will show how many places are still available per timeslot.
    Requirements: The availability of timeslots must not be set to “-1” (= unlimited).
  • Hide "Save data for next time" button
    If this option is activated (=Toggle on green), the option to save their data for their next visit is not displayed to guests.
  • Hide language switcher
    If this option is activated (=Toggle on green), the language selection (DE, EN, etc.) is hidden at the bottom of the event page and in the registration form.

Email template

Event > Design > Email template

Email template - Event > Design > Email template

Here you can specify which template should be used for your emails.


You currently have the choice between the following templates:

  • -- From Agency » Design --
    Default setting, the ticket template specified under “Agency > Design” is used
  • Classic (will not be developed further)
  • Modern

If you change the template, no data will be lost! So you can try out the view of the different templates at any time by setting them up and then inviting yourself to an event and playing through the process.

Ticket design

Event > Design > Ticket design

Ticket design - Event > Design > Ticket design

If you use guestoo with the Pro subscription or above, you can specify here which template should be used for your tickets.

This feature can also be booked in addition to the Basic subscription - more information about this can be found here.


You currently have the choice between the following templates:

 Once you have decided on a template, upload the required image(s). Pay attention to the specifications that you are stated below the upload.

Note: In order to test the selected ticket template, register for your event as a guest. You will find the ticket in the confirmation email.

Wallet design

Event > Design > Wallet design

Wallet design - Event > Design > Wallet design

If you use guestoo on the Pro subscription or higher, you can customize the design for your Wallet ticket here.

This feature can also be booked in addition to the Basic subscription - you can find more information about this here.


This is how:

  • In the “Design” tab of your event, scroll to the “Wallet design” section
  • Click on the "Edit" button in the top right corner
  • Upload a logo for the Wallet ticket
    Dimensions: 360x100 px
  • Upload a thumbnail for the Wallet ticket
    Dimensions: 100x100px
  • Click on the "Save" button in the top right corner

If you want to test the appearance of your Wallet ticket, register for the event as a guest and go through the registration process. You will find the Wallet ticket as an attachment in the confirmation email.

Use your own font

Event > Design > Use your own font

Use your own font - Event > Design > Use your own font

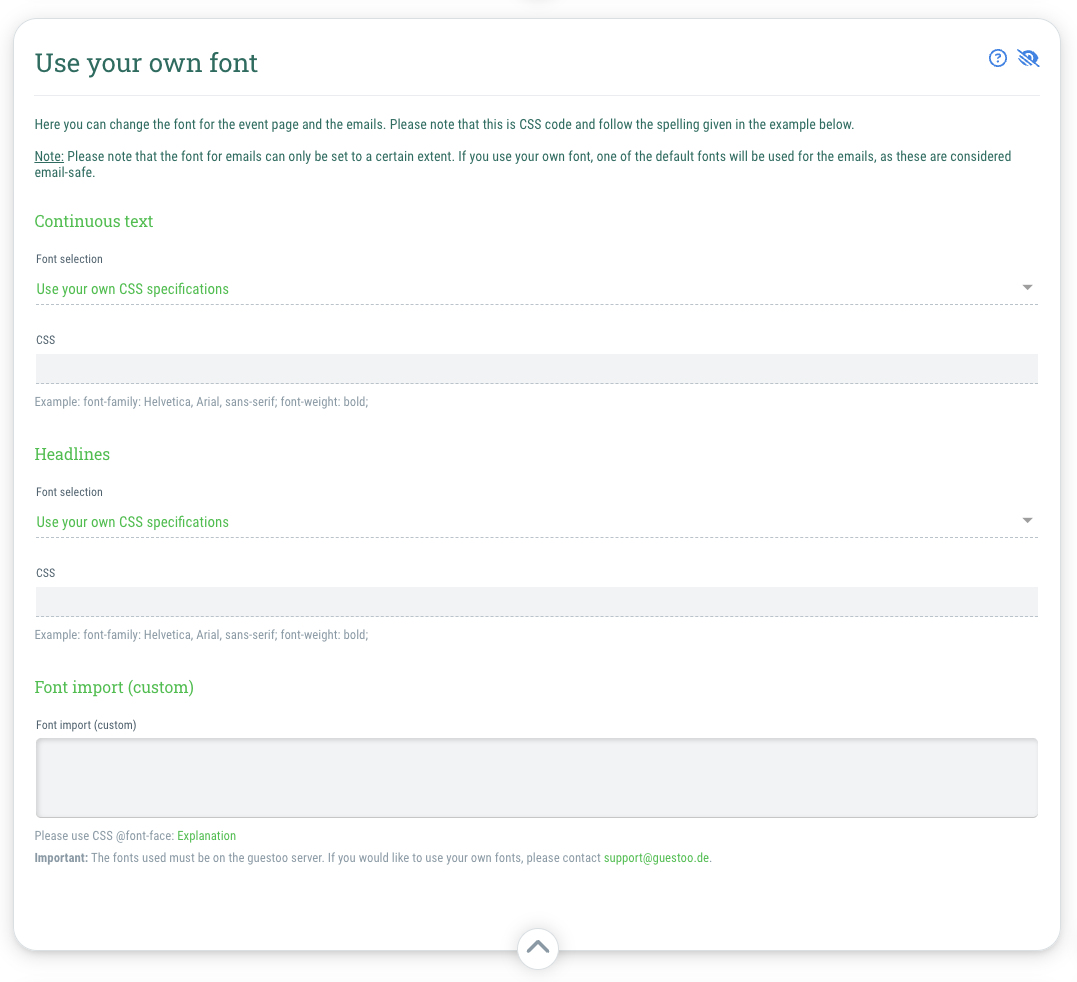
If you are using guestoo in the Pro subscription or higher, you can change the fonts used for the event page and emails here.

This feature can also be booked in addition to the Basic plan - you can find more information about this here.


You can set the font for the continuous text and for the headlines separately.

This is how:

  • Go to the "Design" tab of your event
  • Scroll to the "Use your own font" section
  • Click on the "Edit" button in the top right corner
  • Go to the dropdown menu under "Continuous text” or “Headlines”
  • Choose the desired font
  • You can also select the option “Use your own CSS specifications” and enter the desired CSS specifications in the field below. Make sure to import the font accordingly under "Font import (custom)"
  • Once you have chosen the desired fonts, click on the "Save" button in the top right corner


Use your own fonts

If you would like to use a font other than those already listed in the dropdown menu, that is also possible.

The fonts must be available on the guestoo server - please contact support@guestoo.de with the following data:

  • Your agency ID
  • Webfont(s)
  • CSS file for the different font styles or at least the information which font styles are required
  • Note: If you do not have web fonts for the desired fonts, you can also send us .otf or .ttf files, provided that the licenses for the fonts permit their use on the web.

As soon as we have installed the fonts, you'll be able to choose them from the dropdown menu.

Event microsite & registration form: Overwrite CSS

Event > Design > Event microsite & registration form: Overwrite CSS

Event microsite & registration form: Overwrite CSS - Event > Design > Event microsite & registration form: Overwrite CSS

If you use guestoo with the Business subscription or higher, you have the option to overwrite guestoo's CSS with your own.

This feature can also be booked in addition to the Pro subscription - you can find more information about this here.

Notes on overwriting the guestoo CSS
  • There are two places where you can overwrite the CSS: the event microsite and the iFrame form.
  • The CSS you enter will be integrated after our standard CSS on the page.
  • Caution!! If you do something wrong here, you can make your site unusable in the worst case. Therefore, we recommend that you only use this function if you are familiar with CSS.
  • If you leave the two fields empty at this point, the settings you have stored under Agency > Design will be used as a fallback.
  • If you have entered something under Agency > Design, but want to use the guestoo standard for this event, enter the following in the field: /* --- */

Tip: Helpful code snippets for customizing the HTML and CSS can be found here.

Event microsite: Use your own custom HTML (microsite only)

Event > Design > Event microsite: Use your own custom HTML (microsite only)

Event microsite: Use your own custom HTML (microsite only) - Event > Design > Event microsite: Use your own custom HTML (microsite only)

If you use guestoo in the Business subscription or higher, you have the option of integrating your own header and footer into your event microsite with the help of HTML.

This feature can also be booked in addition to the Pro subscription if you wish - you can find more information here.

Notes on overwriting the guestoo HTML
  • There are two places where you can add your own HTML to the event microsite: In the header and in the footer
  • The header code is inserted directly after the body tag, before our code.
  • The footer code is inserted after our code.
  • Caution!! If you do something wrong here, you can make your event microsite unusable in the worst case. Therefore, we recommend that you only use this function if you are familiar with HTML.
  • If you leave the two fields empty at this point, the settings you have stored under Agency > Design will be used.
  • If you have entered something under Agency > Design, but want to use the guestoo standard for this event, enter the following in the field: <!-- -->

Tip: Helpful code snippets for customizing the HTML and CSS can be found here.