Emails

Here you can find out how to manage the standard email texts for your event and how to send additional mailings to your guests.
All the settings explained on this page can be found in the “Emails” tab of your event or event template.

Du kannst für das guestoo Back-End zwischen zwei Darstellungsoptionen wählen. Die Screenshots in der Doku basieren auf dem "Klassischen Design".
Hier siehst Du die Unterschiede, damit Du dich auch im "Modernen Design" zurecht findest: » guestoo Back-End-Design

Note: If you cannot see some of the sections described on this page, there may be two reasons for this:


1) You do not have the required subscription to use the corresponding function.


2) The sections are hidden. To display them, scroll to the bottom of the “Emails” tab and click on “Show more options”.
There you can select which sections should be displayed and which should be hidden so that you have a better overview. :)

Custom mailings

Custom mailings -

Click on the “Open mailing dialog” button to send custom mailings and invitations to your guests.

You can find out how to do this on this page.

Default email texts

Customize the default email texts and adjust them to your liking

Default email texts - Customize the default email texts and adjust them to your liking

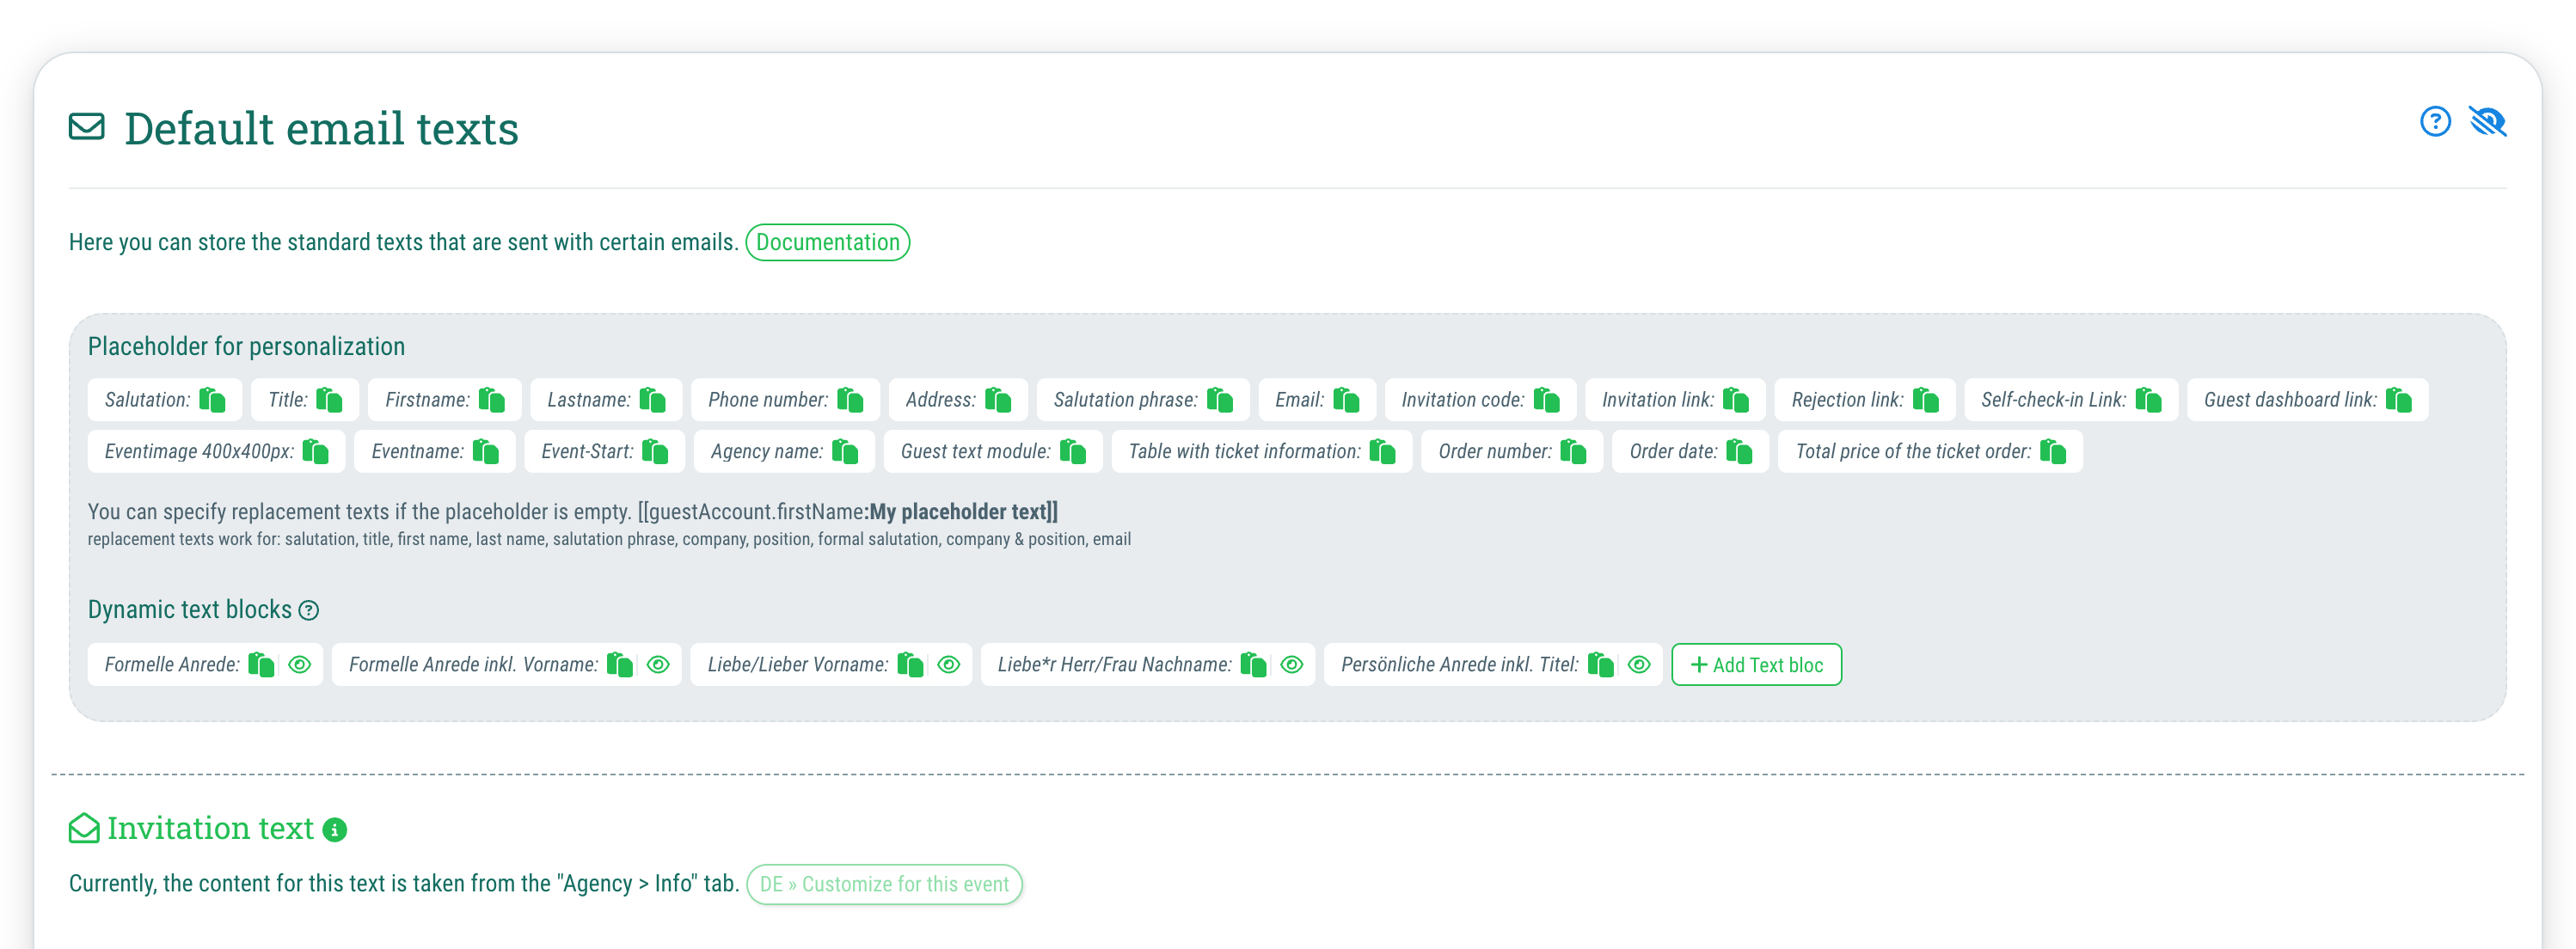
Here you see a list of all emails that are automatically sent to your guests by using guestoo and you can customize them accordingly.

Important: If you don't edit the email texts manually here, the texts that you have saved in the agency settings will be used as default. To change the email text specifically for your event, click on the “Customize for this event” button at the respective section.

You can edit the following email texts here:

  • Invitation text
    Your guests will receive this email when you manually invite them to an event.
  • Double opt-in email (DOI)
    Your guests will receive this email after registering for the event to confirm that their details are correct. If you have deactivated the DOI procedure in your workflow, you can ignore this template, but we recommend that you use the DOI procedure for legal reasons.
  • Confirmation email » Registered, but not yet confirmed
    This text is in the confirmation e-mail if the option, that you must first confirm each guest manually before their participation is confirmed, is activated.
  • Confirmation email to the guest
    Your guests will receive this email to confirm their participation after they have confirmed the accuracy of their data by clicking on the link in the DOI email.
  • Automatic reminder email to the guest
    This email will be sent to the guest 3 days before the event if the automatic reminder is activated. You can find out how to (de)activate it further down on this page.
  • Cancellation to a guest
    This e-mail will be sent to your guests if you cancel their participation manually.
  • Confirmation email in case of cancellation by the guest
    Your guests will receive this email as confirmation if they have canceled their participation in the event via the “Cancel” button in the confirmation email. This email template is only relevant if you allow your guests to cancel their participation after they already signed up for the event.
  • Email with check-in link
    In this e-mail, your guests will receive the link to check in so that they can check in independently at the event.
  • Email with check-out link
    In this e-mail, your guests will receive the link to check out so that they can check out of the event themselves.

Tip: You can use the placeholders shown above to personalize the emails to your guests, e.g. by inserting their name. In order to use one of the available placeholders, click on the corresponding placeholder to copy it to your clipboard and then paste it into the desired position in the text. You can find an overview of all the placeholders which can be used on this page.

File upload (Pro subscription and higher)

Provide your guests with further information and files

File upload (Pro subscription and higher) - Provide your guests with further information and files

This is a feature that is not included in all subscription plans. You can find an overview of the subscriptions in which the feature is included or can be booked on this page. To add the feature to your subscription, visit the Feature Shop (you can find it under Agency > Feature Shop or directly under this link).


In order to make changes to your event, first click on “Edit” in the top right-hand corner:

  • Here you have the option of uploading one or multiple files to make them available to your guests
  • To do this, select the desired file or drag and drop it into the browser window
  • As soon as the file has been uploaded, you can specify a title and the conditions under which the file will be sent to your guests or offered for download:
    • Show on the event microsite: Your guests can download the file from the event microsite.
    • Attach to invitation email: The file will be attached to the invitation email.
    • Attach to confirmation email: The file will be attached to the confirmation email and is therefore helpful for further information that is only relevant for guests who have already confirmed their participation.

Important: As soon as you have made all the desired changes, don't forget to confirm them by clicking on “Save” (top right corner).

Disable emails

Disable emails -

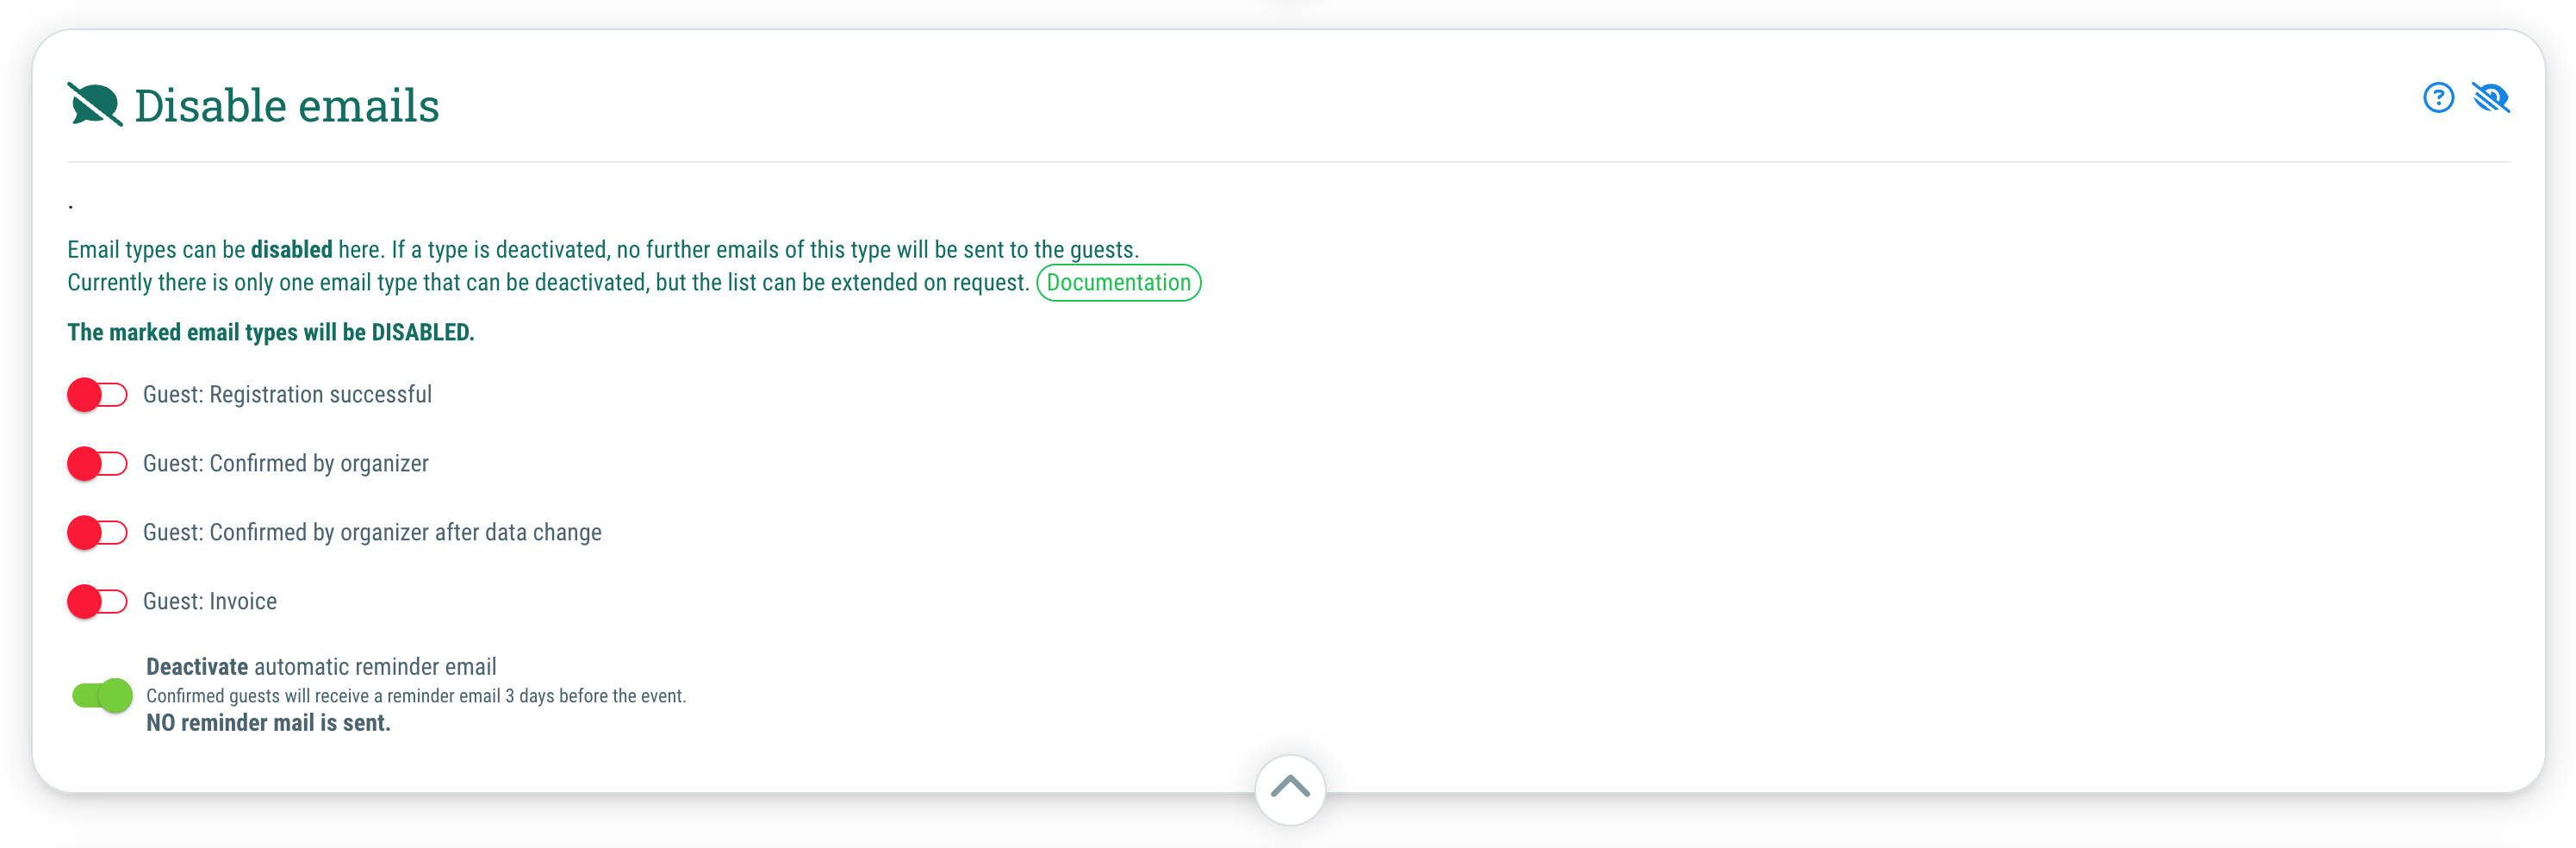
You can deactivate certain email types here.

If you deactivate the email type, no further emails of this type will be sent to the guests of this event.

This is how it works:
  • Go to your event and change to the "E-Mails" tab
  • Scroll to the "Disable emails" section
  • Click on "Edit" in the top right corner
  • To deactivate an email type, click on the corresponding toggle next to the respective email type
  • If the toggle is green, the email type is deactivated
  • If the toggle is red, the email type is activated (Default setting)
  • Once you are ready, click on the "Save" button in the top right corner
Guest: Registration successful

If you deactivate (= toggle on green) this email type, the guest will not receive a confirmation email after successful registration.

Guest: Confirmed by organizer

If you deactivate (= toggle on green) this email type, the guest will not receive a confirmation email after their participation has been confirmed by the organizer.

Guest: Confirmed by organizer after data change

If you deactivate (= toggle on green) this email type, the guest will not receive a confirmation email after the organizer has confirmed their data changes.

Guest: Invoice

If you deactivate (= toggle on green) this email type, the guest will not receive an email containing the invoice for their order.

Deactivate automatic reminder email

The automatic reminder email is a reminder that is automatically sent out to all guests who have activated the corresponding notification in their profile settings three days before the event. If a guest has deactivated the notification “Reminder 3 days before an event”, they will not receive such a reminder email, regardless of what you as the organizer set at the event.

If you want to create your own reminder email and/or want to ensure that all guests receive the email, you can create and send your own mailing instead.


Note: The list of email types that can be deactivated can be extended on request - please contact support@guestoo.de


Further settings

Further settings -

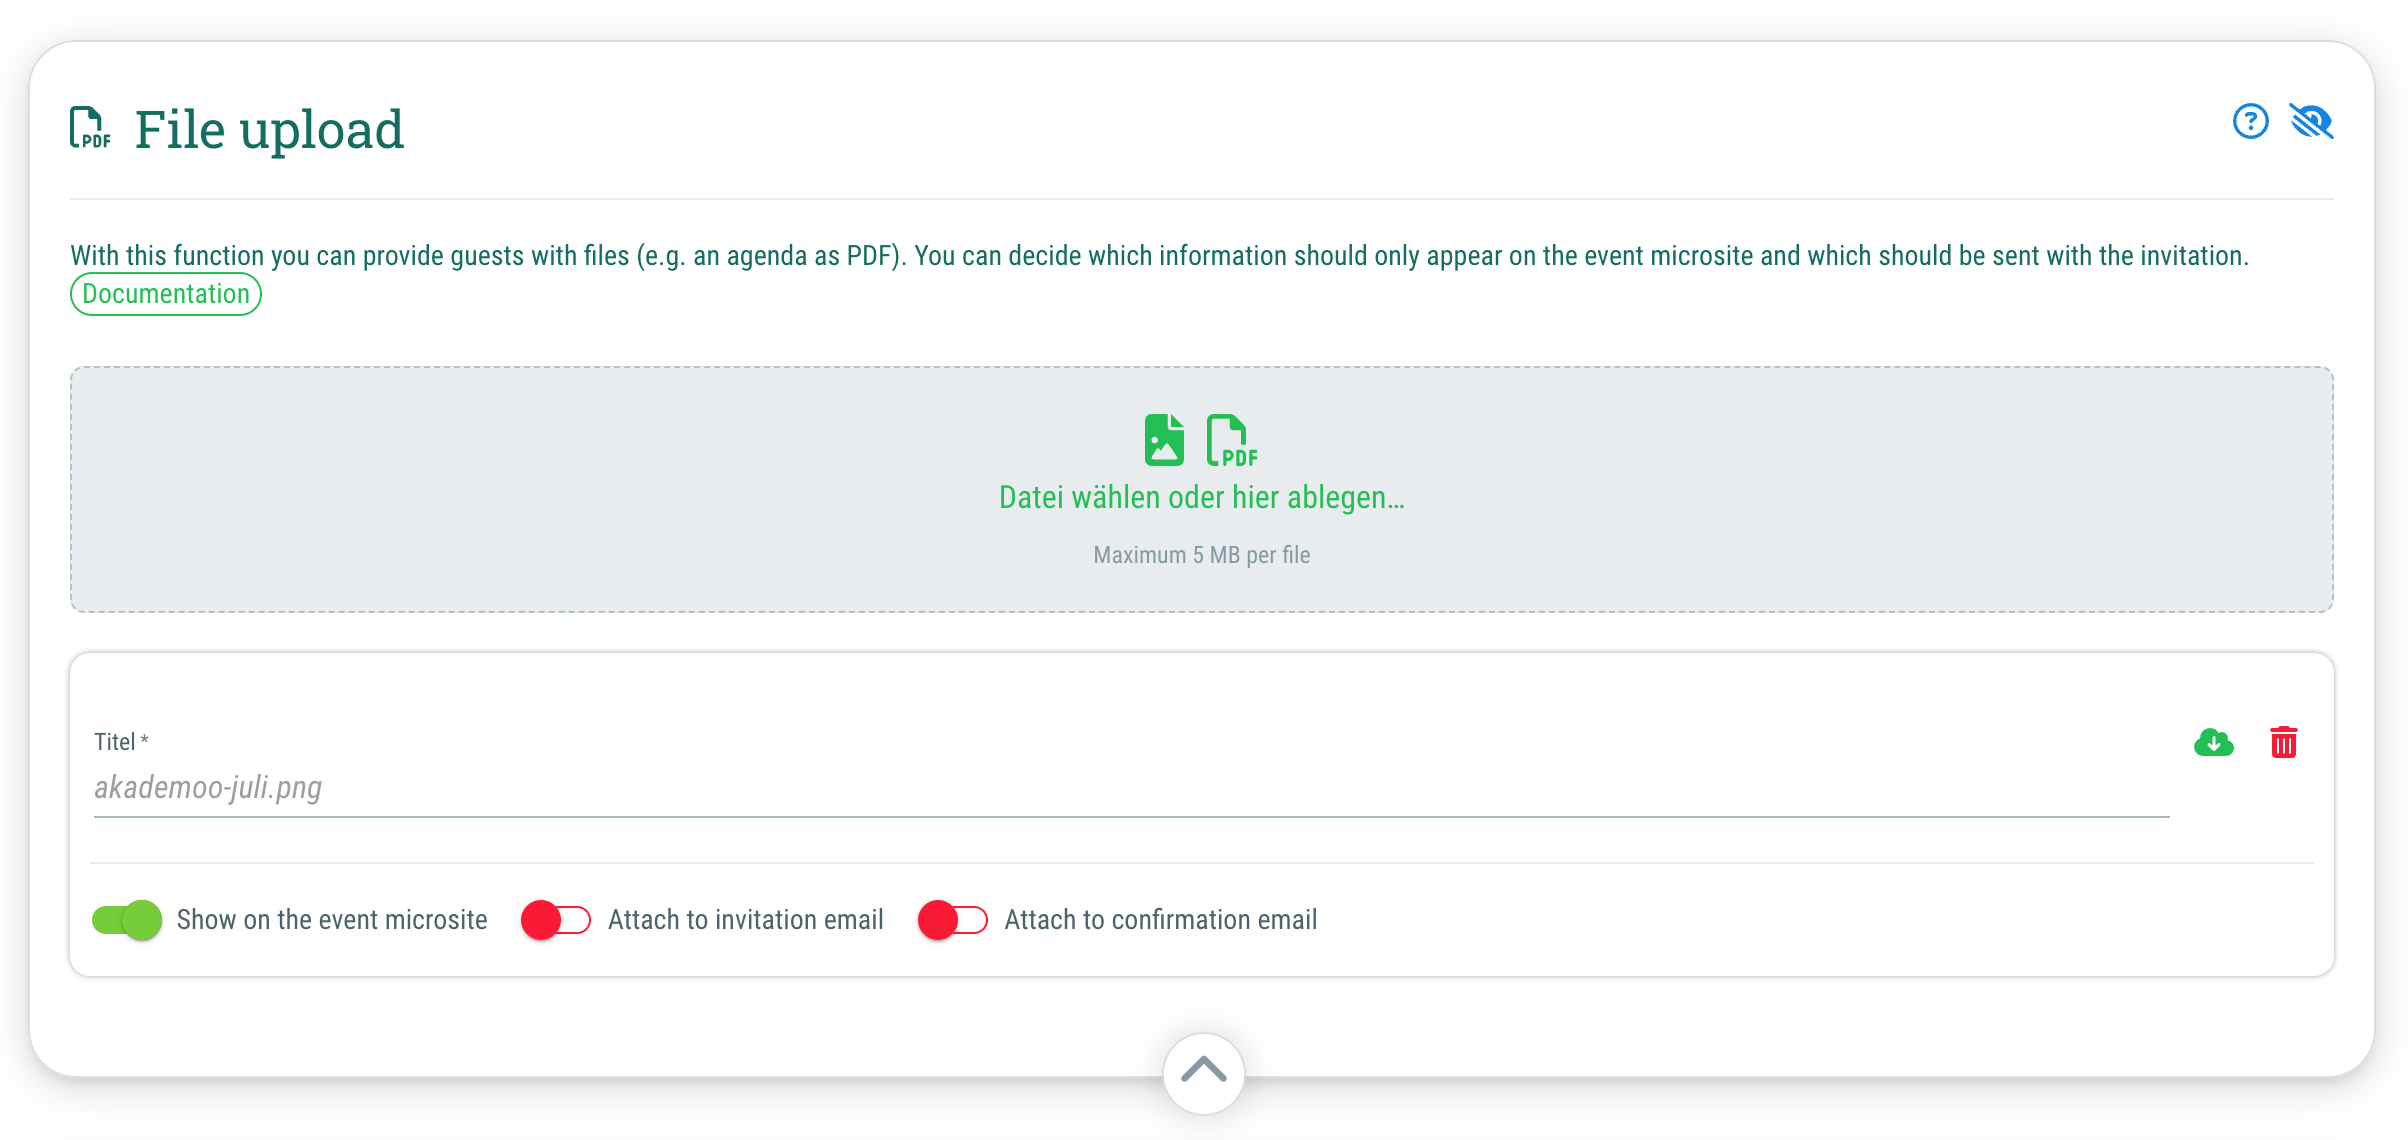
You can make the following settings here:

  • Display information about purchased tickets in emails
    If you activate this option (=toggle on green), the information about the purchased tickets will be displayed in the confirmation email and in mailings.
  • Display standard header in emails
    If this option is activated, the name of the event and the type of email (invitation, cancellation, confirmation, etc.) are displayed as a heading in the email text. Applies to all default emails.
  • Display "Show details" button in emails
    If you activate (=toggle to green) this option, the “Show details” button, which takes your guests to the event microsite, is displayed.
  • Display "Delete data" button in emails
    If this option is activated (=toggle set to green), your guests will see a link in every email that gives them the option to delete their data that is saved in guestoo.
  • Display link to guest dashboard in emails
    If this option is activated (=switch to green), a link to the guest dashboard is displayed at the bottom of the email text. The guest dashboard provides the guest with an overview of all guestoo events to which they have registered or been invited.

Email sender settings

You can find out what changes you can make to the email sender settings on this page.