Guests

Here you can find out how to manage the guests within your event.
You can find all the settings explained here in the “Guests” tab of your event or your event template.

Du kannst für das guestoo Back-End zwischen zwei Darstellungsoptionen wählen. Die Screenshots in der Doku basieren auf dem "Klassischen Design".
Hier siehst Du die Unterschiede, damit Du dich auch im "Modernen Design" zurecht findest: » guestoo Back-End-Design


Search and filter guests

Search and filter guests -

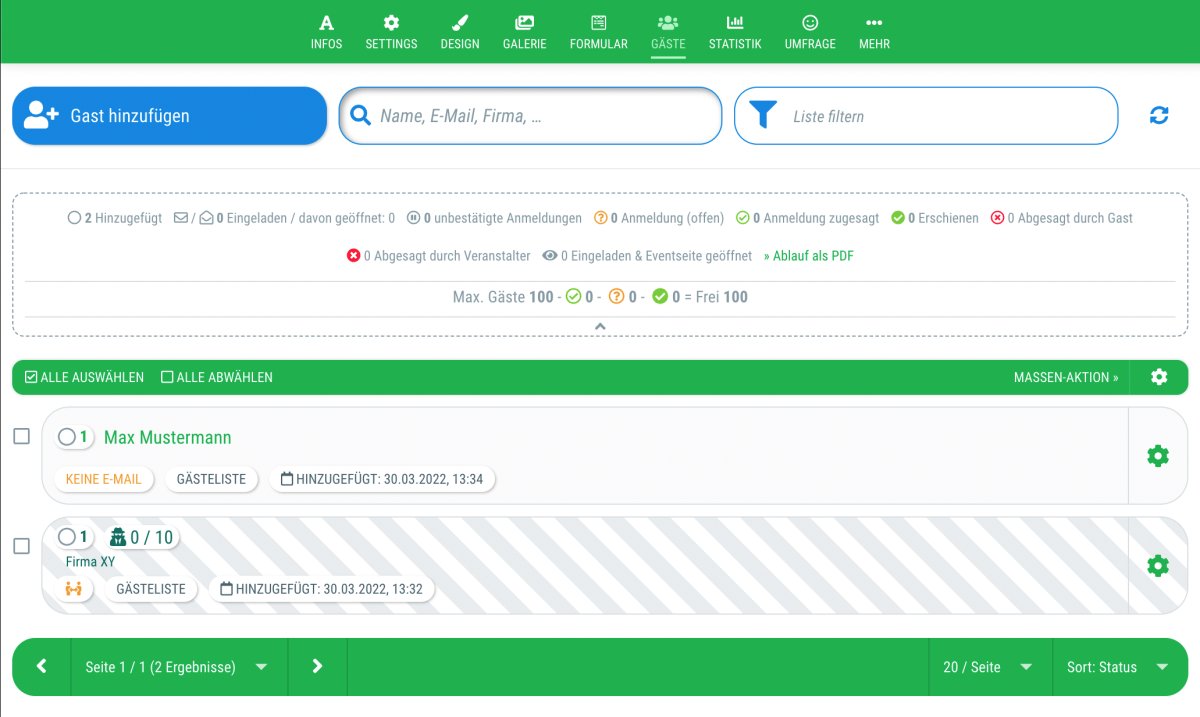
In the guest list, you have the option of searching for specific guests or filtering the guest list. 

Search guest

In the search field, you can enter a specific criterion by which the list should be searched, e.g. the guest's first name, surname or company. This is helpful if you are looking for a specific guest or only want to display the employees of company X.

Filter guest list

Directly on the right of the search field there is another field that allows you to filter the guest list.

By clicking on it, you will be shown a dialogue window with the following filtering options:

  • Sorting order
    Choose which criteria should be used to sort the guests in the guest list:
    • Name
    • Registration date (older first)
    • Registration date (newer first)
    • Cancellation date (older first)
    • Cancellation date (newer first)
    • Creation date (older first)
    • Creation date (newer first)
  • Status (Multiple selections possible)
    You can find an explanation of the different statuses here.
    • Added
    • Invited
    • Registration (open)
    • Registration confirmed
    • Appeared
    • Canceled by organizer
    • Canceled by guest
  • Unconfirmed registrations
    • No
    • Yes
  • VIP
    • All
    • Do not show VIPs
    • Show VIPs only
  • Guests on waiting list
    • All
    • Only waiting list
    • Only no waiting list
  • Orders to be approved
    • All
    • Only not approved
    • Only already approved
  • Public participant profile
    • All
    • Only deactivated profiles
    • Only activated profiles
  • Invalid email addresses
    • No
    • Yes
  • Origin (event specific)
  • Only search for specific sample guests
    • Do not show sample guests
    • Search only for sample guests
    • Only sample guests without registrations
    • Only sample guests with registrations
    • Only sample guests with free slots
  • Organize by registration ID
    • No
    • Yes
  • Invitation tracking
    • Has NOT opened the invitation email.
    • Has NOT clicked on the invitation link in the email.
  • Winner
    • All
    • Only no winners
    • Only winners
  • Tickets
    All tickets available for the guest to choose from are displayed here. Click on a ticket to filter the guest list according to the guests who have purchased the ticket.
  • Timeslots / Smart selection list
    Here you will be shown an overview of all event-specific fields of the type “Timeslots / Smart selection list” that you have created, including all timeslots that are available for selection. If you click on one or more timeslots, you will only be shown guests who selected one of these timeslots when they signed up.
  • Selection list
    All event-specific fields of the “Selection list” type that you have created are displayed here, including the selection options. You can click to select which option the guest must have selected when signing up to appear in the filtered guest list.
  • Checkbox
    If you have created event-specific fields of the type “Checkbox”, these will be displayed here. By clicking on the desired field, the guest list is filtered according to guests who have clicked on this checkbox when signing up.
  • Eventspecific fields (Type "text" or "number")
    Here you can enter a value that must be entered in a particular event-specific field of the type "text" or "number" for the guest to appear in the filtered overview.
  • Check-in status
    • All
    • Checked in
    • Checked out
  • Present from
    • Date
    • Time
  • Present until
    • Date
    • Time
  • Only guests with changes to event-specific fields
    Only shows guests whose event-specific data has been changed since the date and time specified here:
    • Date
    • Time
  • Keywords (Multiple selections possible)
    Here you can click on the keywords you want to filter by. If you click on several keywords, only guests who have been assigned all the keywords you clicked on will be displayed.
  • Campaigns (Multiple selections possible)
    Here you can click on the campaigns you want to filter by. If you click on several campaigns, only guests who are assigned to all the campaigns you clicked on will be displayed.
  • Agreements (Multiple selections possible)
    • Only guests who have the value assigned
    • Only guests who do NOT have the value assigned (one is enough)
  • Language (Multiple selections possible)
    Here you can select which language(s) must be set for the guest to appear in the filtered list.
Important information about the filters
  • The filters set in the guest list remain active until you deactivate them again (even after logging out)!
  • If you want to see all guests, but notice that some guests do not appear in the guest list, please check that no filters are set!
  • To deactivate all set filters, click on the red “X” symbol in the “Filter list” field

Guest statuses

Guest statuses -

Above the guest list you will find a set of different symbols, each representing a status that your guests can be in, as well as the number of guests in each status.


This is what the different symbols / statuses mean:

  • Added
    The guest has been added to the guest list by the organizer but has not been invited yet
  • Invited / thereof opened
    The guest has been invited by the organizer but has not yet signed up for the event
  • Unconfirmed registrations
    The guest has signed up for the event but has not yet confirmed their participation via DOI procedure
  • Registration (open)
    The guest has signed up, but you still have to accept or reject their registration
  • Registration confirmed
    The guest has signed up and their participation in the event has been confirmed
  • Appeared
    The guest has arrived at the event / has been checked in
  • Canceled by guest
    The guest has canceled their participation in the event
  • Canceled by organizer
    The organizer has cancelled the guest's participation
  • Invited & opened event page
    The guest has been invited and has already viewed the event page, but has not yet signed up
  • Order Status
    • Payment process open
      The payment process has not yet been completed
    • Waiting for receipt of payment
      The order process has been completed, the system is waiting for receipt of payment
    • Waiting list
      The guest is on the waiting list and is currently waiting for a place to become available for them
    • Paid
      The guest's payment has been received
    • Canceled
      Die order has been canceled
    • Refunded
      The order has been canceled and the amount paid by the guest has been refunded

Add a guest

Add a guest -

If you hover over or click on the “+Add guest” button, you can add one or more guests to the guest list of your event.

You have various options for this:

  • With email address
  • By name
  • Rule-based from address book
  • Create sample guests
  • Create blank guests
  • Import guests from excel

With email address

With email address -

How to add guests using their e-mail address:

  • Click on the “+Add guest” button above the guest list
  • In the dialogue window, enter the desired e-mail address(es) in the field
  • Multiple e-mail addresses can either be separated with , or inserted one below the other in the field (e.g. copied from an Excel table or list) 
  • If you would like to immediately invite the guests to the event by email, you can also activate the “Send invitation” option
  • You can then customize the invitation text and add placeholders as desired
  • Now confirm that you have the consent of each individual person
  • Click on “Invite” (or on “Add” if you have decided against sending an invitation email right away)
  • Done - the guests are now added (and invited, if the corresponding option was activated)

By name

By name -

This is how you add guests by entering their name:

  • Click on the “+Add guest” button above the guest list
  • In the new window, switch to the “By name” tab
  • You can now enter the first name and/or surname of a guest here
  • guestoo will then automatically search your guestoo address book for guests with this name
  • Click on the respective name to add the guest to the list
  • You can remove accidentally added guests by clicking on the trash can icon
  • By clicking on “+Add row” you can add as many additional guests as you like
  • Once you have added all guests, you must now confirm that you have the consent of each individual person
  • Click on “Add” to add the selected guests to the guest list
  • Alternatively, you can also click on “Add & edit” - the master data of the added guests will then open in a new window where you can customize them directly
  • Done - the guests have been added to the event!

From address book

From address book -

This is how you add all guests from your guestoo address book who meet the criteria you have defined:

  • Click on the “+Add guest” button above the guest list
  • In the dialogue window, switch to the “From address book” tab
  • Here you can define the desired criteria according to which the guests from your address book should be added to the guest list.
    Note: Only contacts that meet ALL of the criteria you specify will be added to the guest list!
  • I want to import all guests and not filter by keywords, campaigns or consents
    If you activate this option, ALL people in your guestoo address book will be added to the guest list
  • Tags
    Here you can select which tags must be specified for the person to be added to the guest list. Multiple selection is possible, but this means that ALL tags must be saved on the person for them to be added.
  • Campaigns
    Here you can select which campaigns the person must be assigned to in order for them to be added to the guest list. Multiple selection is possible, but this means that ALL campaigns must be saved for the person to be added.
  • VIP status
    Here you select which status the persons must be in in order to be added: All, Normal or VIP
  • From other event
    Here you can select an existing event to add all guests of this event to the guest list
  • Agreements
    Here you can define one or more agreements that people must have consented to in order to be added to the event's guest list
  • If you would like to invite guests who meet these conditions to the event by email immediately, you can also activate the “Send invitation” option
  • You can then customize the invitation text and add placeholders as desired
  • Now you only have to confirm that you have the consent of each individual person to add them to the event
  • Click on “Add” (or "Invite" if you have enabled the option to invite the guests to the event immediately) to add the selected guests to the guest list
  • Done - the guests are now added (and invited)!

Sample guests

(Pro subscription and higher)

Sample guests - (Pro subscription and higher)

Creating sample guests is helpful when you do not yet have any specific guest information, but would like to already specify certain information or campaigns.


You can use sample guests to give certain groups of guests the same invitation code. This code can then be used to sign up X times and every guest who signs up will have the same default settings you have set up on the sample guest (e.g. certain event-specific fields, permission to bring accompanying persons, ticket promotion codes, keywords, etc.).


This is how it works:

  • Click on the “+Add guest” button above the guest list
  • In the dialogue window, switch to the “Sample guests” tab
  • Here you specify how many sign ups should be possible for this sample guest. This can either be a concrete number or the value “-1” if the number of registrations should be unlimited
  • Click on “Add” to add the sample guest to the guest list
  • Alternatively, you can also click on “Add & edit” - the master data of the sample guest you have just added will then open in a new window, where you can customize it directly, e.g. to specify a campaign or information that you already have.
  • Done - the sample guest is now added!
  • Note: Sample guests are displayed in the guest list with a striped background!
Possibilities

As soon as you have created a sample guest, you have exactly the same options for this guest as you do for any other guest.

If you click on the gearwheel next to the sample guest, you can:

  • Edit the master data of the sample guest (e.g. to specify information, campaigns, keywords, etc.)
  • Send an invitation by e-mail (in order to do this, an e-mail address or deputy e-mail address must be specified in the master data in advance)
  • Send info mailings to the sample guest
  • Copy the invitation link for the sample guest and pass it on.
    You can find the URL by clicking on the gear icon and choosing the “Edit” menu item and switching to the “Settings” tab in the dialog window. The invitation link can be found under the “Guest access” section
  • Note: Sample guests are not real guests, but serve as a template or sample for signing up real guests.
Use examples
  • An event to which several companies receive an invitation:
    • A sample guest is created for each company
    • For each sample guest, you can define how many guests are allowed to sign up via the sample guest's registration link (e.g. 20 guests for company 1, 30 guests for company 2).
    • If desired, the company address and other information can be specified in advance on the sample guest
    • Each company receives the respective registration link of the associated sample guest, so that several employees of this company can sign up as guests via the same URL
  • An event to which visitors to a particular trade fair are to be invited:
    • A sample guest is created for which a campaign is specified in order to be able to identify the guests as visitors to this trade fair at a later date
    • The registration link of the sample guest will be passed on to the visitors of this trade fair
    • The campaign is automatically saved to all guests who have used the registration link

Blank guests

Blank guests -

Creating blank guests is helpful if, for example, you do not yet have any guest information or simply need a lot of invitation codes for your event. Each guest receives a unique invitation code that you can print on invitation cards, for example.


This is how it works:

  • Click on the “+Add guest” button above the guest list
  • In the new window, switch to the “Blank guests” tab
  • Here you enter how many blank guests you would like to create
  • Click on “Add” to add the blank guests to the guest list
  • Alternatively, you can also click on “Add & edit” - the master data of the guests you have just added will then open in a new window where you can customize them directly
  • Done - the blank guests are now added!

Import guests from Excel

Import guests from Excel -

How to add guests via Excel import:

  • Go to the “Guests” tab of your event
  • Click on the “+Add guest” button above the guest list and select the menu item “Import guests from Excel”
  • Download the master file and customize your Excel spreadsheet according to the master file.

    Important: In order for the import to work, the header rows of the columns must be named exactly as in the example. The order does not matter.
  • Tip: You can also make a guest export, change the data in the Excel spreadsheet and add new guests and then import this file again. After the export you will receive a report by email. To view the report, you will need the password that is displayed here
  • XLS file
    Here you select the Excel file from which you want to import the guests into guestoo
  • Assign tags
    If you wish, you can select or add tags here that are to be assigned to the imported guests
  • Assign campaigns
    If you wish, you can select or add campaigns here that are to be assigned to the imported guests
  • Add guests to an event
    Here you can directly add the imported guests to the guest list of an event. The guests do not yet receive a notification - you can trigger this in the “Guests” tab of the event if you wish. Note: Only events with a “to” date that is set after the current date are displayed, regardless of their status.
  • Overwrite existing guest data with the data from the Excel import
    By default, existing guests are only assigned the tags and campaigns specified above. If you activate this option, you can select which other guest data should be overwritten
  • Now you only have to confirm that you have the consent of each individual person
  • Click on “Add” to add the guests to the guest list
  • Done - the guests are now being imported!
  • As soon as the import of the guest data is completed, you will receive an email with an import report to the email address with which you are currently logged in to guestoo with. The attached file gives you an overview of the successfully imported guests and any error messages if the import of one or more guests didn't work
Important notes on Excel imports
  • When importing, only the first sheet of the Excel file is taken into account! Therefore, make sure that the first sheet contains the correctly formatted data of your guests.
  • A maximum of 5000 lines can be imported at once using the Excel import. Empty rows are also counted - so make sure you delete any unnecessary empty rows before uploading the file!
Explanation of the Excel import columns

Note: The Excel import currently only works with German terms for the columns. Please stick to these exact column names when importing an Excel file.

  • E-Mail
    Please note that each email address may only exist once, as guests are uniquely identified by their e-mail addresses! If you would like to import several guests with the same e-mail address, please use the “Stellvertreter E-Mail (Event)” column for this purpose
  • guestoo ID
    Please note that each guestoo ID may only exist once, as it uniquely identifies each guest. If you create several guests with the same guestoo ID in the import, the data of the first line created with this ID will be overwritten with the data of the last line created with this ID.

    Example:
    Line 1: guestoo ID: 4321 - Name: Herbert
    Line 2: guestoo ID: 4321 - Name: Luise
    -> Only one guest with the guestoo ID “4321” is created. The name of the guest is “Luise”
  • Externe ID
    The external ID must also be unique for guestoo. Follow the same instructions as for the guestoo ID.
  • Stellvertreter E-Mail / Stellvertreter E-Mail (Event)
    If you want to create several guests with the same email address, you can use the proxy email for this. The “Stellvertreter E-Mail” column stands for the e-mail address defined globally in the address book for the guest, the “Stellvertreter E-Mail (Event)” column only refers to the event.
  • Benachrichtigungen
    In this column you can enter the email address(es) that should be notified as soon as the guest's status changes. You can separate multiple addresses with a semicolon ; 
    You can find out how to enable these notifications on this page.
  • E-Mail-Absender
    You can set for each guest which email address should be displayed as the sender for the emails you send to them from guestoo.
    In order to do this, you can use the following columns:
    • Mail-Absender Name
      Here you enter the name that should be displayed as the sender, e.g. Max Mustermann, Mustermann Events, etc.
    • E-Mail-Absender Adresse Name
      Here you enter the part of the email sender address that comes before the @. If the sender address should be invitation@guestoo.de, you would enter “invitation” in this column
    • E-Mail Absender Adresse Domain
      Here you enter the part of the email sender address that comes after the @. If you want the sender address to be invitation@guestoo.de, you would enter “guestoo.de” in this column
  • VIP 
    Here you can specify whether the guest should have VIP status.
    Available options: Ja / Nein (Translation: Yes / No)
  • Sprache
    Here you enter the abbreviation of the language that is also used for the translations in guestoo
    Example: DE, EN, FR ...
  • Ticket Promotion Code
    Here you can enter a promotion code that should automatically be applied to the guest when purchasing a ticket. This is useful, for example, if you want to give certain guests a discount on their purchase. In order to do this, the voucher must first be created. You can find out how to do so on this page.
  • Eventspezifische Felder Codes
    You can also use the import to fill in the event-specific fields you have created for your guests.
    In order to do this, go to the “Settings” tab of the event-specific field and copy the name that is displayed under the “Import field” section.

    Example: Free text (7eb81769-80dd-453f-af9f-c5b98740d81b)
    -> “Free text” can be replaced by a text of your choice, e.g. the name of the event-specific field. However, it is important that the brackets and the ID remain unchanged!

    Tip:
    If you want to fill in several event-specific fields and do not want to search for the code for each individual field, you can also simply download an Excel export of the event and fill it with the corresponding guest data and then import it.

Managing guests

You have various options for managing your guests in the guest list.


You can find these by clicking on the cogwheel symbol next to the relevant guest.

Alternatively, you can also perform a bulk action by placing a checkmark next to all desired guests or clicking on the “Select all” button. Then click on “Selected (X)” in the top right-hand corner and select the desired action.

You will find the following options/actions in both menus:

  • Edit
    Redirects you to the guest's master data. You can find more information about the options you have there on this page.
  • Remove
    Deletes the guest from the event. The deletion must be confirmed again and you have the option of informing the guest of the deletion by email beforehand.

Guest List

  • Reset status
    You can use this function to reset the guest's status to “Added”, e.g. if the guest was accidentally confirmed manually.
    Important: An existing order is not automatically canceled when this function is used. If the guest signs up again after their status has been manually reset, existing orders will be canceled and not automatically reversed.
  • Mark as invited
    Here you can mark the guest as invited if you have invited them outside of guestoo, e.g. by telephone or by printed invitation.
    Only displayed if the guest is in the “Added” status.
  • Confirm manually
    You can use this to manually confirm the guest if they have confirmed their participation in the event outside of the guestoo invitation process, e.g. by telephone.
    Only displayed if the guest has the status “Added” or “Invited”.
  • Confirm
    With this option you confirm the guest's participation in the event. This option is only displayed if:
    • “Manual confirmation by the organizer” is activated in the event settings
      or:
    • the order has not yet been marked as paid. If you accept the participation of a guest whose order has not yet been marked as “Paid”, you will be asked whether you would like to mark the order as “Paid” at the same time.
  • Cancel
    With this option you cancel the guest's participation in the event. This option is only displayed if:
    • “Manual confirmation by the organizer” is activated in the event settings
      or:
    • the order has not yet been marked as paid. If you cancel the participation of a guest whose order has not yet been marked as “Paid”, their order will be automatically canceled.
  • The guest has canceled
    You can use this option if the guest has canceled outside of guestoo (e.g. by phone). In the next step, you will be asked to confirm the cancellation and have the option of sending the guest a cancellation confirmation.
  • Check-in
    Here you can check the guest in. This view is very minimalistic and allows you to select which guests from the registration you want to check in (if accompanying persons have also been signed up), select the date and time of the check-in and specify a check-in note.
  • Check-out
    Here you can check out the guest when they leave the event.
  • Check-in view
    Here you can check the guest in. This view is a little more detailed. It allows you to add additional accompanying persons to the guest directly on site. You will also see the event-specific information that was requested from the guest in the registration form. You have the choice of checking in all the people signing up at once or separately.

Guest service

  • Rebook (into another event)
    With this option you can rebook a guest to another of your events. You can find more information about this here.
  • Resend confirmation + ticket
    With this option, the confirmation email including the ticket is sent to the guest again.
  • Download ticket
    You can download the guest's ticket here.
  • Contact documentation
    By clicking on this option, you can download a contact sheet of the guest, which documents the origin of the guest, as well as the confirmation of the DOI e-mail and all given consents. Which data this contact sheet contains and how you can download a contact documentation of all your guests is described on this page.

    Note: The PDF file with the contact documentation is downloaded directly. You will not receive it by email.
  • Info mailing to this guest
    Here you have the option of sending an info mailing to the guest, which you can personalize in the next step.
  • Write email
    If you click on this menu item, you will be redirected to your email program to write an email to the guest.
    Note: Emails sent in this manner are not documented and saved in guestoo!

Bestellung

  • Resend payment information
    Sends the guest the email with the required payment information again with one click.
  • View order
    Clicking on this option will take you directly to the overview of the guest's order for this event.
Kapitel-/Abschnittsübesicht
Guests