Info

Here you can find out how to manage the basic information for your event.
All the settings explained here can be found in the “Info” tab of your event or event template.

Du kannst für das guestoo Back-End zwischen zwei Darstellungsoptionen wählen. Die Screenshots in der Doku basieren auf dem "Klassischen Design".
Hier siehst Du die Unterschiede, damit Du dich auch im "Modernen Design" zurecht findest: » guestoo Back-End-Design

Note: If you cannot see some of the sections explained on this page, there may be two reasons for this:


1) You may not have the required subscription to use the corresponding function.


2) The sections are hidden. To reveal them, scroll to the bottom of the “Info” tab and click on “Show more options”.
There, you can customize which sections should be displayed and which should be hidden so that you have a better overview. :)

Event or template

Event or template -

Here you specify whether you want to create an event or a template.

Differences between events and templates
  • Guests can register for an event, but a registration is not possible with an event template.
  • Templates can be used as samples for recurring events. You can customize a template according to your wishes and then create any number of events from it. This can save you a lot of time and effort, especially when you are planning frequently recurring events or several similar events.

What & Event image

What & Event image -

In order to make changes to your event, first click on the "Edit" button in the top right corner.

  • Name: Here you can define a name for the event. You can use this name to search for the event later in the event overview and it is also the event name that will be publicly displayed to your guests.
  • Subtitle: Here you can enter a subtitle to describe your event in more detail if you wish. The subtitle will also be publicly displayed to your guests.
  • Internal name: If you wish, you can enter a name that you internally use for your event, e.g. if you use a different name for the event for internal administration than the one that is displayed to the guests. If you enter a name here, you and the other users of the guestoo agency will first see it in the event overview. The public event name is then displayed right after the internal name.
  • External Event ID: If available, you can enter an ID here that you use for this event outside of guestoo. Your guests will not see this event ID - it only serves to make internal administration easier for you.
  • Event image: Here you have the opportunity to upload a picture to make your event even more vivid and individual.

    The uploaded image file must meet the following requirements:
    • File type: PNG oder JPG
    • Longest side: minimum 2000px
    • DPI: 72
    • Colors: RGB
    This image will be shown here:
    • Event site, Emails:
      The image will not be cropped
    • Apple Wallet ticket, Admission ticket (as a fallback, if you don't upload another picture there):
      The image will be cropped to a square
    Note: If you use the feature Echte Mehrsprachigkeit, you can maintain a separate event image for each language. Therefore, when changing the event image, make sure to edit the event image in all language tabs that are relevant for your event!

Important: As soon as you have made all the desired changes, don't forget to confirm them by clicking on the “Save” button (top right).

When

Here you specify the date and time of the event

When - Here you specify the date and time of the event

Here you specify the date and time at which your event will be taking place

  • In order to make changes to your event, first click on the "Edit" button in the top right corner
  • From / Until
    Specify the date and time of the event start (“From”) and the date and time of the event end (“Until”).
  • Note:
    If your event does not have a specific date, you can click on the “Event has no date” button.
  • Additional info
    You can enter further information for your guest in this text field, e.g.: “Admission 30 minutes before the start of the event”, “Please use the North Entrance”, etc.
  • Registration possible from / Registration possible until
    Here you can specify from when or until when registration for your event is possible. This registration deadline can also be set if the event does not have a fixed date!

    Important note:
    If you activate the registration for the event only from a certain date, you and all other logged-in manager users still have the possibility to access the registration form for the event so you can see how the changes you have made affect the registration form. However, if you try to register, you will receive an error message as event registration is only possible from the specified date! If you want to see the event site in the exact way a guest will see it, please use an incognito window of your web browser!
  • Time zone
    Here you select the time zone in which the event and the associated times should be displayed. If you do not select a specific time zone here, “Europe/Berlin” is automatically set as the time zone.
  • Time format
    Here you select the format in which the event-related times are to be displayed. You have the choice between:
    • 24h-Format (10:00, 11:00, 12:00, 13:00, 14:00 ...)
    • 12h-Format (10:00, 11:00, 12:00, 01:00, 02:00 ...)

Important: As soon as you have made all the desired changes, don't forget to confirm them by clicking on “Save” (top right).

Type of event

Here you define what kind of event you want to organize

Type of event - Here you define what kind of event you want to organize

In order to make changes to your event, first click on “Edit” in the top right corner.


You can choose between:

  • Online event
    An event that takes place solely digitally, e.g. via a livestream or an online meeting.
  • On location event
    A classic event that takes place exclusively on site, i.e. all guests will come to the event location to take part in the event.
  • Hybrid event
    An event that takes place both online and on site - in other words: there are both participants who attend the event on site and participants who follow the event digitally via livestream or online meeting. You can find a quick guide to creating a hybrid event here.

Important: As soon as you have made all the desired changes, don't forget to confirm them by clicking on “Save” (top right).

Where

Here you specify the location of the event

Where - Here you specify the location of the event

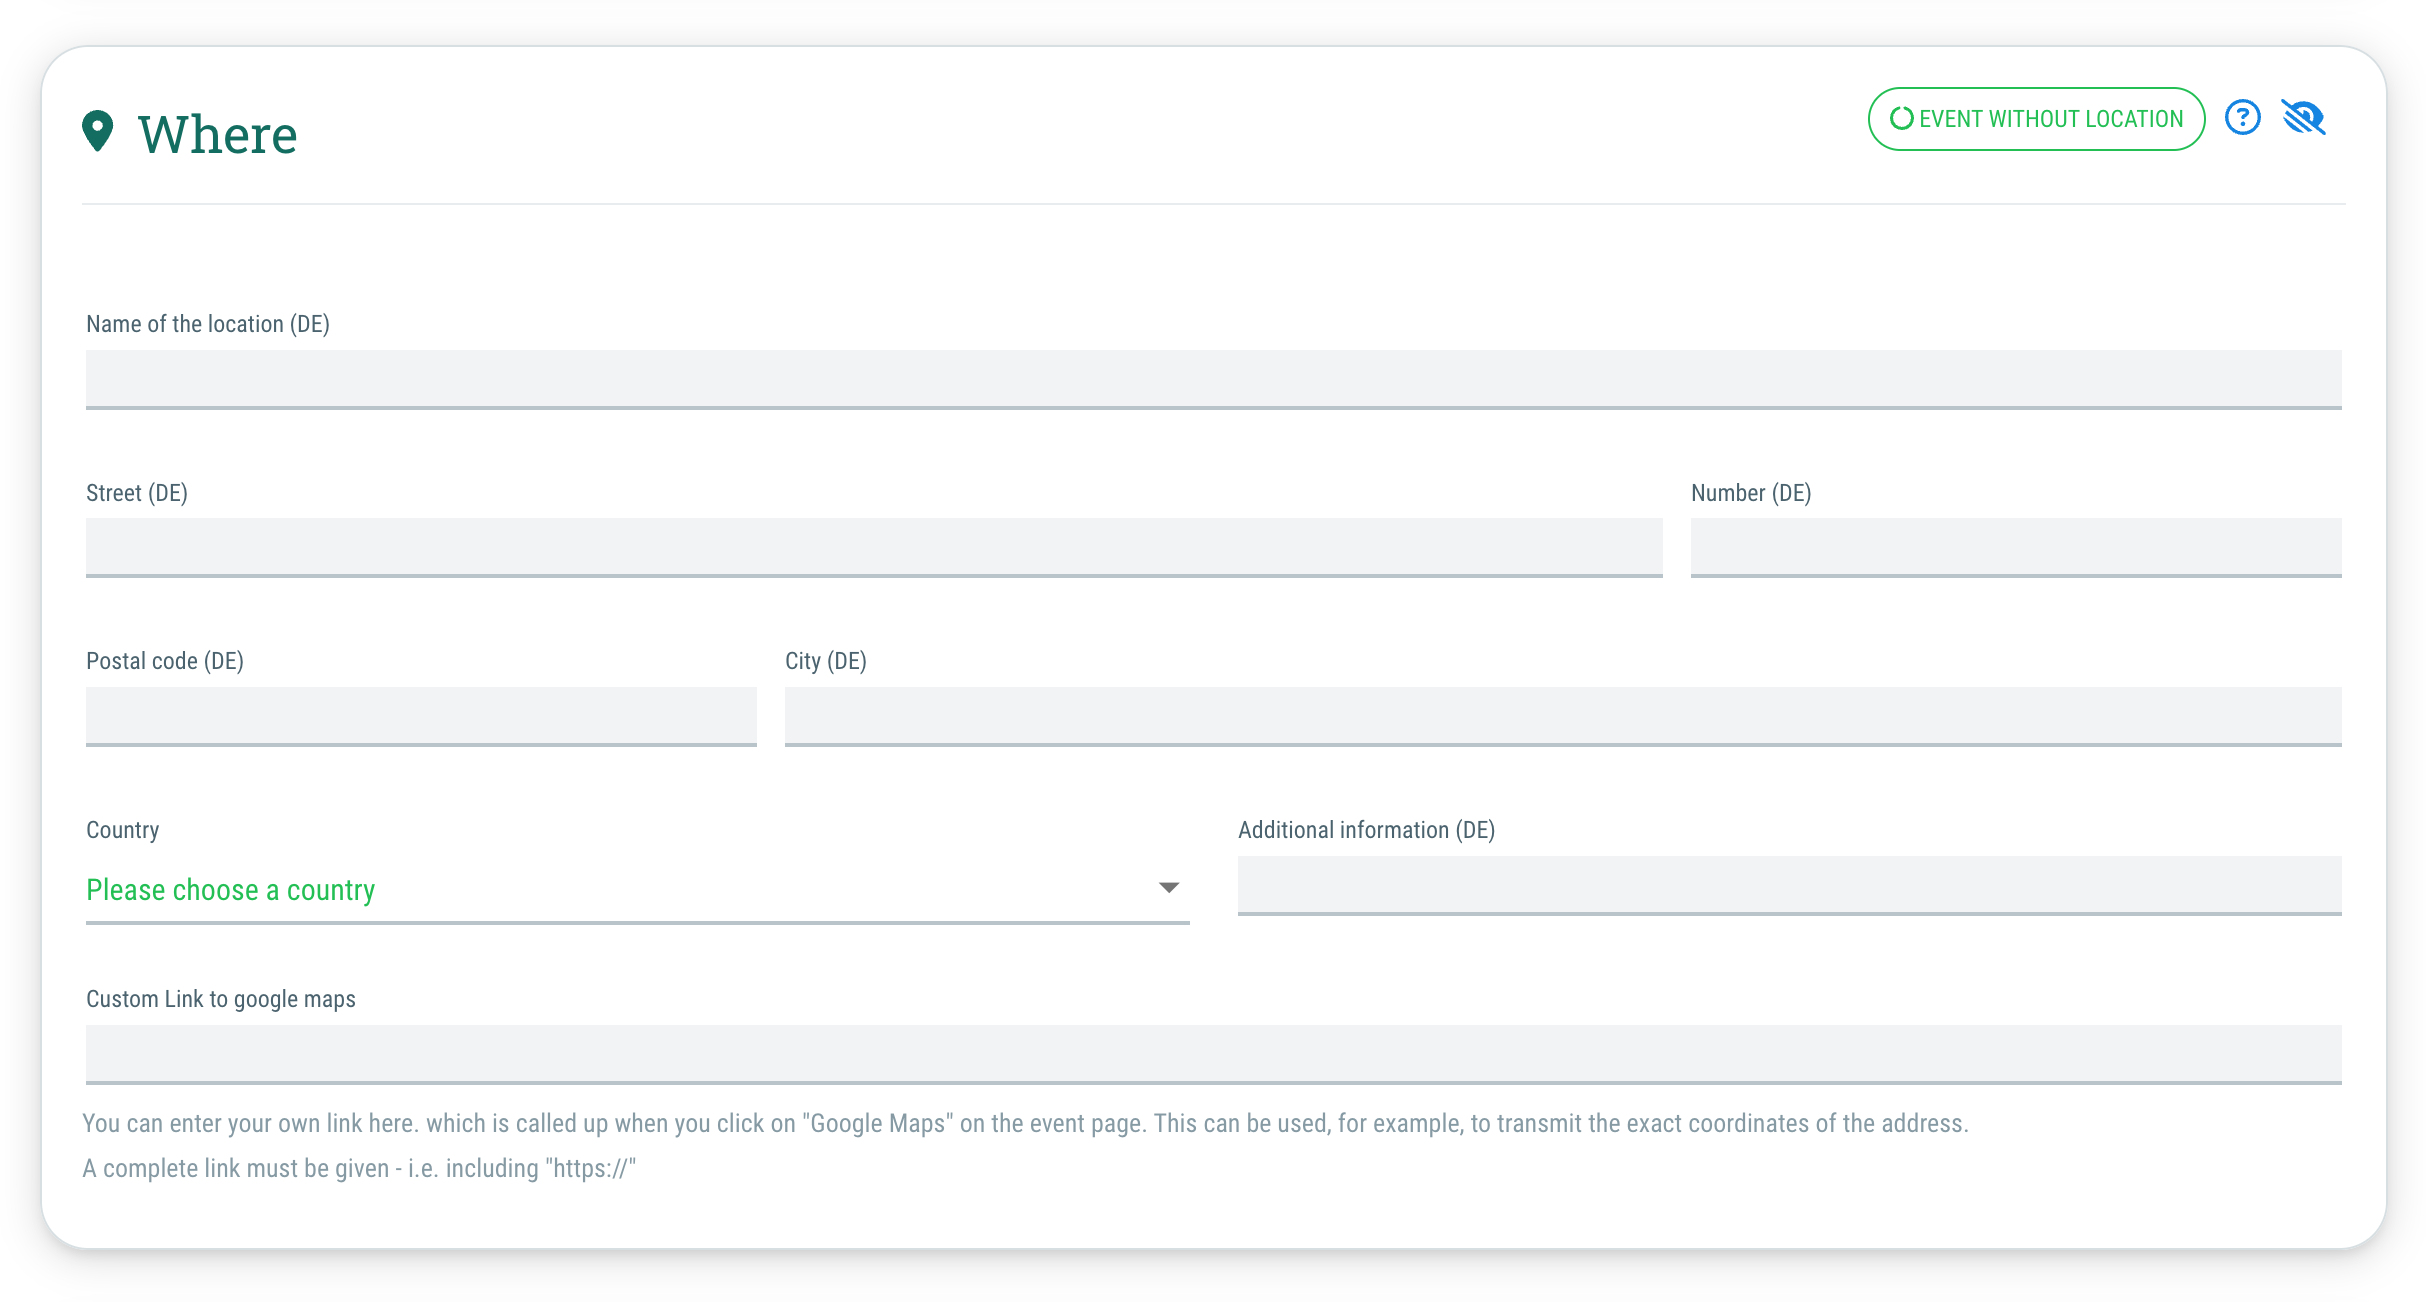
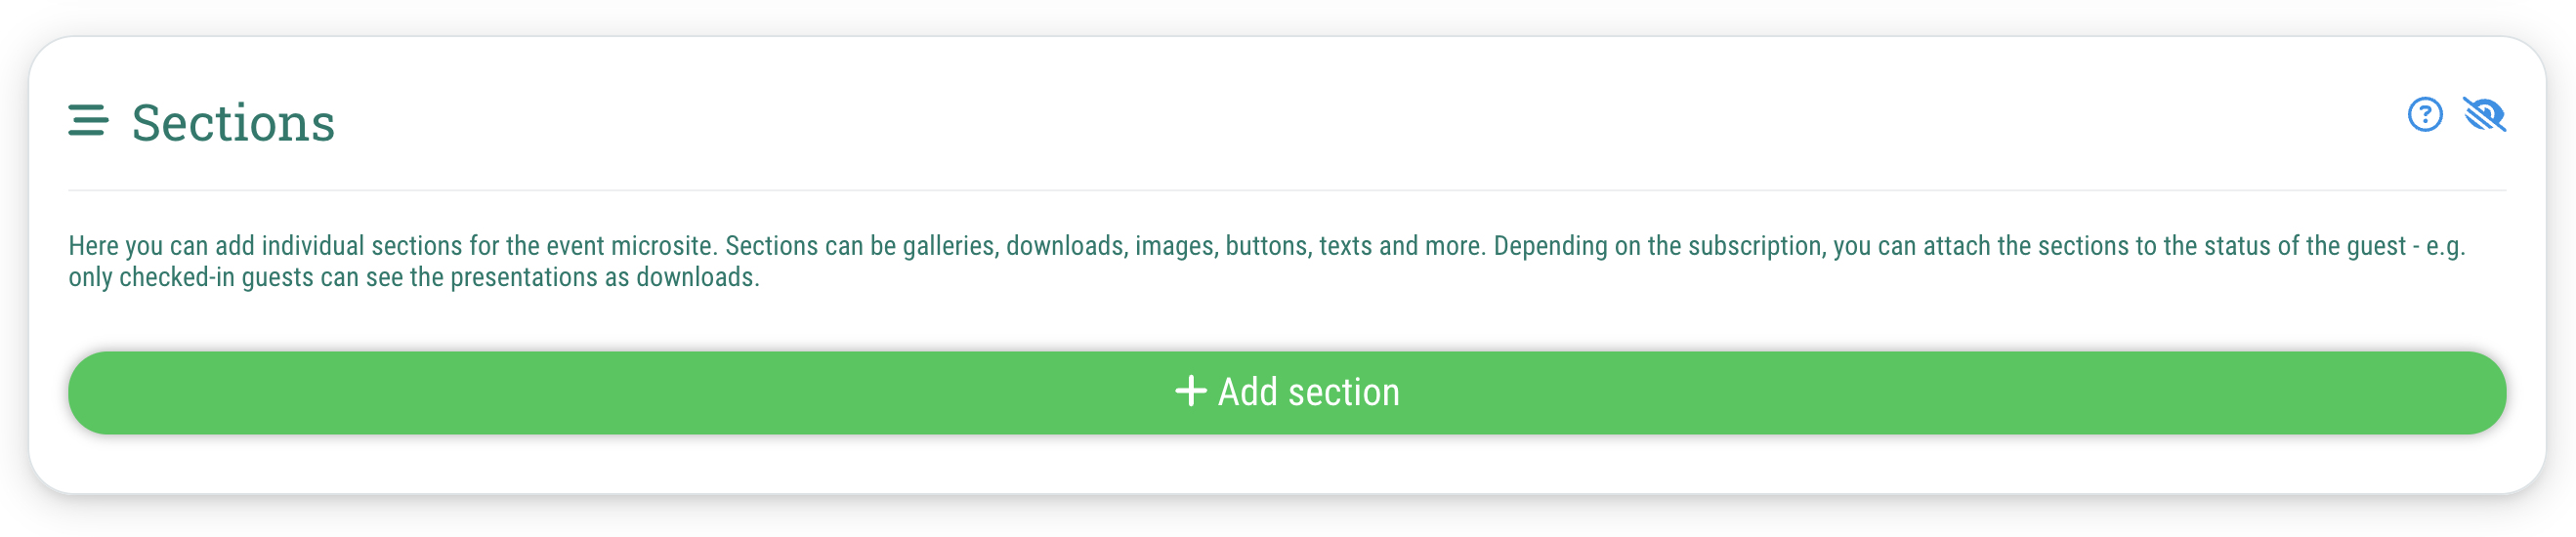
In this section, you specify where your event will take place.

Important: This section is only displayed if you have selected “On-site event” or “Hybrid event” as the type of event.


In order to make changes to your event, first click on “Edit” in the top right corner.


You can enter the following details:

  • Name of the location: e. g. Trade fair hall 2
  • Address: Street, Number, Postal code, City
  • Additional address information: Here you can provide additional information about the parking situation or other important information for your guests.
  • Note:
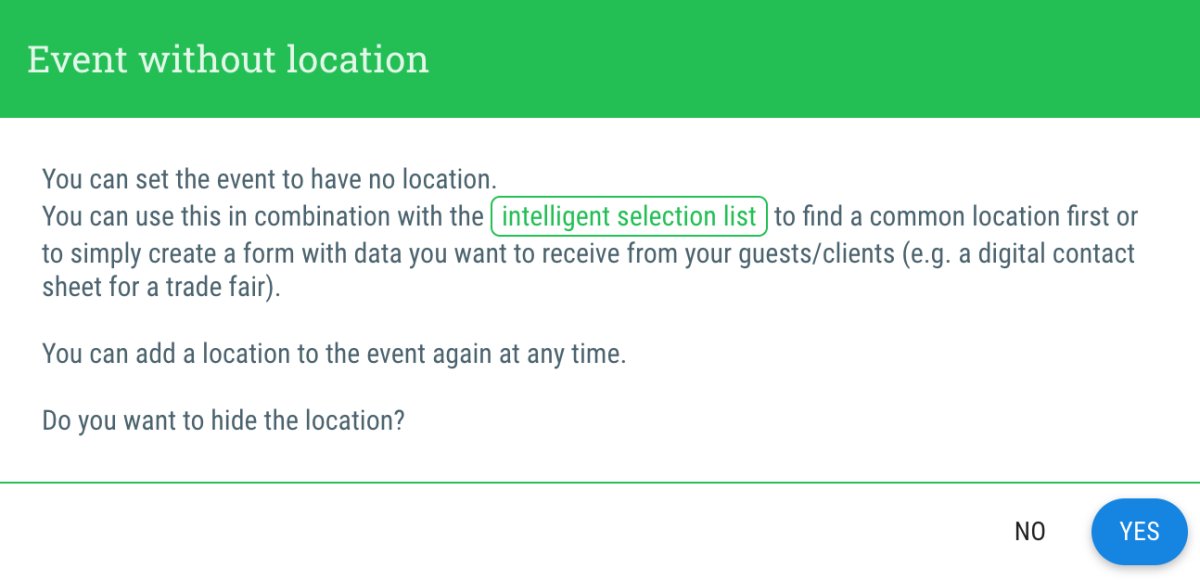
    If your event does not have a specific location, e.g. because you want to use timeslots to allocate appointments or only want to use the form to collect data from your guests/clients, you can also click on the “Event has no location” button here.

Note: If you use the feature Echte Mehrsprachigkeit, you can enter a dedicated address for each language. However, the complete address must be entered in each language used, even if, for example, the street remains the same. When changing the address, make sure to edit it in all language tabs that are relevant for your event!

Important: As soon as you have made all the desired changes, don't forget to confirm them by clicking on “Save” (top right).

Meeting URL

Enter the meeting URL for digital events

Meeting URL - Enter the meeting URL for digital events

Important: This section is only displayed if you have selected “On-site event” or “Hybrid event” as the type of event.


If you enter a URL here, it will be displayed in the address line of the event's calendar entry.
Many calendars then also show directly that it is a digital meeting and it is easier for your guest to recognize how to access the meeting.

Meeting URL when using timeslots

If you are offering several rooms at an event and the guest can select one of those via a timeslot field (Event > Form > Event-specific fields) when signing up for the event, you can enter an individual meeting URL for each individual timeslot. In order to do this, you must activate the calendar entry in the timeslot field.

Self-Check-in/-Check-out

If you are working with Self-Check-in/Check-out (Event > Settings), you can also insert the placeholder for the Self-CheckIn link in the field for the meeting URL:

  • Self-Check-in-Link[[guest.checkinLink]]Adds a link that allows the guest to check in via guestoo and then redirects to the meeting URL. But for this you must have activated the self-check-in

Important: As soon as you have made all the desired changes, don't forget to confirm them by clicking on “Save” (top right).


Contact details for visitors

Contact details for visitors -

Here you can enter the details of a contact person for your guests in case they have any questions.

To make changes to your event, first click on “Edit” in the top right-hand corner

You can enter the following data here:

  • Name of contact person: Name of the person, which your guests can contact if they have any questions or problems regarding the event.
  • Phone number: e. g. 0123 456789
  • Email: e. g. kontakt@muster-event.de
  • Additional contact information: e. g. "Available daily from 9am to 5pm"

Important: As soon as you have made all the desired changes, don't forget to confirm them by clicking on “Save” (top right).

Editorial texts

Here you can manage the editorial texts

Editorial texts - Here you can manage the editorial texts

To make changes to your event, first click on “Edit” in the top right-hand corner

The following input fields are available:

  • Intro text: Will be displayed as an introductory text on top of the event microsite.
    Tip: In order to format the text, you can use HTML tags, like <b>Text</b> for bold text.

  • Description: Is displayed on the event microsite. You can use this to give your guests further information regarding the event and to give them an idea what's waiting there for them.

  • Intro text registration form: This is the text that will be displayed above the registration form.
    Tip: In order to format the text, you can use HTML tags, like <b>Text</b> for bold text.

  • Note: To personalize the editorial texts, you can use the placeholders that are displayed above the input fields. Simply click on the respective placeholder to copy it to your clipboard and then paste it in the desired position. You can find an overview of all the placeholders you can use on this page.

Important: As soon as you have made all the desired changes, don't forget to confirm them by clicking on “Save” (top right).

Sections

(Basic subscription and higher)

Sections - (Basic subscription and higher)

With the Basic subscription and higher, you have the option of customizing your event page even further by using sections.


This is how it works

  • Go to the "Info"-Tab of your event
  • Scroll to the "Sections" section 
  • Click on "+New section" in order to create a new section
  • Choose the desired Display type in the dropdown menu and enter the necessary information
  • Click on "+Create new" in the bottom right corner
  • Done - the new section has been created! 
Presentation types

To make your event page as individual as possible, you can choose from various display types:

  • Normal content display
    Section with a headline, sub-headline, image and body text
  • Section header
    Section headline, sub-headline and (if provided in the chosen template) an image
  • Image only
    Section that consists only of an image
  • Text only
    Section that consists only of text
  • Collapsible (Click to see details)
    Shows the headline, sub-headline and a small preview image - by clicking on it, the section expands and the text and full uploaded image are displayed
  • Explanation
    Displays a headline, sub-headline and a small preview image
  • YouTube video
    Embed a video on your event page using the YouTube video ID
  • Custom HTML
    Here you can enter your own custom HTML code to display content on your event page
  • Button
    Adds a button with a customizable label that leads to the specified link
  • Gallery
    Adds a gallery to which you can upload multiple images
  • Downloads
    Inserts a download overview in which you can make one or more downloads available to your guests
Tab "Settings"

If you create or edit a new section, there is not only the “Content” tab for each section, but also a “Settings” tab.

Here you have the following options:

  • Status
    Here you can choose whether the section is active or inactive. Inactive sections are not displayed - you can use this status to prepare sections for a later date or to hide a section that is no longer required
  • Design-Details:
    • Width
      • 100%
      • 50%
      • 33,33%
      • 25%
    • Color: Background
      Here you can specify a hexadecimal code (#000000) for the background or select a background color for the section using the color picker tool.
    • Additional classes
      Here you can add additional classes for the section
    • Show in menu
      Here you can choose whether the section should appear as a link in the side menu. If this option is activated, the guest can jump directly to this section by clicking on the menu item
  • Visible for guests in status
    If the feature "Sichtbarkeit der Abschnitte für die Event-Microsite" is included in your guestoo subscription, you can specify here which status your guests need to have in order to be able to see this section:
    • Without invitation
    • Added
    • Invited
    • Registration (open)
    • Registration confirmed
    • Attended the event (checked in)
    • Cancelled by organizer
    • Cancelled by guest
    • Keywords:
      Here you can select a keyword from the drop-down menu that must be assigned to the guest in order for them to be able to see this section of the event page.

Note: You can also use placeholders to personalize the texts within the sections. You can find an overview of all the placeholders you can use on this page.


Important: As soon as you have made all the desired changes, don't forget to confirm them by clicking on “Save” (top right).

File upload (Pro subscription and higher)

To provide your guests with files containing further information

File upload (Pro subscription and higher) - To provide your guests with files containing further information

This is a feature that is not included in all of our subscription plans. You can find an overview of the subscriptions in which the feature is included or can be booked on this page. To book the feature for your subscription, visit the Feature Shop (you can find it under Agency > Feature Shop or directly under this link).


To make changes to your event, first click on “Edit” in the top right-hand corner

  • Here you have the option of uploading one or more files to make them available to your guests
  • Select the desired file or drag and drop it into the browser window
  • As soon as the file has been uploaded, you have the option of entering a title and the conditions under which the file will be sent to your guests or offered for download:
    • Show on the event microsite: Your guests can download the file from the event microsite.
    • Attach to invitation email: The file will be attached to the invitation email.
    • Attach to confirmation email: The file is attached to the appointment confirmation e-mail and can be used for providing files with further information that is only relevant for guests who have already confirmed their participation.

Important: As soon as you have made all the desired changes, don't forget to confirm them by clicking on “Save” (top right).

Ticket Text

For further important information for your guests

Ticket Text - For further important information for your guests
  • Here you can enter a note that will be displayed on the ticket, in the calendar entry, the Apple Wallet ticket and the reminder email
  • You can use this note to remind your customers to bring their ID or make them aware of other things they should keep in mind for the event
  • The note is highlighted and is therefore well suited for important and compactly summarized information
Useful for
  • Important notes
  • Compact information that you want to remind your guests of again
  • etc

Note: You can also use placeholders to personalize the ticket text. You can find an overview of all the placeholders you can use on this page.


Important: As soon as you have made all the desired changes, don't forget to confirm them by clicking on “Save” (top right).

Default email texts

Default email texts -

This section has been moved. You can now find it in the new “Emails” tab of the event.

You can find the full documentation for the standard e-mail texts on this page.

Legal texts

Here you can find out which legal texts are required and what you should be aware of

Legal texts - Here you can find out which legal texts are required and what you should be aware of

To ensure that your event fulfills all statutory and legal requirements, it is important that you maintain the following legal texts:

  1. Imprint
  2. Privacy Policy
  3. optional: Conditions

Note: If you do not maintain the legal texts in the event, the legal texts that you have saved in the agency settings will automatically be used.

Important note

Please note that guestoo does not offer legal advice and our information does not claim to be complete! If you have any legal questions or need help with the creation of legal texts, please contact a lawyer, legal advisor or data protection officer.


Important: As soon as you have made all the desired changes, don't forget to confirm them by clicking on “Save” (top right).


Custom Call-to-action

This is how you can refer the guest to your own page after registration

Custom Call-to-action - This is how you can refer the guest to your own page after registration

Here you can create your own Call-to-Actions, i.e. a button that is displayed to your guests after a specific action and that redirects them to your website, for example.

There are two different Call-to-Actions that you can use:

Button after registration
  • This button is displayed in the following places: in the confirmation dialog, on the Double-opt-in confirmation page, in the confirmation email and on the event page (from the “Registered open” status onward)
  • In order to use this, you have to fill out the following fields:
    • Link in confirmation dialog:
      Here you enter the URL of the page to which the guest should be redirected

      Important: Don't forget the https:// at the beginning of your URL! You can also use placeholders in your URL, e. g. https://yourWebsite.com?ref=guestoo&guestId=[ [guest.id] ] Remove the spaces between the square brackets!
    • Button label:
      Here you enter the text that should be displayed on the button, e.g. “To our website”, “View more events”, etc.
  • An example for how you can use a Call-to-action after a successful registration can be found here.
Button after cancellation
  • This button is displayed in the following places: in the confirmation dialog of the cancellation and in the cancellation email
  • In order to use this, you have to fill out the following fields:
    • Link in confirmation dialog:
      Here you enter the URL of the page to which the guest should be redirected

      Important: Don't forget the https:// at the beginning of your URL! You can also use placeholders in your URL, e. g. https://yourWebsite.com?ref=guestoo&guestId=[ [guest.id] ] Remove the spaces between the square brackets!
    • Button label:
      Here you enter the text that should be displayed on the button, e.g. “Book alternative date”, “View other events”, etc.
  • You can use this Call-to-action to redirect your guests to the event overview page to book an alternative date or show them other relevant information about future events they might be interested in

Important: As soon as you have made all the desired changes, don't forget to confirm them by clicking on “Save” (top right).

External promotion code

(Business subscription and higher)

External promotion code - (Business subscription and higher)

With this option, you can send the guest a promotion code (e.g. in the confirmation email). This makes sense if, for example, you have a petrol station as an event sponsor and every participant in the event should receive 25% off a car wash at the petrol station.

This is how it works:

  • Go to the "Info" tab of the event and scroll to the section "External promotion code"
  • Click on "Edit" in the top right corner
  • First, choose the type of promotion code you wanna use. You can choose between:
    • Image: If you choose this type of promotion code, you can upload a picture that includes the code
    • Barcode: If you choose this type, enter the code that should be included in the barcode
    • QR-Code: For this type, enter the URL that the QR code should forward your guests to
    • Text: For this type, enter the desired text
  • Click on the "Save" button in the top right corner
  • Below the input fields, you see placeholders that can be used to insert the promotion code into a mailing. By clicking on the placeholder, it is automatically copied to your clipboard and can then be inserted at the desired location (right-click -> Paste or CTRL + V)
  • To insert an uploaded image into a mailing, use the following code:

    <img src="[ [event.promotionCodeImage] ]"/> Remove the spaces between the square brackets!!

Important: As soon as you have made all the desired changes, don't forget to confirm them by clicking on “Save” (top right).

Overwrite organizer data

Overwrite organizer data -

If you want your guests to see a different name, a different logo and/or a different description for your event, you can set this in the “Info” tab of the event in the section “Overwrite organizer data”.

You have the following options to customize the appearance:

  • Organizer logo: Logo that should be used for this event

    Note: The aspect ratio of the logo should ideally be at least 20:5 in order for it to be displayed correctly.
  • Name: Name of the organizer
  • Description: Description or other important information about the organizer

Note: If you don't enter anything in this section, guestoo will use the data provided in the agency settings as a fallback! 


Important: As soon as you have made all the desired changes, don't forget to confirm them by clicking on “Save” (top right).