Registration process

Here you can define how the registration process should work, e.g. whether an invitation is necessary, whether registered guests should be confirmed automatically, etc.

Event > Settings > Section "Registration process"


Note: If you cannot see this section, it is probably hidden.

In order to display it, scroll to the bottom of the “Settings” tab and click on “Show more options”.
There you can set which sections should be displayed and which should be hidden so that you have a better overview. :)

Du kannst für das guestoo Back-End zwischen zwei Darstellungsoptionen wählen. Die Screenshots in der Doku basieren auf dem "Klassischen Design".
Hier siehst Du die Unterschiede, damit Du dich auch im "Modernen Design" zurecht findest: » guestoo Back-End-Design

Guest confirmation

Should the guests be confirmed automatically or manually?

Guest confirmation - Should the guests be confirmed automatically or manually?

Depending on which and how many guests you want to allow to register for your event, you can select here whether the guests should be confirmed automatically or manually after registration.

Automatic confirmation after registration

If you choose this option, all guests who register for your event will be automatically confirmed ( as long as the maximum number of guests has not been exceeded). However, you still have the option of canceling one or more guests at a later date.

Ideal if you are expecting a lot of guests and don't feel like confirming each guest manually.

Manual confirmation by organizer

If you choose this option, all guests who register for your event will initially be set to the status “Registration (open)”. You then have the opportunity to select the guests in the guest list and manually accept or reject them. 

Ideal for smaller events where you want to decide for yourself who you would like to have at your event and who you don't.

Waiting list

Waiting list -

Here you can decide whether you want to enable a waiting list for your event or not.

Waiting list open

If you choose this option, all guests who register for your event after it is already full will be placed on a waiting list. If a guest who has already been accepted cancels their participation in the event, you have the option of letting a guest who is on the waiting list move up. 

Waiting list closed
If you choose this option, there is no waiting list for your event. As soon as the maximum number of guests for the event has been reached, no one can register for the event.

Max. guests / Max. guests per registration

Max. guests / Max. guests per registration -

Some events are so exclusive that only a maximum number of places are available, while at other events the number of guests is unlimited. With the help of the settings “Max. guests” and “Max. guests per registration” you can control how many guests (per registration) are allowed to sign up for your event.

Max. guests

Here you define the maximum number of guests that can register for your event.

Note: If you do not want to specifically limit the number of guests, you can enter a very high value here, e.g. “999999”

Max. guests per registration

Here you specify the maximum number of guests that may register per registration, i.e. how many accompanying persons each guest may bring. 

Consider unconfirmed guests

If you activate this option, guests who have not yet confirmed their DOI email will be included in the calculation of available places in the event.

By default, this option is deactivated so that a spot is considered available until the DOI email has been confirmed. This means that a guest can “lose” their place in the event if they do not confirm their DOI email in time and another guest registers in the meantime, including DOI confirmation.

Activate button "Register another guest"

If you activate this option, a button will be displayed to the guest after successful registration, which enables the registration of another guest.

Most of the first guest's data is copied so that the guest only has to individualize a few fields.


Important: This does NOT work in the following scenarios:

  • 1) with invited guests (excl. Sample guests)
  • 2) if more than one guest is allowed per registration
  • 3) if the guest is immediately redirected to the payment process


Always display number of accompanying persons prompt

Ensures that the guest must first indicate whether accompanying persons are to be brought along before the form fields become visible.

Automatic attachments in the confirmation email

Automatic attachments in the confirmation email -

Here you can choose which attachments the guest should receive in the confirmation email after registering.


This is how it works:

  • Change to the "Settings" tab of your event
  • Scroll to the "Registration process" section and search for the headline "Automatic attachments in the confirmation email"
  • Click on the "Edit" button in the top right corner
  • Choose which attachments the guest should receive by (de-)activating each of the available options:
    • Toggle on green = the guest will receive this attachment
    • Toggle on red = the guest will not receive this attachment
  • Once you have made all the desired settings, click on the "Save" button in the top right corner


You can (de-)activate the following attachments for your confirmation emails:

  • Ticket
    This is a PDF file containing an admission ticket with a QR code that you can scan at the entrance/check-in.
  • Calendar entry
    This is a calendar entry that the guest can save to their digital calendar. If you activate this option, the calendar entry will be sent as a link in the email text. There is a separate link for each guest of the registration (main guest + accompanying person(s)).
  • Calendar entry as attachment
    This is a calendar entry that the guest can save to their digital calendar. If you choose this option, the calendar entry will be sent as an .ics file attached to the email. There is only one calendar entry for all guests of the registration.
  • Apple Wallet
    If you activate this option, the text of the confirmation email will contain a link to an individual Apple Wallet ticket for each guest (main guest + accompanying person(s)).
  • Google Wallet
    If you activate this option, the text of the confirmation email will contain a link to an individual Google Wallet ticket for each guest (main guest + accompanying person(s)).
  • Check-in QR code as an image
    If you activate this option, a QR code will appear as an embedded image in the email text of the confirmation email. This is a QR code that is valid for all guests of the registration.

Cancellation options

Cancellation options -

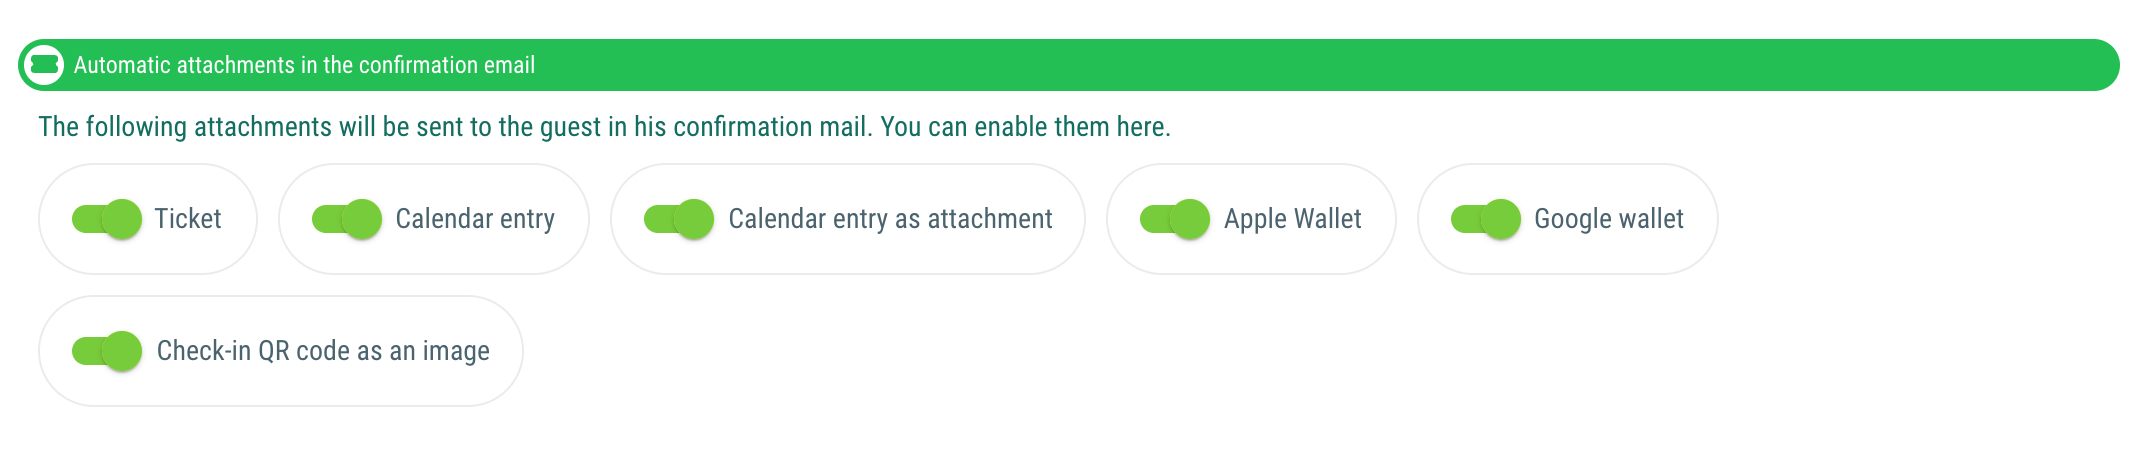
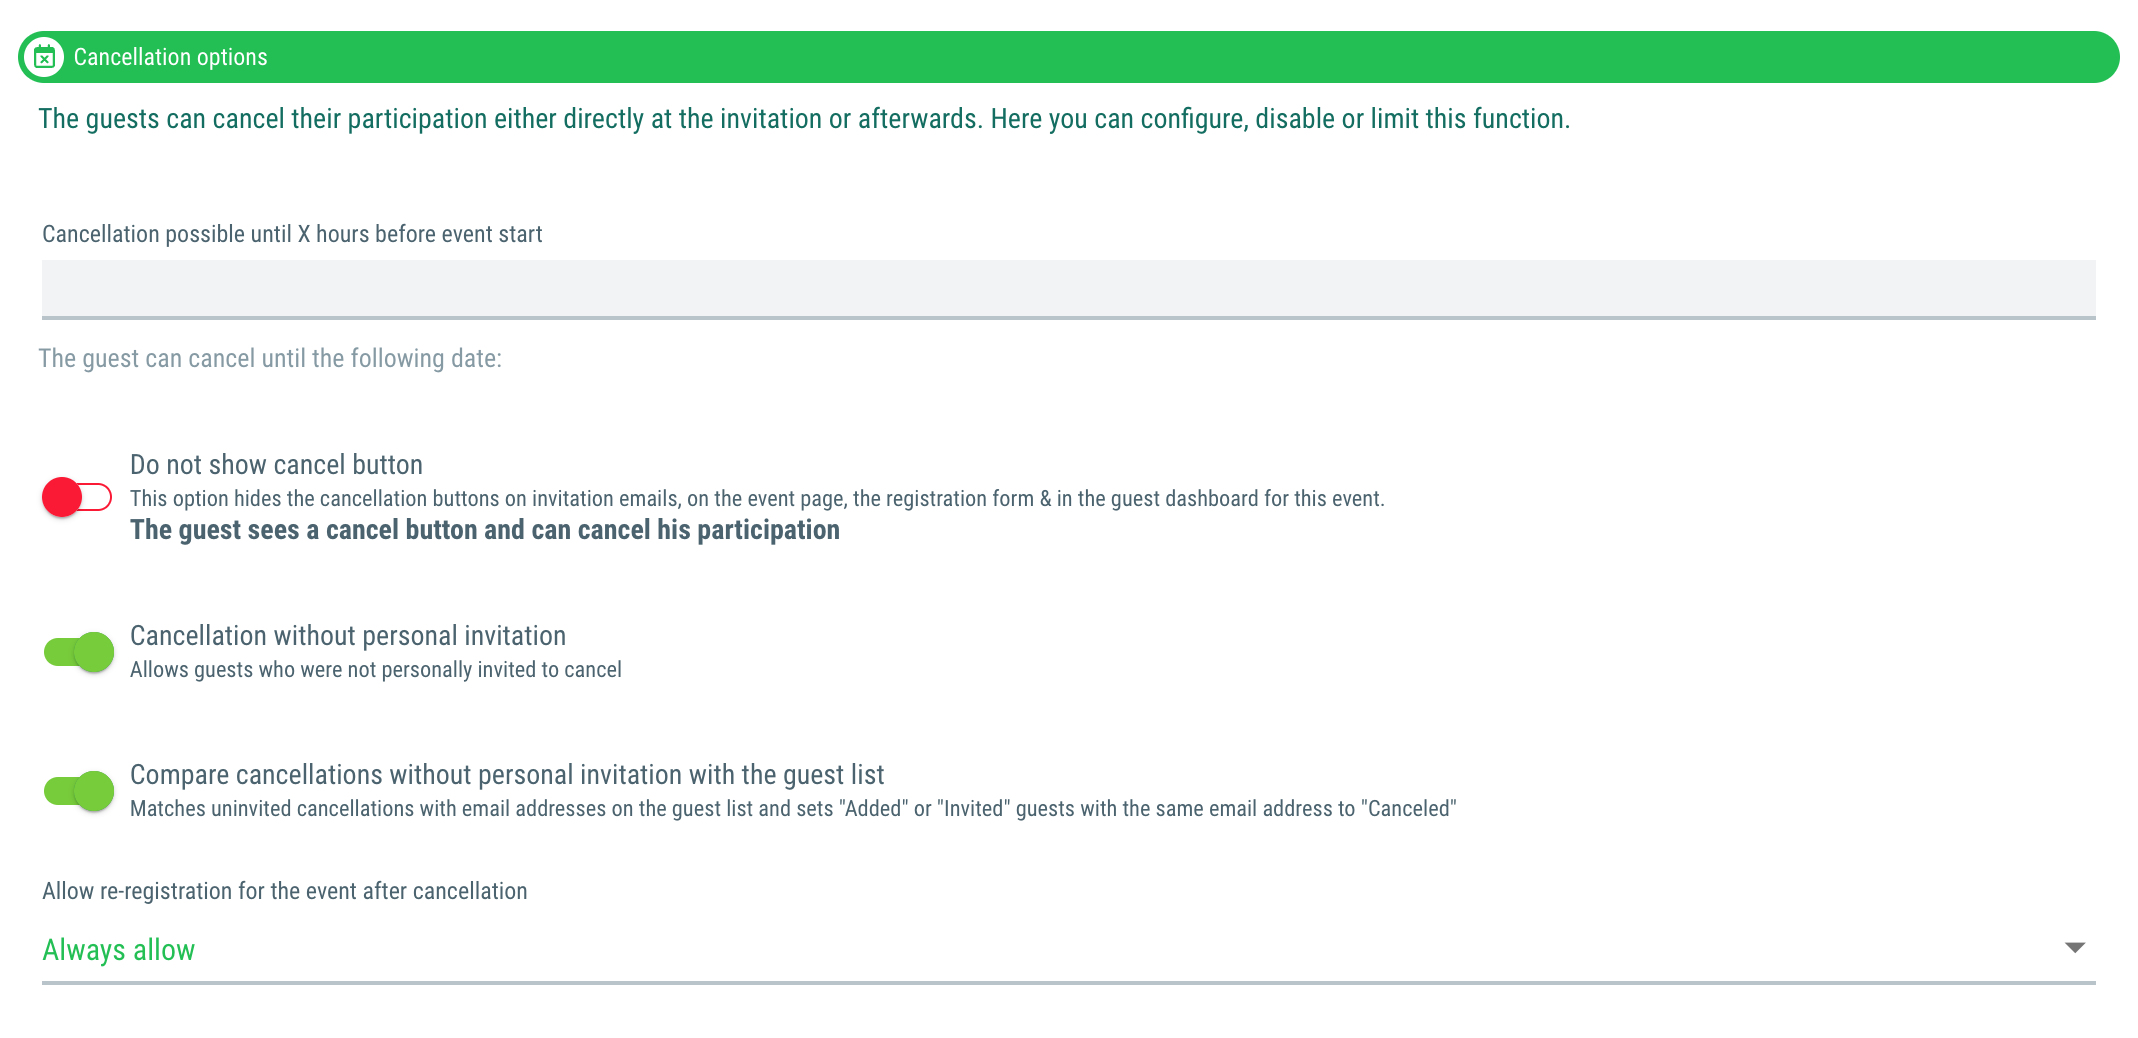
Here you can set whether and under which conditions your guests can cancel their participation in the event.

Cancellation possible until X hours before event start

Here you can enter the date by which the guest has the option of canceling their participation in the event or canceling their order. 

Helpful if you want to ensure that a cancellation is only permitted up to e. g. 24 hours before the start of the event.

Do not show Cancel button

If you activate this option, the guest will not be able to cancel their participation in the event directly via guestoo if they don't have time or can't participate for any other reason.

Recommended if, for example, you want your guests to call you if they want to cancel.

If you leave the option deactivated, your guests will see a cancel button in the invitation email, on the event page, in the registration form and in the guest dashboard, which they can use to easily cancel their participation.


Cancellation without personal invitation

If you activate this option, guests who do not have a personal invitation or QR code can also cancel their participation in the event. 

Activating this option is recommended if you only want to print the general QR code for the event on your invitations and do not want each guest to receive an individual code, but still want them to have the opportunity to let you know they won't be participating.

Compare cancellations without personal invitation with the guest list

If you activate this option, the email addresses of people who have canceled their participation in the event without an individual invitation code will be compared with the guest list. If a canceling guest is already on the guest list, the guest you have added/invited will be set to the “Canceled” status.

Allow re-registration for the event after cancellation

Here you can define whether a guest who cancels their participation in the event or whose participation has been canceled by a manager user is allowed to register for the event again or not.


You can choose from one of the following options:

  • Always allow
  • Only allow if the guest has canceled themself
  • Only allow if the guest has been canceled by a manager
  • Do not allow

Change of registration data by the guest

Pro subscription and higher

Change of registration data by the guest - Pro subscription and higher

With the corresponding feature, you can determine whether and up to how many hours before the event the guest may change or add to their registration data.

Allow guest data to be changed by the guest

If you activate this option (=toggle on green), the guests will be able to change their registration data for the event. If the option is deactivated, the registration data can't be changed by the guest.

Change of registration data possible until X hours before event start
  • Optionally, you can enter up to how many hours before the event start the guests are allowed to change their registration data.
  • Example: The event starts on 01.01.2023 at 18:00. If you enter the value “4”, your guests will have the opportunity to edit or add to their registration data until 01.01.2023 at 14:00.
Use cases

If you allow your guests to change/add their registration data at a later time, this can have the following advantages:

  • The information in the form fields can be edited by the guest if changes have occurred in the meantime
  • Your guests can enter their arrival and flight details afterwards if these are not yet known at the time of registration
  • If you can only specify the dates for lectures and workshops at a later date, you can ask your guests to make their selection afterwards, e.g. via an info mailing
  • If you later require further information from your guests, you can add new fields at any time and ask your guests to fill them in
  • Your guests can change or remove their accompanying person(s) afterwards (but no additional accompanying persons can be added!)
Exceptions
  • No additional accompanying persons can be added by the guest. However, the details of existing accompanying persons can be adjusted or removed completely (provided no tickets have been ordered for these persons)
  • If tickets were purchased during registration, they cannot be changed


Other

To avoid typing errors in email addresses

You also have the option to (de)activate the following option in the “Registration process” section

Enter email address twice

If this option is activated, your guests will have to enter their email address twice in the registration form. This is helpful to reduce possible typing errors.

Recommended for all events!