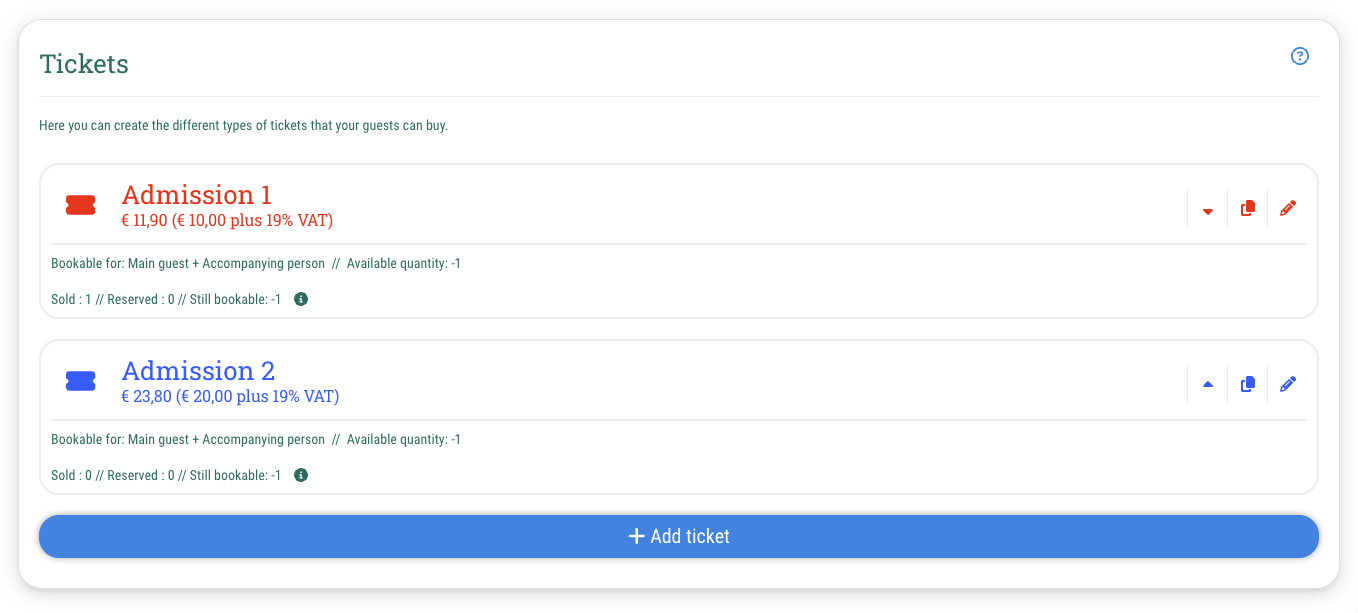
Here you can see an overview of the tickets you have already created.
The tickets are always displayed in the color you have specified.
Next to each ticket, you'll see various symbols that give you the following options:
- Arrow up/down: Used to sort the tickets. If you click the up arrow, the ticket is moved one place further up, with the down arrow you move the ticket one place further down.
- Copy icon: Click on this icon to duplicate the corresponding ticket. Before creating the new ticket, you have the option of making changes to the settings in a new window.
- Pencil icon: Click on this icon to open a new window in which you can change the ticket settings. You also have to follow this path if you want to delete a ticket.
Add ticket(s)
Below the tickets you have already created, you will find the “+Add ticket” button.
Click on this button to open a new window in which you can maintain the following information and settings for the new ticket:
Tab "General info"
- Name
e. g. Category 1, Day ticket, Kids ticket etc.
- Description
A more detailed description of the ticket.
Note: This description is only visible when selecting the ticket during registration, not on the ticket or in the confirmation email.
- Ticket type
Provided you have booked the corresponding feature, you have the choice between:
- Main ticket: A ticket type of which the guest must select at least one before they can book further additional tickets - in most cases the admission ticket.
- Additional ticket: Tickets that can be selected in addition to a main ticket, e.g. for additional workshops, a bag of popcorn, etc.
- Ticket is mandatory (for additional tickets)
If you activate this option (= toggle on green), the guest must buy this additional ticket in order to register for the event. If you also specify the conditions to which the ticket is linked in the “Conditions” tab, then it is only mandatory if these conditions apply.
- Who can book the ticket?
Determines who may select the ticket when registering. You have the choice between:
- Main guest
- Accompanying person
- Main guest + accompanying person
- Dependence on other tickets (Feature required)
If you have already created other tickets, you can define a dependency on an existing ticket here.
In order to do this, click on the desired ticket(s) and then specify which condition must be fulfilled in order to book the ticket:
- At least one must be selected
- All must be selected
- Available quantity
Here you enter how many tickets of this type are available, e.g. “50”
If you enter “-1” here, the number of available tickets is unlimited.
- Ticket code
If you assign a code here, the guest must first enter this code in order to have the ticket displayed.
You can also enter the code for the guests before they sign up for the event.
- Color
Here you can specify a color of the ticket to make it easier to distinguish them. This is used in the following places: in the booking process/registration form, in the check-in screen, internally in the “Tickets” tab
- Which price should be set?
You can choose between:
- Net/ gross price
Here you enter the price of the ticket
- VAT
Here you select the VAT rate.
The VAT rate used will depend on your event. When in doubt, please consult your tax advisor or similar.
You have the choice between:
- No tax
- 5%
- 7%
- 10%
- 13%
- 16%
- 19%
- 20%
Tab "Settings"
Tab "Conditions" (Pro subscription and higher or corresponding feature necessary)
- Ticket conditions
- Bookable from
Here you can set a date from which the ticket can be booked. If this date has not yet been reached, the ticket will not be shown to the guest for selection.
- Bookable until
Here you can set a date until which the ticket can be booked. If this date is exceeded, the ticket will no longer be displayed to the guest for selection.
- Minimum amount of guests
If you enter a value here, this ticket is only available from a minimum number of X guests.
- Maximum amount of guests
If you enter a value here, this ticket is only available up to a maximum number of X guests.
- Valid from (Time)
By default, the ticket is valid from the start of the event or from the start time of the selected timeslot. However, you can also manually enter a time in the format HH (e.g. “12”) or HH:MM (e.g. “12:00”) here.
- Valid until (Time)
By default, the ticket is valid until the end of the event or until the end time of the selected timeslot. However, you can also manually enter a time in the format HH (e.g. “12”) or HH:MM (e.g. “12:00”) here.
- Valid from accompanying person (Number)
Here you can enter from which accompanying person the ticket should be selectable. The accompanying persons are numbered consecutively and start at 1.
- Valid until accompanying person (Number)
Here you can enter up to which accompanying person the ticket should be selectable. The accompanying persons are numbered consecutively and start at 1.
- Minimum age
If you enter a value here, the ticket will only be available to guests who have reached the specified minimum age.
- Maximum age
If you enter a value here, the ticket will only be available to guests who have not yet reached the specified maximum age.
- Extended ticket conditions
- And / Or
Here you select whether the following conditions must all be met for the ticket to be displayed (“And” option) or whether it is sufficient if one of the conditions is met (“Or” option)
- Add condition
Click on the “+Add condition” button to create a condition for your ticket. Select the following things in order to do this:
- Field: The field to which the condition should refer
- Operator (equal / unequal / is not empty / is empty)
- Value: The value that the field should have
Tab "Create coupons"
You can also specify that your guests receive a coupon when they purchase this ticket.
This is how:
- Activate (= Toggle on green) the option "Ticket generates a coupon"
- Voucher value: Here you enter the monetary value of the voucher, e.g. “20” for a voucher worth €20. If you leave this field empty, the price of the ticket is automatically taken as the voucher value.
- Valid for the following ticket categories:
Here you can select for which ticket category(ies) the voucher should be redeemable (multiple selection possible)
Further information regarding the creation and usage of coupons can be found here.
Tab "Ticket codes" (Feature necessary)
If you use the corresponding feature, you can also use your own QR codes instead of the QR codes automatically generated by guestoo.
This is how:
- Go to the “Tickets” tab of your event
- Click on the pencil icon next to the desired ticket to edit the settings
- Switch to the "Ticket codes" tab
- Activate the toggle on the option “Use your own ticket codes”
- Click on the “+Add codes” button
- Enter the available codes one below the other in the text field. You can also copy and paste a column from an Excel spreadsheet, for example.
- Once all codes have been entered, click on the “+Create new” button
- Note: If you want to delete individual codes, you can do this by clicking on the trash can icon next to the code you want to delete.
- Click on the "Save" button